FRASER COAST Quality Aerial Photography is in BURRUM HEADS & TOOGOOM pt4
89 View

Share this Video
- Publish Date:
- May 4, 2024
- Category:
- Aerial Photography
- Video License
- Standard License
- Imported From:
- Youtube
Tags
Hello,
I am StewArt Photography’s premium photographer.
Previously in a recent video we flew and photographed the Fraser Coast.
Check it out to see the amazing quality photos obtained available for purchase.
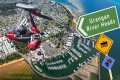
Today’s flight destination is … Burrum Heads and Toogoom.
Photos will be presented shortly after the flight briefing.
Affordable Fraser Coast Quality Aerial Photography provides you an affordable solution for your projects and marketing.
Don’t miss the upcoming photo releases - Subscribe, it’s free, and also activate the notification bell so you don’t miss out when new photos are announced.
If you wish to enquire regarding photos you may be interested in, just scan the QRcode to enquire at FCQAP, or leave a message in the comments.
Do you have a specific location-photographic request? Notify FCQAP in the comments or you can contact us by scanning the QRcode above.
Flying Eyes Optics eyewear
🇳🇿 Thanks for connecting with me again on my microlight trike flexwing flying adventures.
Learn - enjoy - assist @
🛩 If you'd like to know more about my aircraft adventures please visit my bio at
Come join the CrayonBox ride.
Get in touch and I'll give you a shout-out.
If you are enjoying my fIying adventure videos please consider supporting my efforts. You could buy me coffee or breakfast at
Flying, cameras and production are all costly and a little will go a long way to help. Thank you.
Buckle Up! Let's go.
www.youtube.com/@CrayonboxAviationAdventures
AUSTRALIAN Aviation Resource Guide
#crayonboxflyingadventures #queenslandaustralia #microlightflying
By: Crayonbox Aviation Adventures
Title: FRASER COAST Quality Aerial Photography is in BURRUM HEADS & TOOGOOM pt4
Sourced From: www.youtube.com/watch?v=VRtemqiSDwo
Look at the 3 highest-rated drones on Amazon Today!
Frequently Asked Questions
Is it possible to make money from drone photography?
For photographers trying to make money with drones, the biggest problem is that there aren’t any products that can solve the problems associated with them. You can enjoy the experience by using quality equipment and software.
Insurance costs and liability are another concern. Most photographers prefer to photograph from the ground. But we're talking about an entirely new way of capturing images where you could potentially get paid for your efforts.
Drones can capture light very much in the same way as video cameras. Why not create stunning photos using the same technology?
Companies are making huge strides towards creating high-quality photos taken from the sky. We have already discussed DJI & GoPro. We are starting to see more companies entering the space.
These cameras can be used for aerial photography but are also very useful on the ground. Major manufacturers invest heavily in their imaging technology.
This means you can eventually buy a drone which shoots 4K videos, and takes amazing photographs. We might already be witnessing this happening. Companies like DJI have been releasing higher-resolution versions of their Phantom series of drones.
DJI's Inspire 2 recently came out with a 12-megapixel sensor, capable of shooting at 5120x3456 Pixels. The Inspire 2 can also be used to record RAW files at 30 frames/second.
Yes, drone photos can be a great way to make some extra cash.
How do I get started drone photography?
There are many options for starting to photograph with a drone. A ready-made drone package is the first choice. This kit will contain everything you need for getting started. They vary in price from $200 to $500 depending upon the model.
Another option is to build your own drone. Although this can be a bit complicated, it's still possible to create something that works well enough to take some decent photos and videos.
Quadcopters are the best option for those looking to build their drone. Quadcopters have four propellers (or rotors) as opposed to two like traditional helicopters.
It is much easier to assemble and maintain a quadcopter than a helicopter. It's also cheaper to purchase and easier to carry around.
You'll first need to select the right parts. You'll need motors, batteries, controllers, and props. Pick the correct size, weight and type.
Next, decide which controller you would like to use. You have many choices, including joysticks and touch screens as well as remote controls. A built-in camera is an option, as you don’t need to attach a separate device. We recommend buying one.
Once you've made your selections, you are ready to assemble it. A preassembled kit is a great option to save time and make things simpler. However, if you prefer to build your own, you'll need to follow a few steps before assembling your drone.
Step 1: Attach battery pack
For your quadcopter to be built, you'll need the battery pack connected to the motor. To begin, remove the cover plate at the bottom of your battery pack. Next, slide your battery into place.
Step 2: Connect the motors
Next, install the motors into the correct slots. Each motor needs to be installed in its respective slot. When installing the motors, make sure they face forward and are perpendicular to the frame.
Step 3: Install your propeller
Finally, you'll need to attach the propellers to the frame. Be sure to place them at equal distances.
You are now ready to test the drone. If there is no movement after you turn on your engine, double-check that you have the propellers facing forward. Make sure the propellers are free from obstructions.
Can drones shoot nighttime photos?
That's the right answer. But we have been doing it for years. For decades, we've been taking photos at night.
There's one problem. Night photography requires specialist equipment. It's impossible to achieve night photography with a camera less than $10,000.
A series of wavelengths are created when light hits an object.
These wavelengths overlap and combine to form white light at very long distances from the source.
This is why you can still see colors in the distance even though the sun may be millions of kilometers away.
Contrary to popular belief, light that strikes objects close to their source reflects in a narrow range of wavelengths. These wavelengths bounce right back to us without overlapping.
That means that the closer the object is, the brighter it appears. This is why objects glow under black light.
The energy the object absorbs influences how much light is reflected. The object may reflect more red light than blue light when it is hit by light.
Because the human eye is most sensitive to blue light, objects look bluer when viewed under black light.
This is what drones have to do. If you're trying to photograph something dark, such as a forest or a cave, you need to use a very bright light source.
A regular lamp will not be powerful enough for the illumination of the entire scene. It will give you only a shadowed picture and nothing else.
If you want a good picture, you'll need to use a strobe instead. You won't want to lug around a large flashgun so you will need a smaller one.
Because they produce flashes that are so rapid, these lights are often called speedlights.
If we say "stroboscopic", you can see the light pulse across the screen. The better the quality of the image, the faster it is.
This tutorial will not cover how to install a Speedlight. But there are plenty of tutorials online.
We will tell, for clear pictures, that you need to ensure that the subject is evenly illuminated.
You should aim the beam at a 45 degree angle to achieve this. You can adjust light intensity by moving your flashgun's head.
Once you've found the perfect setting, keep the gun steady and press the shutter release button.
Press the shutter once more, just before the flashlight reaches the subject. This will cause the flashgun's flash to go off again, causing it to send out another blast of light.
The first burst is the most visible, and the second captures the moment after the burst has ended.
The result is continuous exposure, where both bursts are recorded.
Now that you are able to take photographs during the day, let us move on to night photography.
I've covered everything you need about night photography.
However, there is still one thing that needs to be addressed: the color balance.
Many people believe that images taken at night are too dark.
This is true even for daytime images.
The camera will always record darker images regardless of whether you are taking photos at dawn and dusk.
Is a drone worth the money?
A great product is essential if you are serious about your business. If you want to make a name for yourself, you need to have a great product.
The problem with most photographers is that they're not selling themselves. They're trying to convince someone else to buy their stuff instead of convincing themselves to do it.
However, if you want to start your own business, you won't have the luxury of waiting for others to allow you to do so. You will have to find customers now.
That means you'll need to create a compelling story that helps them figure out why they should buy your products instead of somebody else's.
You'll also need to come up with an effective strategy for marketing those products. But even after you've done all that, you still might fail because you haven't figured out how to price your products correctly.
You might decide to charge too little. Or you may decide to charge too little. You could be charging too much or you might make a mistake.
This will help you avoid making costly mistakes. This doesn't necessarily mean that you need to be a capitalist. What it means is that you must learn how to value your time, money, and effort.
Also, you must develop strategies to measure your business' success.
Once you know the price, you can start building the best product. A product that makes financial and creative sense.
Product that solves problems and delivers real benefits.
One that is unique from the rest.
After you've developed the product, you can launch it. And you'll be ready to build your brand.
It doesn't really matter if your goal is to fly a drone or not. Because it will help you get started as a photographer. It will also help you improve your photography skills. It will also help you to grow your business.
How do I fly my drone
The best way to learn how to fly a drone is by practicing. Pilots need to practice flying drones. They are far more stable than regular aircraft. We recommend that you practice indoors, or close to your house, for beginners.
To fly a drone you will need to have three fundamental skills. These are taking off, hovering and landing.
Take Off
The drone will take off by simply being lifted into the air. The button on the controller should be pressed until the drone moves upward. When the drone has reached a certain height you can stop pressing the button.
Hovering
Hovering is when the drone stays in midair. Holding down either the left or right triggers while pressing the throttle will allow you to hover. By holding down both triggers, you can tilt the drone to move it.
Landing
Landing refers to returning the drone safely to Earth. To land, let go of the throttle and gently tilt the controller towards the ground. The drone will eventually slow down, and then land.
Flying your drone is a matter of comfort. But be careful not to crash into anything.
Are there any good spots to fly a drone and take photos?
Drones can be used to capture stunning images of landscapes and nature. Drones are great for taking close-up shots or stunning landscapes.
Mountain, deserts, lakes and oceans are all great places to use drones. Drone enthusiasts often capture scenic views of their hometowns and other local attractions.
If you want to see new places, it is worth shooting at night as the lights illuminate the surroundings. You might also consider shooting in other seasons, especially during winter when there is snow on the ground.
Which hour is best to photograph drones?
If there isn’t any activity on the ground, a drone could capture aerial shots during sunrise or sunset.
Drones are great tools for capturing beautiful photos of landscapes and the sky above them. Some drones cannot fly at night and you may miss amazing views.
To ensure you don't miss out on any potential photo ops, consider flying during sunrise and sunset hours. Because there are fewer cars and more people on the roads, these times offer stunning opportunities for photos of nature.
You'll find that you can shoot at lower levels of light, which makes it easier for you to take pictures without worrying about overexposing.
You won't need to contend with strong winds, rain or snow. All these factors make daylight ideal for taking photos with a drone.
If you are looking for night scenes to capture, then flying at night is a good option. This will allow you to see the cityscape from a different perspective.
Statistics
- A grey card is just a piece of thick paper that is a specific shade of grey (18%), which will be the foundation on which we choose our color temperature. (dronegenuity.com)
- Here's proof: according to an analysis of FAA drone registration numbers by drone market research and data group Drone Industry Insights, DJI had a 76.8% market share in the U.S. (thedronegirl.com)
- Among the biggest improvements, the Skydio 2+ has over the standard 2 is a 20% longer battery life, longer range if you add the Beacon, and a neat AI video creation tool called Keyframe. (thedronegirl.com)
- Again, no stabilization is applied, and the 50% throttle stick position cuts the power to the motors. (photographypro.com)
- 60 second video with branding, captions, contact information, and music Strip / Convenience / Neighborhood / Community Centers pricing per center (up to 400,000 sq ft) PLACE ORDER (dronebase.com)
External Links
[TAG6]
[TAG8]
How To
How can I improve the quality of my drone photos?
The drone photo is a fantastic way to capture incredible images. The result can be more stunning than any image taken with a conventional camera if you do it correctly.
You can improve the quality of your photos. One way is to make sure you're using the right settings for each model.
You can edit your photos with some apps and tools. Adobe Photoshop Lightroom software is one of these. This software allows you edit multiple photos at once, and lets you adjust each one separately.
You can also crop your image and make it more interesting. You can also remove unwanted objects or adjust lighting and contrast.
Snapseed is another option that allows basic editing such as cropping, brightness adjustment, and color correction.
Post-processing is important, but it's also crucial to ensure that your final product looks professional.
This means knowing how to set your camera correctly and learning how to position yourself properly.
Also, make sure that you have the right settings for the lens. For example, if shooting landscapes, go for a longer focal point (e.g. 200mm), but if you are shooting close-ups (e.g. 50mm), you can choose a shorter focal.
Finally, learn how to shoot in RAW format because this gives you greater control over the final image.
These techniques will allow you to create breathtaking drone images that will amaze everyone.