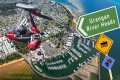
St Louis Aerial Drone Photography and Video for Pointe 400 Downtown STL
0 View

Share this Video
- Publish Date:
- February 27, 2023
- Category:
- Aerial Photography
- Video License
- Standard License
- Imported From:
- Youtube
Tags
Mike Haller
314-892-1233
[email protected]
At St Louis Drone Video, we specialize in providing professional aerial photography and drone videos for a broad range of applications, including real estate, construction, mining, agriculture, marketing and insurance. Such aerial photographs or drone videos of your business location can be highly beneficial for marketing materials, print, or even on digital platforms such as websites or video channels.
By: St Louis Drone Video
Title: St Louis Aerial Drone Photography and Video for Pointe 400 Downtown STL
Sourced From: www.youtube.com/watch?v=t84kWU0oCDM
Look at the 3 most popular drones on Amazon while they're on sale
Frequently Asked Questions
How much money do drone photographers make?
A photographer makes more than $10k per gig depending on how long he/she flies for and where he/she shoots. Photographers who work in remote areas, such as forests or national parks, could make upwards of $20-30 per hour.
An average person makes $15-$25 per hour in retail. This means that you could make $50-$75 flying drones, if you so desired. However, there are also plenty of opportunities to earn even more. Drone pilots typically fly for companies that require them to travel across the country or even internationally.
Depending on how long you fly and how far you travel, you can expect to pay $100-$300 per flight. You might find it worthwhile if flying is something you enjoy and you also love taking photos.
What are the downsides of drone photography
Drone photography is a great way to capture images as well as video. But there are also downsides when choosing to fly a small aircraft.
The biggest disadvantage of flying drones are their cost. Depending on the type of drone you purchase, it could set you back hundreds or even thousands of dollars.
Flying a drone requires training and certification, so you'll need to invest time and money to learn how to operate them safely.
Safety is another issue. Drones can be dangerous as they need to be repaired and maintained constantly. It is possible to injure or cause property damage by losing control of your drone while you are taking photos.
You might find yourself spending more time controlling a drone that actually shooting photos or filming. In addition, you may have limited airspace where you can fly your drone.
You can only fly your unmanned air vehicle within certain areas. You cannot fly higher than 400 feet, or within five miles of any stadiums, hospitals or schools.
Finally, drones aren't for everyone. Some people feel uneasy about flying these machines because they fear they might crash or fall out of the sky. Others fear that they could accidentally hit an object or person.
You might be uncomfortable flying a drone. Instead, you can try traditional aerial photography or videography.
Which hour is best to photograph drones?
A drone could capture images from the air during sunset and sunrise hours, even though there is not much activity at ground level.
Drones can capture beautiful photographs of landscapes and the sky over them. But sometimes drones aren't allowed to fly at night, so you miss out on spectacular views.
If you want to make sure that you capture all the photo opportunities, fly during sunset and sunrise hours. These times provide more opportunities to capture stunning shots of nature because there are usually fewer cars on the road and fewer people walking around.
Also, you'll find yourself shooting at lower light levels. This makes it easier to capture images without worrying about overexposing them.
In addition, you won't have to deal with strong winds, rain, snow, or fog. All these factors make daylight ideal for taking photos with a drone.
Consider flying at night if you want to capture nighttime scenes. This will give you an unrivalled view of the cityscape.
What equipment do you need to take drone photos?
Drone photography involves more than simply flying a camera. Planning and executing a successful drone shoot requires a lot of considerations. From choosing the right location to determining how much insurance you need to carry out a successful aerial shoot.
It is essential to make sure you have permission to fly drones within the area you are planning to shoot. You should check to see if there are restrictions on where and how you can fly your drone. If there are, you may need to apply for a license to fly them in these areas.
You also need to check what regulations apply in your country. Some countries require permits to fly drones, while others limit the number of flights you can make within a set period.
You will need permission to fly drones. After each flight, you will also need to locate a safe place to land the drone. Many local businesses offer landing pads to rent for a fee. You will also get storage space. You could also buy a landing pad.
Before you begin shooting, you must decide on the type of drone you want. There are many drones with different capabilities and features. Fixed-wing drones tend not to be as expensive and are easier to operate, while multirotor drones can be more stable and powerful.
Once you decide which type of drone is best for you, the next step is to determine what equipment you will need. A drone camera typically includes a gimbal and remote controller, batteries, memory card, and batteries.
The gimbal helps stabilize the camera in flight. It makes it simple to take sharp images and not worry about losing the device. To keep the camera stable, the gimbal attaches directly on the drone's body.
Remote controllers let you control your drone remotely. These devices include joysticks and buttons that let you move the drone forwards, backward, left, and right and adjust its altitude.
The drone's motors are powered by batteries, and the cameras have memory cards that store images taken by the drone. You'll need enough battery power to ensure clear pictures.
Once you've selected the equipment you'll need, you'll need to figure out where you'll shoot. Are you going to be shooting indoors or outside? Will you be photographing architecture or landscapes in your home? What kind of places are you going to be shooting? All of these factors impact how you should prepare for your shoot.
If you are planning on shooting inside, lighting will be an issue. Multiple lights are the best way to illuminate a room. You can place one large, centrally located light above your subject and another in the middle of the room. A third is closer to the floor.
Outside, you need to be aware of wind conditions. Drone pilots can be blown off-course by windy days. Avoid taking off during stormy weather.
If you are going to be bringing extra equipment like tripods or stands, consider whether this is something that you will need. These items will ensure your drone stays level, so you don’t lose quality shots.
Outdoor shoots should be done between 10 and 4 pm. Although there won’t be as many people around at this time, it will still provide enough light for stunning photos.
Let's conclude that drone photography is more than just fun. It can also be extremely useful for taking stunning aerial photos. By following some simple steps, you can start creating amazing images today!
What are the laws concerning drone photography?
The Federal Aviation Administration (FAA) regulates drone flights. Local laws might also apply to drone flight operations. For information on drone flying regulations in your state, contact the transportation department.
The FAA requires drone owners to obtain a license in almost all cases. The FAA has published guidelines regarding licensing. You can learn more about these guidelines here.
In some states, drone owners must register their drones with government. To learn more, visit our Guide to Drone Registration.
What drone can be used to take aerial photos?
There are two options if you want to do aerial photography. Either rent a small, remote-controlled helicopter or purchase an expensive camera kit with a stabilizing gimbal.
This is the best option if you want to shoot a movie or video because it allows you complete control over what the shots look like. The second option will require you to pay more for the pilot and make you more dependent on him.
But what if you want to make sure the shot looks great even though you're not controlling the camera? This is where drones come into play.
A drone is a small aircraft that can fly autonomously and take photos or video without any input from the operator.
They are extremely versatile and can fly very close to buildings to capture images and record footage. They are also capable of flying low above crowds in order to take photos of people.
Drones are incredibly useful for aerial photography and videography. Drones are also great for marketing, as they can be used to create stunning visuals that would otherwise take a lot more manpower and equipment.
They can be placed in strategic places to capture amazing imagery. They can also be flown remotely making them very easy to use.
One example is hiring drones for weddings. These drone pilots can fly over the ceremony area to capture incredible photographs of the groom and bride.
They can also fly them over to guests and capture portraits of loved ones. Or they can fly them over reception areas to capture beautiful views of the venue.
These activities are perfect to make promotional material or event coverage. Drones can also be used to make short films. One could be used to demonstrate to clients that your company is superior.
Drones are increasingly becoming popular for aerial photography and videography. If you are looking to be a professional photographer, then a Drone might be the right choice.
Statistics
- Again, no stabilization is applied, and the 50% throttle stick position cuts the power to the motors. (photographypro.com)
- Though the Mavic 3 is about 50% heavier than the Mavic Air 2, it's still conveniently sized. (nytimes.com)
- Among the biggest improvements, the Skydio 2+ has over the standard 2 is a 20% longer battery life, longer range if you add the Beacon, and a neat AI video creation tool called Keyframe. (thedronegirl.com)
- Here's proof: according to an analysis of FAA drone registration numbers by drone market research and data group Drone Industry Insights, DJI had a 76.8% market share in the U.S. (thedronegirl.com)
- Compared to the old days of the Phantom, this drone is super small, but it will likely require you to check a bag, the way a Mini 3 Pro could easily stow away in an oversized pocket. (thedronegirl.com)
External Links
blog.dronebase.com
- Is Aerial Drone Photography Right for My Commercial Building?
- 4 Ways Drone Photography Can Make New Home Buyers More Comfortable
youtube.com
How To
How to create a Time Lapse with a Drone
Two main types of cameras are commonly used when making time-lapses: DSLRs (Digital Single Lens Reflex), that are usually more expensive than point and shoot digital cameras.
DSLR cameras also tend to produce higher-quality images due to the way light enters the lens. However, video requires manual focus and exposure settings.
It is easier for beginners to use point and shoot cameras such as those made of GoPro. Videos can look grainy due to the lower resolution.
A consumer drone makes the best time-lapse camera. These small flying robots offer a cheaper alternative to professional drones.
A drone can be described as a remote controlled aircraft that is autonomous and does not require human intervention. A drone typically uses a single propeller to fly, although quadcopter drones may have multiple propellers.
In addition to providing aerial footage, a drone can capture cinematic shots from a bird's eye view. Drones can also be equipped with a gimbal stabilizer to shoot smooth handheld footage.
For a time-lapse effect, you can start recording while your drone hovers above the subject. If the sun is not directly overhead, the sky will not appear dark during the shot.
You can adjust the shutter speed and aperture to achieve the desired effect. You could, for instance, set the shutter speed to 30 seconds when you're shooting a sunset and leave the aperture wide open so that as much natural light is allowed in.
The opposite approach should be used for night shots. Use a slow shutter speed of 1 second and close the aperture to reduce the amount of light entering the camera. This produces a bright image that makes details visible.