By: DezerT Eagle Photography Title: Mountains of Waterbury DMV side | CineFlow 5 Sourced From: www.youtube.com/watch?v=o7us7xRap-M
You've got check out the 3 best drones on Amazon while they're on sale
Frequently Asked Questions
Is there a good place to take photos from a drone?
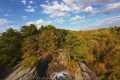
Drones have been a very useful tool in capturing stunning shots of nature. Drones are perfect for both close-up shots and stunning photos of wildlife like butterflies and birds.
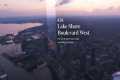
Drones are best used in mountains, deserts and other locations such as beaches, cities, oceans, rivers, and lakes. Drone enthusiasts often capture scenic views of their hometowns and other local attractions.
To discover new areas, you should shoot at night when the lights illuminate it. You might also consider shooting in other seasons, especially during winter when there is snow on the ground.
What time of day is best for drone photography?
A drone could capture aerial images during sunrise and sunset hours when there isn't much activity on the ground.
Drones are great for taking beautiful photos of landscapes as well as the sky. Some drones cannot fly at night and you may miss amazing views.
If you want to make sure that you capture all the photo opportunities, fly during sunset and sunrise hours. You have more chances to capture breathtaking shots of nature during these times because there are fewer cars driving and fewer people around.
You'll also find yourself shooting in lower light levels, making it easier to shoot without worrying about overexposing your image.
You won't need to contend with strong winds, rain or snow. These are all factors that make daylight great for photography with a drone.
If you are looking for night scenes to capture, then flying at night is a good option. This will give a unique view of the cityscape.
How can I get started with drone photography
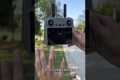
There are several ways to start photographing using a drone. A ready-made drone package is the first choice. This kit will contain everything you need for getting started. They vary in price from $200 to $500 depending upon the model.
Another option is to build your own drone. Even though this can be difficult, it is still possible to build a drone that will take decent photos or videos.
If you are interested in building your drone, we recommend you begin with a quadcopter. Like conventional helicopters, quadcopters have four rotors or propellers.
It is much easier to assemble and maintain a quadcopter than a helicopter. It is also less expensive to buy and easier to transport.
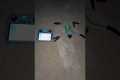
You'll first need to select the right parts. You'll need motors, batteries, controllers, and props. Pick the correct size, weight and type.
Next, you will need to choose which type of controller you want. Many different types are available, such as joysticks, touch screens, and remote controls. A built-in camera is an option, as you don’t need to attach a separate device. We recommend buying one.
Once you've made your selections, you are ready to assemble it. A preassembled kit is a great option to save time and make things simpler. You can build your drone on your own by following these steps.
Step 1: Attach battery pack
For your quadcopter to be built, you'll need the battery pack connected to the motor. To begin, remove the cover plate at the bottom of your battery pack. Slide the battery into its place.
Step2: Connect the motors
Next, mount the motors to the right slots. Each motor must be placed in the appropriate slot. Make sure the motors are facing forward when installing them.
Step3: Install the propeller
The propellers will need to be attached to the frame. Place them at an equal distance.
You are now ready to test the drone. If there is no movement when the engine turns on, check that the propellers point forward. Make sure the propellers are free from obstructions.
Statistics
Regional & Super Regional Centers pricing per center (400,000+ sq ft) PLACE ORDER (dronebase.com)
Though the Mavic 3 is about 50% heavier than the Mavic Air 2, it's still conveniently sized. (nytimes.com)
Greater than 50% throttle stick position generates positive thrust, but less than 50% throttle stick position reverses the direction of the motors, allowing upside-down flying! (photographypro.com)
A grey card is just a piece of thick paper that is a specific shade of grey (18%), which will be the foundation on which we choose our color temperature. (dronegenuity.com)
60 second video with branding, captions, contact information, and music Strip / Convenience / Neighborhood / Community Centers pricing per center (up to 400,000 sq ft) PLACE ORDER (dronebase.com)
When a drone becomes part of you, it is considered a good distance. You lose sight of the drone's physical boundaries when you view it as an independent entity.
A good distance for a drone allows you to immerse yourself in the environment without worrying about where the drone is going next.
It also has psychological benefits. This gives us more control over our environment, which makes us feel closer to nature.
There is also a downside. The drone could be damaged if it is flying too close to the ground. How far from the ground can you fly?
It depends on the drone type you have. A good rule of thumb when filming aerial footage or landscapes is to keep your drone at least 500 feet above ground.
You might choose to film a cityscape at 1,000 feet, for instance. This allows you to avoid blocking your view by trees and other buildings.
Because drones struggle in low-light conditions, this is why. If you are flying in the dark, you can reduce the time you spend hovering by lowering the altitude.
Make sure there are no obstructions like power lines, traffic signs, tall buildings, etc.
You might also consider flying during the daylight rather than at night. This avoids reflections caused shadows and street lights.
Also, consider the size and weight of the drone. The closer the drone is to the ground, the greater its size. For example, a large quadcopter will usually require a minimum height of 300ft.
You should never miss the golden hour if you are looking for great drone footage.
This is the time between 3 and 6 PM. You have the best visibility due to the direct overhead sun.
It is also known for its "magic hour", which is perfect for capturing stunning images.
You should not fly your drone between sunset and sunrise. These times can cause poor-quality footage.
You now have all the information you need to make amazing drone videos.