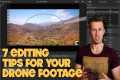
San Diego 4k drone view 🇺🇸 Flying Over San Diego | Relaxation Film With Calming Music - 4K HDR
2,157 View

Share this Video
- Publish Date:
- September 2, 2023
- Category:
- Aerial Photography
- Video License
- Standard License
- Imported From:
- Youtube
Tags
Welcome to this aerial drone footage of San Diego, California, USA in 4K HDR resolution! City Of San Diego, California, USA 4K ULTRA HD HDR 60 FPS Collection of Drone & Aerial Footage USA 8K ULTRA HD 60 FPS Collection of Drone & Aerial Footage
All clips were recorded with the brand new DJI Mavic 3 in 5.1K 10bit and rendered with Final Cut Pro.
Enjoy! Hope you guys like it!
🎹 Richard | Relaxation Film 4k
∷∷∷∷∷∷∷∷∷∷∷∷∷∷∷∷∷∷∷∷∷∷∷∷∷
►I hope that my music and my work bring you a lot of peace and relaxation in your day.
►Enjoy the colors of nature with 4K resolution. Great for 4K TVs!. Music for relaxation, sleep, meditation, yoga and learning.
👋Don't forget to subscribe to us now if you like this video. It would be a motivational booster for us to create more relaxing videos.
∷∷∷∷∷∷∷∷∷∷∷∷∷∷∷∷∷∷∷∷∷∷∷∷∷
©Very important!! All rights to pictures and music in the video belong to the authors! The channel introduces music under the CC license. If you do not like that we use your music or image, please contact us, we will remove this video or indicate information about you under it.
#4KVideo #california #ourplanet #RelaxingMusic #Nature #4K #4khdr #relaxationfilm
By: Relaxation Film 4k
Title: San Diego 4k drone view 🇺🇸 Flying Over San Diego | Relaxation Film With Calming Music - 4K HDR
Sourced From: www.youtube.com/watch?v=S-7cyp1iwO4
Look at the 3 highest-rated drones on Amazon Today!
Frequently Asked Questions
Can drones be used to take night pictures?
That's the right answer. We've been doing this for many years. We've been taking pictures at night for decades.
There is one catch. Night photography requires specialized equipment. It's impossible to achieve night photography with a camera less than $10,000.
A series of wavelengths are created when light hits an object.
These wavelengths are combined to produce white light at very far distances from their source.
This is why your eyes can see colors even if the sun is many millions of miles away.
The opposite is true. When light strikes an object very close to its source it reflects in narrow wavelengths. These wavelengths bounce right back to us without overlapping.
This means that objects appear brighter when they are closer to each other. This is how objects glow when exposed to black light.
The amount of light reflected depends on how much energy the object absorbs. Therefore, if light hits an object, it might reflect more blue than red light.
Because the human eye is most sensitive to blue light, objects look bluer when viewed under black light.
This is what drones have to do. If you're trying to photograph something dark, such as a forest or a cave, you need to use a very bright light source.
A normal lamp will not be strong enough to illuminate the whole scene. It will only create a shadowed scene.
If you want a good picture, you'll need to use a strobe instead. And since you don't want to carry around a huge flashgun, you'll need to buy a small one.
These lights are called speedlights due to the fact that they produce flashes light so fast, they can create a stroboscopic effect.
The light pulses across the screen when "stroboscopic" is used. The better the picture, the faster the rate.
We won’t talk about how to setup a Speedlight. There are many tutorials available online.
We will tell, for clear pictures, that you need to ensure that the subject is evenly illuminated.
To achieve this, you should aim the beam at a 45-degree angle. You can adjust the flashgun's intensity by moving its head.
Once you have chosen the best setting, hold your gun steady while you press the shutter release.
Just before the flashlight reaches your subject, you can press the shutter button again. This will cause the flashgun's flash to go off again, causing it to send out another blast of light.
The subject will be illuminated by the first burst. The second burst will capture that moment.
The result is continuous exposure, where both bursts are recorded.
Now that you are able to take photographs during the day, let us move on to night photography.
I've covered everything you need about night photography.
The color balance is the last thing we need to address.
Most people assume that any images taken at night will look too dark.
And that's true - but it's also true for daytime pictures.
The camera will always record darker images regardless of whether you are taking photos at dawn and dusk.
How do I fly my drone?
The best way to learn how to fly a drone is by practicing. Even though drones are very stable compared to regular aircraft, it takes time for pilots to gain experience. We recommend that beginners practice indoors or near their home.
Three skills are necessary to learn how to fly a drone. These are taking off, hovering, and landing.
Take Off
Simply lift the drone in the air to take off. You can do this by pressing the button on controller until the drone begins moving upward. Stop pushing the button when the drone reaches a desired height.
Hovering
Hovering refers to keeping the drone in midair. Holding down either the left or right triggers while pressing the throttle will allow you to hover. Tilt the controller to move the drone. Hold down both triggers.
Landing
Landing is the act of returning the drone safely to earth. To land, let go of the throttle and gently tilt the controller towards the ground. The drone will eventually slow down, and then land.
If you feel comfortable flying your drone, take it out of the house. But be careful not to crash into anything.
Is it safe to fly a drone in the night?
Drones are growing in popularity every day. As well as providing us with amazing aerial shots of our homes and businesses, drones are also useful for surveying large areas, delivering goods, and capturing video footage of events such as sporting matches. There are very few regulations regarding drone use. They have been banned in some US states while others have limited their use.
Drone flying in daylight hours is quite safe. But, at night there are risks. Flying a drone at night could put you and other pilots in danger. This is because it is difficult to spot obstacles and hazards, so errors made by the pilot could lead to an accident.
Drones are rapidly becoming more popular. Therefore, it is important to learn how to safely operate them. There are currently two types of drones available: fixed-wing as well as rotary-wing. Fixed-wing drones generally have smaller wings and are easier to control than rotary models. A fixed-wing drone usually has four propellers, while a rotary-wing model only has one.
To avoid any accidents, it is recommended that you familiarise yourself with local laws regarding drone usage and make sure that you keep your drone within your line of sight at all times. Make sure that your drone comes with lights. This will make it easier for you spot potentially dangerous objects. If you plan to take photographs, you should protect your camera lens against damage. It is also a good idea to use protective goggles when flying your drone.
Flying drones at night poses a number of dangers, including collisions with power lines, trees, and buildings. Drones can also get lost or fall out the sky. Your drone must be kept clear of obstacles and keep close to the ground. Drones can also be affected by wind gusts or sudden weather changes. These conditions can cause your drone to lose control and crash land.
Drones are becoming more popular but they can pose health risks. For example, the noise emitted by these devices can affect hearing and cause headaches. The vibrations from drones can also cause harm to the body. You could also face legal action and fines for flying drones without an operator licence.
This guideline will help prevent any accidents. You must keep your drone within your direct line of sight when flying it. If you are flying near airports, make sure that you obey any restrictions imposed by airport authorities. Avoid flying your drone on water because it can increase the chance of a crash.
Statistics
- 60 second video with branding, captions, contact information, and music Strip / Convenience / Neighborhood / Community Centers pricing per center (up to 400,000 sq ft) PLACE ORDER (dronebase.com)
- A grey card is just a piece of thick paper that is a specific shade of grey (18%), which will be the foundation on which we choose our color temperature. (dronegenuity.com)
- Though the Mavic 3 is about 50% heavier than the Mavic Air 2, it's still conveniently sized. (nytimes.com)
- Among the biggest improvements, the Skydio 2+ has over the standard 2 is a 20% longer battery life, longer range if you add the Beacon, and a neat AI video creation tool called Keyframe. (thedronegirl.com)
- Greater than 50% throttle stick position generates positive thrust, but less than 50% throttle stick position reverses the direction of the motors, allowing upside-down flying! (photographypro.com)
External Links
[TAG6]
[TAG9]
How To
How can I make my drone pictures look better?
The drone photo is a fantastic way to capture incredible images. It can even be better than any photo you take with a camera when done properly.
You can improve the quality of your photos. One is making sure to use the most appropriate settings for your model.
After taking photos, there are a few apps and tools that can help you edit them. Adobe Photoshop Lightroom is one example. It allows you to import multiple files and then adjust each shot individually.
You can also crop and enhance individual parts of your image. This includes cropping out unwanted objects and changing lighting and contrast.
Snapseed also offers basic editing tools such as cropping or brightness adjustments and color correcting.
The most important aspect of post-processing, however, is ensuring that your final product looks professional.
This involves knowing how your camera works and how to position yourself correctly.
Also, be sure to choose the right settings on your lens. You might choose a longer focal distance (such as 200mm) if you want to shoot landscapes. If you need to capture close-ups, opt for a shorter focal line (such as 50mm).
Finally, learn how to shoot in RAW format because this gives you greater control over the final image.
You can create amazing drone images once you have mastered these techniques.