DJI Open 2 vs. DJI Avata 2 vs. DJI FPV – Which One is the Best? 🚀 DJI is back with some incredible drones! The DJI Open 2, DJI Avata 2, and DJI FPV are redefining aerial photography and immersive FPV flying. Which one suits your style? Let me know in the comments! 🎥✨ DJI Open 2, DJI Avata 2, DJI FPV, best FPV drone, DJI drone comparison, drone photography, FPV racing, cinematic drones, drone review, best DJI drone 2025 #DJI #DJIAvata2 #DJIOpen2 #DJIFPV #Drones #DronePhotography #FPVDrone #TechReview #CinematicDrones #DroneLovers #djimini3pro
By: Journey Chronicles Title: DJI Open 2 vs DJI Avata 2 vs Dji FPV | Which One is Better Sourced From: www.youtube.com/watch?v=SNGdeY50-_Q
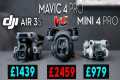
Check out the 3 best drones on Amazon Today!
Frequently Asked Questions
Can drones take pictures at night?
That's the right answer. But we have been doing it for years. We've been taking pictures at night for decades.
There's one problem. Night photography requires special equipment. With a camera costing less than $10k, there is no way to do night photography.
A series of wavelengths are created when light hits an object.
These wavelengths are combined to produce white light at very far distances from their source.
This is how our eyes are able to see colors even when the sun is miles away.
On the contrary, when light strikes an object close to its source, it reflects in a narrow band of wavelengths. These wavelengths bounce straight back to us without overlapping.
It means that the object closer you are, the brighter it will appear. This is why objects can glow under black lights.
The amount of light reflected depends on how much energy the object absorbs. The object may reflect more red light than blue light when it is hit by light.
The human eye is sensitive to blue light the most so objects appear brighter when viewed in black light.
What does all this have to do about drones? Use a very bright light source to photograph dark places, such a forest or cave.
A regular lamp will not be powerful enough for the illumination of the entire scene. You will get a shadowed image, nothing more.
You will need a strobe if you want to take great photos. You won't want to lug around a large flashgun so you will need a smaller one.
These lights are called speedlights due to the fact that they produce flashes light so fast, they can create a stroboscopic effect.
When we say "stroboscopic," you can watch the light pulse across the screen. The higher the speed, the better the picture.
We won't discuss how to set up a Speedlight here. There are many tutorials available online.
We will tell, for clear pictures, that you need to ensure that the subject is evenly illuminated.
For this to happen, aim the beam at 45°. You can adjust the light's intensity by moving the flashgun's head.
Once you have selected the correct setting, hold the gun steady and release the shutter release key.
Just before the flashlight reaches your subject, you can press the shutter button again. This will trigger the flashgun to fire another burst of light.
The subject will be illuminated by the first burst. The second burst will capture that moment.
The result is a continuous exposure where both bursts of light are recorded.
Now that you're comfortable taking photos during the day let's get to night photography.
So far, I have told you everything you need to know about photographing things at night.
But there's still one thing left to cover: the color balance.
Most people assume that all images taken at nights will be too dark.
This is true even for daytime images.
It doesn’t matter whether you’re shooting at dawn or at dusk. The camera will always record a darker shot.
Which drone is used for aerial photography?
You have two choices if your goal is to fly. Either rent a small, remote-controlled helicopter or purchase an expensive camera kit with a stabilizing gimbal.
This option is great for filming a video or film as it allows you to control the look of your shots. With the second option, you'll have to pay more and be much more dependent on the pilot.
What happens if the shot doesn't look perfect? Drones are the answer.
A drone is a tiny aircraft that flies autonomously and takes photos or videos without input from its operator.
They are extremely versatile and can fly very close to buildings to capture images and record footage. They can also fly low above crowds to take pictures of people.
Drones make great aerial photography and videography tools. They're also great marketing tools because you can create amazing visuals without having to use a lot of equipment and manpower.
You can easily place them in strategic locations to capture stunning imagery. They can also fly remotely, making them extremely easy to operate.
A few companies have hired drones for weddings. These drone-flying wedding photographers can capture stunning photographs of the bride or groom from above the ceremony area.
They can also fly the cameras to relatives to capture portraits. They can also fly them above reception areas to capture stunning views of the venue.
These types of activities are ideal for creating promotional material or event coverage. You can also make short films with drones. A drone could be used by you to show clients your company is better than theirs.
Drones are becoming more popular for videography and aerial photography. If you are looking to be a professional photographer, then a Drone might be the right choice.
Where are the best places to take photos with a drone?
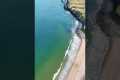
Drones can be used to capture stunning images of landscapes and nature. Drones can be used to take close-up photos of birds and butterflies, or capture stunning scenery.
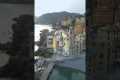
Drones are best used in mountains, deserts and other locations such as beaches, cities, oceans, rivers, and lakes. Drone enthusiasts enjoy taking stunning photos of their surroundings and other local attractions.
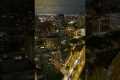
If you want to see new places, it is worth shooting at night as the lights illuminate the surroundings. You could also shoot during other seasons, especially winter when snow blankets.
What are the drawbacks to drone photography?
Drone photography allows you to capture stunning images and video. You must be aware that small aircraft can have their downsides.
Drone flying is expensive. It all depends on what type of drone you choose. You could end up spending hundreds of thousands or even thousands.
Drone flying requires certification and training. You'll need to spend time and money learning how to safely operate them.
Another downside is safety. Drones are dangerous due to their constant maintenance and repair. You could inflict serious injury or property damage if you lose control of your drone when taking photos or filming videos.
You might find that you spend more time operating a drone than actually capturing photographs or recording footage. In addition, you may have limited airspace where you can fly your drone.
You may be restricted by local governments as to where your unmanned aerial vehicle can fly. You can't fly over 400 feet or within 5 miles of stadiums or hospitals, schools, prisons or other military bases, as well as nuclear power plants and dams.
Drones aren’t for everyone. Flying these machines is not for everyone. Some fear they might fall or crash out of the sky. Some people worry about accidentally hitting another person or object.
If you're not comfortable flying a drone, then maybe you should stick to traditional aerial photography and videography methods instead.
Which drone should a beginner buy?
It is easy to fly a drone, and the best drones for beginners. These drones are equipped with an "FPV" camera which allows the user to control the drone remotely via a smartphone app.
Some quadcopters are designed specifically for aerial photography. You might consider a multirotor model if you plan to explore more advanced features, like autonomous flight mode and obstacle avoidance.
The drones come in two price categories: low-cost ones under $100 and high-end ones over $300.
The cheapest models have a shorter range and a shorter battery life. However, the best models offer better performance and longer flight times.
As they are simpler to use and handle, beginners tend to choose the cheapest options. If you intend to fly your drone for hours, however, you might consider buying a more expensive model.
Statistics
A grey card is just a piece of thick paper that is a specific shade of grey (18%), which will be the foundation on which we choose our color temperature. (dronegenuity.com)
Compared to the old days of the Phantom, this drone is super small, but it will likely require you to check a bag, the way a Mini 3 Pro could easily stow away in an oversized pocket. (thedronegirl.com)
Among the biggest improvements, the Skydio 2+ has over the standard 2 is a 20% longer battery life, longer range if you add the Beacon, and a neat AI video creation tool called Keyframe. (thedronegirl.com)
Here's proof: according to an analysis of FAA drone registration numbers by drone market research and data group Drone Industry Insights, DJI had a 76.8% market share in the U.S. (thedronegirl.com)
Greater than 50% throttle stick position generates positive thrust, but less than 50% throttle stick position reverses the direction of the motors, allowing upside-down flying! (photographypro.com)
Tips for Beginners on How to Take Outstanding Drone Images
These are the top tips for creating great drone photos
You must ensure that you have enough space for your drone to fly safely. You should keep it out of buildings, trees, power lines, and other obstructions.
Before you begin flying, be sure to know where you're going. Drone flying can make it easy to lose your way. If you don’t know exactly where you have flown, it is possible to end up dangerously close to cliff edges or in someone’s yard.
Keep your drone safe! Keep your drone close to your body to keep an eye on what's happening. Avoid flying at night and in adverse weather conditions (such as heavy rain).
Bring extra batteries if you plan to do long flights. You should always carry spare batteries with you. This way, you won't run out of juice mid-flight.
Good quality lenses are essential. The clearer the image, the higher the resolution. A camera lens with a low pixel count, such as those found on most smartphones, will blur the image.
Start small. Make short videos when you are learning how to fly a drone. Once you feel confident with this, move on to longer videos.
Avoid using your drone indoors. Drones should not be used indoors. They can cause damage and destruction to furniture and walls.
Practice makes perfect! Try different things with your drone. You can use your drone to capture different angles on the same scene. Or, go outside and practice flying around your house.
Be creative! While you may think you need to stick to the rules to make great drone pictures, there is no rule book about photography.
Learn more about how your camera settings work. There are many advanced features on today's cameras. These settings can improve the quality of your photos.
Be patient! You might be tempted to rush, but sometimes you need to wait to get the shot.
Have fun! Remember why you bought your drone in the first place. Enjoying yourself while flying your drone can add to the experience.
Share your work! Upload your best shots to social networking sites like Facebook and Instagram. Tell others how much you had fun shooting them!
Keep learning! Continue reading magazines and books on photography. Watch tutorials online. 15. Stay safe! Before you take to the skies, make sure that all safety precautions are taken. Ensure your drone has enough battery life left and its landing gear is in working condition. Follow all FAA regulations.
Find your style! Once you have mastered the basics you will be able to create your own style. Try different styles and techniques until one works for you.
Use apps! Get free photo editing tools for your smartphone. These tools can be used to enhance your photos.
Notes! Keep track of everything that you read from this article. This will help you remember the information better. You can write down the most important points in a journal or notebook.