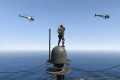
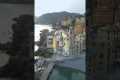
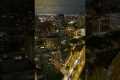
By: GALINSCHI_STUDIO Title: Mavic 3 Pro Brooklyn Bridge at night #brooklynbridge #newyork #drone #skyline #nyc #new Sourced From: www.youtube.com/watch?v=10adcvd21Qc
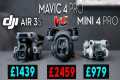
Here are the 3 most popular drones on Amazon Today!
Frequently Asked Questions
What are the downsides of drone photography
Drone photography is a great way to capture images as well as video. You should be aware of the potential downsides of flying a small aircraft.
The most obvious disadvantage of flying drones is the cost involved. It can cost hundreds to thousands depending on which drone you buy.
A drone pilot must be trained and certified. This means that you will need to invest your time and money in order to learn how to safely fly them.
Safety is another problem. Drones are inherently dangerous because they require constant maintenance and repair. A drone that is not controlled properly can cause serious injury to someone or damage property.
You might find that you spend more time operating a drone than actually capturing photographs or recording footage. A drone can be difficult to fly because of limited airspace.
You can only fly your unmanned air vehicle within certain areas. For example, you can not fly above 400ft or within five mile of any local airports, stadiums and hospitals.
Drones are not for everyone. Some people feel uneasy about flying these machines because they fear they might crash or fall out of the sky. Others fear that they could accidentally hit an object or person.
If you are not confident flying a drone, you can stick with traditional aerial photography methods and videography instead.
Is a photography drone worthwhile?
A great product is the most important thing if you want to start your own business. If you plan to promote your business, make sure you have a great product.
Many photographers don't know how to sell themselves. They try to convince someone else to purchase their stuff rather than convincing them to do it.
You won't be allowed to wait for anyone else when you start your own business. You will have to find customers now.
You will need to tell compelling stories that help them understand why your products are better than others.
You'll also need to come up with an effective strategy for marketing those products. However, you might fail to properly price your products even after all that.
There are two options. You could decide to charge too low. Either way, if you don’t know what your charges are, you’re most likely making a mistake.
You can avoid making these mistakes by starting to think like a businessman. However, this doesn't mean you must become a businessman. What it means is that you must learn how to value your time, money, and effort.
You must also develop strategies to measure the success of your company.
Once you have a good understanding of pricing, you can now focus on creating the best product possible. It should be a product that can make sense creatively and financially.
A product that solves problems and provides real benefits.
One that stands apart from the rest.
Once you have built the product, it's ready for launch. Now you are ready to build your business.
You should consider buying a drone to take photos. Because it will help you get started as a photographer. It will also help you improve your photography skills. It will also help to expand your business.
Can drones be used to take night pictures?
That's the right answer. We've been doing this for many years. We've been taking pictures at night for decades.
But there's a catch. Night photography requires special equipment. There's no way to do it with any camera that costs less than $10k.
When light hits an object, it bounces back in a series of wavelengths.
These wavelengths overlap and combine to form white light at very long distances from the source.
This is why our eyes can see colors even though the sun is millions of miles away.
Contrary to popular belief, light that strikes objects close to their source reflects in a narrow range of wavelengths. These wavelengths bounce directly back to us and do not overlap.
This means that objects appear brighter when they are closer to each other. This is how objects glow when exposed to black light.
How much energy the object absorbs affects how much light is reflected. When light hits an object it will reflect more blue light than red.
Because the human eye is most sensitive to blue light, objects look bluer when viewed under black light.
This is what drones have to do. You need a bright light source if you want to photograph dark objects, such as caves or forests.
A normal lamp won't provide enough light to illuminate the entire scene. It will only provide a shadowed view and not much else.
If you want to get a great picture, you will need a flashgun. It's not practical to have a bulky flashgun around, so it's best to get a small one.
Speedlights are also known for their flashes of light that create a stroboscopic effect.
When we say "stroboscopic," you can watch the light pulse across the screen. The higher the speed, the better the picture.
We won't cover how to set-up a Speedlight. But you can find many tutorials online.
We'll tell you, to get a clear shot, ensure that your subject is well lit.
The beam should be aimed at a 45° angle in order to achieve this. You can adjust light intensity by moving your flashgun's head.
Once you have set the setting that is right for you, hold the gun steady as the shutter release button is pressed.
Just before the flashlight reaches your subject, you can press the shutter button again. This will fire another flashgun burst.
The first burst is the most visible, and the second captures the moment after the burst has ended.
The end result is a continuous exposure with both bursts light and recorded.
Now that we know how to capture images during the daylight, let's learn how to do night photography.
I have so far covered everything about how to photograph things at night.
One thing is left to cover, however: the color harmony.
Most people assume that nighttime images will not be dark enough.
Yes, it is true. However, it can also be applied to daytime shots.
It doesn't really matter if you take photos at dawn or dusk, the camera will always capture a darker image.
Statistics
Though the Mavic 3 is about 50% heavier than the Mavic Air 2, it's still conveniently sized. (nytimes.com)
A grey card is just a piece of thick paper that is a specific shade of grey (18%), which will be the foundation on which we choose our color temperature. (dronegenuity.com)
Again, no stabilization is applied, and the 50% throttle stick position cuts the power to the motors. (photographypro.com)
Compared to the old days of the Phantom, this drone is super small, but it will likely require you to check a bag, the way a Mini 3 Pro could easily stow away in an oversized pocket. (thedronegirl.com)
Homes with aerial images sold 68% faster than homes with standard images. (alexdronephotography.com)
How to Take Great Drone Photos: Tips for Beginners
These are some great tips to take amazing drone photos
Space is essential for safe flying of your drone. You should keep it out of buildings, trees, power lines, and other obstructions.
Before you take off, make sure you know where you are going! Drone flying can make it easy to lose your way. It's easy to get lost when flying drones.
Keep your drone safe! Keep your drone close to your body to keep an eye on what's happening. Avoid flying at night and in adverse weather conditions (such as heavy rain).
Bring extra batteries if you plan to do long flights. You should always carry spare batteries with you. This will ensure that you don't run short of power during your flight.
Use top quality lenses. Clearer pictures are possible with higher resolution lenses. A camera lens with a low pixel count, such as those found on most smartphones, will blur the image.
Start small. Short videos are the best way to learn how to pilot a drone. When you feel confident, you can move on to longer videos.
Avoid using your drone indoors. Drones cannot be used indoors. They can damage walls, furniture, and other items.
Practice makes perfect! Try out different things using your drone. Use it to capture different angles in the same scene. You can also fly around the house outside.
You can be creative! You might believe you have to adhere to certain rules in order take great drone pictures. However, there is no set rule for photography.
Learn more information about your camera settings. There are many advanced features on today's cameras. These settings can improve the quality of your photos.
Be patient! It is not always possible to be the fastest, but it can sometimes take time to get the perfect shot.
Have fun. Remember why you bought your drone in the first place. You can enjoy flying your drone.
Share your work! Share your favorite photos on social media such as Facebook, Instagram Twitter, Pinterest, and Twitter. Tell others how much you had fun shooting them!
Keep learning! Read books and magazines about photography. Watch tutorials online. 15. Be safe Be safe before you take off! Make sure your drone is fully charged and that the landing gear works properly. Be sure to follow all FAA regulations.
Find your style! Once you master the basics, your unique style will emerge. You can experiment with many styles and techniques until you find the one that works.
Apps! Get free photo editing tools for your smartphone. With these tools, you can easily enhance your photos.
Take note! Keep track of all the information you have learned from this article to help you remember it. Notate important points and write them down in your journal.