The Perfect Drone for Every Beginner! Create. Fly. Capture Without Limits Lanus Triple Camera 4K Drone features next-level imaging performance. Lanus Triple Camera 4K Drone triple-camera system ushers in a new era of camera drones by housing three sensors and lenses with different focal lengths. The Lanus Fly app provides detailed instructions and online support, helping you answer all your questions when using the drone.
By: Adelly Title: DROM® Pro: Your View From the Sky with 4K Camera, Smart Flight, and Advanced Features Sourced From: www.youtube.com/watch?v=Eg6yUd3VqgY
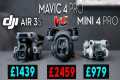
Check out the 3 most popular drones on Amazon Today!
Frequently Asked Questions
What are the essentials for drone photography?
Drone photography requires more than just flying a plane. There are a lot of things you need to consider when planning and executing an effective drone shoot. It all starts with choosing the right place and determining how much insurance is required to make an aerial shoot a success.
The most important thing you can do is make sure that your drones are allowed to fly in the location you want to photograph. This involves finding out if there are restrictions regarding where you can fly or where your drone can be operated. If you find that there are restrictions, you might need to apply for a license in order to fly them.
It is also important to verify the laws in your country. Some countries require drone pilot permits, while others restrict the number of flights that can be made within a certain time frame.
A drone pilot license is required. You'll also need to find a safe and secure place to land your drone after every flight. Local businesses will often offer landing pads for rent at a nominal fee. They also provide storage space and an hourly rate. A dedicated landing pad can also be purchased.
Before you begin to shoot, you will need to decide which drone you want. There are many drones with different capabilities and features. For example, fixed-wing drones are typically less expensive and easier to handle, while multirotors have more power and stability.
After deciding what kind of drone you want to use, you'll need to choose what equipment you'll need. A drone camera usually consists of a gimbal, remote controller, batteries, and memory cards.
The camera is stabilized by the gimbal during flight. The drone's body attaches to the gimbal to ensure that the camera stays steady.
Remote controllers allow you to control your drone from anywhere. These devices include joysticks and buttons that let you move the drone forwards, backward, left, and right and adjust its altitude.
Batteries power the drone’s motors and camera, while memory cards store photos taken with the drone. You'll need enough battery power to ensure clear pictures.
Once you've chosen the equipment that you need, it's time to plan where you want to shoot. Is it indoors or outdoor? Are you going to be shooting landscapes or architecture? Which area are you going for? All of these factors affect how you'll need to prepare for your shoot.
If you intend to shoot inside, lighting is a must. Multiple lights will help lighten a room. Place one large light near the subject, another near it, and yet another close to the floor.
Outside, you need to be aware of wind conditions. Drone pilots may experience problems if they are blown off course by windy conditions. Therefore, you should only take off when the weather is calm.
If you are going to be bringing extra equipment like tripods or stands, consider whether this is something that you will need. These items will help you keep your drone level stable, so you don't lose quality shots.
For an outdoor shoot, it's advisable to work between 10 am and 4 pm. This time there won't many people, but enough light will allow for great photos.
The conclusion is that drone photography can be more than fun. These are just a few steps that you can follow to create incredible images.
Can drones take pictures at night?
Yes, that's the answer. But it's been a long-standing tradition. Since decades, we have been taking night shots.
There is one catch. Night photography requires special equipment. It's impossible to achieve night photography with a camera less than $10,000.
When light strikes an object, it bounces back in various wavelengths.
These wavelengths merge to form white light at long distances from source.
This is how our eyes are able to see colors even when the sun is miles away.
However, when light strikes an object near its source, it reflects within a narrow band wavelengths. These wavelengths bounce back directly to us without any overlap.
This means that objects are brighter if they are closer together. This is why objects seem to glow when they are exposed to black light.
The amount of light reflected depends on how much energy the object absorbs. If light hits an object, it may reflect less red light than more blue.
The human eye is sensitive to blue light the most so objects appear brighter when viewed in black light.
This is what drones have to do. If you want to photograph something dark like a forest or cave, you will need a very bright source of light.
A normal lamp won't provide enough light to illuminate the entire scene. It will only provide a shadowed view and not much else.
You will need a strobe if you want to take great photos. Also, a small flashgun won't be as convenient for you.
Because they produce flashes that are so rapid, these lights are often called speedlights.
When we say "stroboscopic," you can watch the light pulse across the screen. The better the quality of the image, the faster it is.
We won’t talk about how to setup a Speedlight. However, there are numerous tutorials online.
We will tell that it is important to have a bright and even lighting source in order to capture clear images.
For this to happen, aim the beam at 45°. You can adjust intensity by moving the flashgun head.
Once you have chosen the best setting, hold your gun steady while you press the shutter release.
Then, just before the light reaches the subject, press the shutter again. This will activate the flashgun and fire another burst.
While the first burst illuminates the subject, the second one will capture the moment after the first burst has passed.
The end result is a continuous exposure with both bursts light and recorded.
Now that you're comfortable taking photos during the day let's get to night photography.
So far I have covered all you need to know about taking night photos.
One thing is left to cover, however: the color harmony.
Most people assume that nighttime images will not be dark enough.
This is true even for daytime images.
It doesn’t matter whether you’re shooting at dawn or at dusk. The camera will always record a darker shot.
Which drone should a beginner buy?
Drones that are easy to fly for beginners are the best. These drones include those equipped with an FPV camera that allows users to remotely control the drone using a smartphone app.
Some quadcopters are specifically made for aerial photography. You may choose a multirotor if your goal is to explore advanced features such an autonomous flight mode or obstacle avoidance.
In terms of price, there are two types of drones; cheap ones that cost under $100 and expensive ones that cost above $300.
The cheapest models usually come with a limited range and battery life, while the most expensive ones feature better performance and longer flight times.
Many beginners prefer to buy cheaper models because they are easier for them to handle and to learn how to use. However, you may consider purchasing a higher-end model if you plan to spend hours flying your drone.
How much money do drone photographers make?
Photographers make more than $10k a gig depending on the length of their flights and where they are shooting. Photographers who work in remote areas, such as forests or national parks, could make upwards of $20-30 per hour.
The average person can earn between $15-$25/hour working in retail. If you want to fly drones, you could earn $50-$75. However, there are also plenty of opportunities to earn even more. Drone pilots often fly for companies that require them cross-country or international travel.
Prices for flights can range from $100 to $300 depending on the amount of time spent flying and the distance covered. You might find it worthwhile if flying is something you enjoy and you also love taking photos.
Statistics
Though the Mavic 3 is about 50% heavier than the Mavic Air 2, it's still conveniently sized. (nytimes.com)
A grey card is just a piece of thick paper that is a specific shade of grey (18%), which will be the foundation on which we choose our color temperature. (dronegenuity.com)
60 second video with branding, captions, contact information, and music Strip / Convenience / Neighborhood / Community Centers pricing per center (up to 400,000 sq ft) PLACE ORDER (dronebase.com)
Greater than 50% throttle stick position generates positive thrust, but less than 50% throttle stick position reverses the direction of the motors, allowing upside-down flying! (photographypro.com)
Regional & Super Regional Centers pricing per center (400,000+ sq ft) PLACE ORDER (dronebase.com)
The two most common types of camera used to make time-lapses are DSLRs (Digital Single Lens Reflex) which are typically more expensive that point-and–shoot digital cameras.
Due to the way light enters the camera, DSLR cameras tend to produce better-quality images. Videography is not as easy because you need to manually focus and adjust the exposure.
Easy to use, point-and shot cameras, like those made by GoPro. However, videos with lower resolutions look grainy.
A consumer drone is the best camera to time-lapse. These small flying robots offer a cheaper alternative to professional drones.
A drone can be described as a remote controlled aircraft that is autonomous and does not require human intervention. Quadcopter drones can have multiple propellers, but a drone usually uses one propeller.
In addition to providing aerial footage, a drone can capture cinematic shots from a bird's eye view. A gimbal stabilizer can be added to drones for smooth handheld footage.
You can create a time lapse by recording the drone above your subject. If the sun is not directly overhead, the sky will not appear dark during the shot.
To achieve the desired effect, you can adjust the aperture and shutter speed. To capture a sunset, you might set the shutter speed at 30 seconds, and open the aperture wide to let in as much natural sunlight as possible.
For night shots, the opposite approach would be taken. To reduce light entering the camera, slow the shutter speed to 1 second and then close the aperture. This produces a bright image that makes details visible.