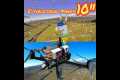
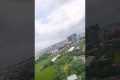
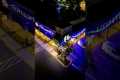
Its still 4 days left to end the light festival in Guangzhou City, China
By: lalin photography Title: Guangzhou City Aerial View Night, China Sourced From: www.youtube.com/watch?v=-duA3dkOxcU
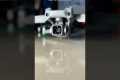
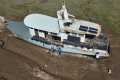
You've got check out the 3 best drones on Amazon while they're on sale
Frequently Asked Questions
How do you get started with drone photography
You have many options to begin photographing with a drone. You can start by buying a drone kit. This kit will contain everything you need for getting started. They cost $200 to $500, depending upon which model you choose.
Another option is to build your own drone. Although it is a complicated task, you can still make something that captures decent images and videos.
For those who want to try building their drone, we recommend starting with a quadcopter. As found on conventional helicopters, a quadcopter has four rotors (or propellers) instead of two.
It is much easier to assemble and maintain a quadcopter than a helicopter. You can also purchase it cheaper and carry it around easier.
You'll first need to select the right parts. You'll need motors, batteries, controllers, and props. Pick the correct size, weight and type.
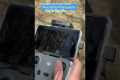
Next, you will need to choose which type of controller you want. There are many options available. These include joysticks, touch screens and remote controls. We recommend purchasing one with a built-in camera, so you don't have to attach a separate device to your drone.
Once you've chosen the right parts, you're ready to assemble your drone. A preassembled kit is a great option to save time and make things simpler. If you would prefer to build your drone yourself, there are a few things you need to do.
Step 1: Attach battery pack
To build your quadcopter, you will need to connect the battery pack and the motor. To start, remove the cover from the battery pack. Slide the battery into its place.
Step 2: Connect the motors
Next, you'll need to install the motors in the appropriate slots. Each motor must be placed in the appropriate slot. When mounting the motors, ensure they face forward and are parallel to the frame.
Step 3: Install the propeller
Finally, you'll need to attach the propellers to the frame. Place them at an equal distance.
Now you are ready to test your drone. If the drone doesn't move when you turn it on, make sure the propellers face forward. Make sure the propellers are free from obstructions.
How much money do drone photographers make?
A photographer could make more or less than $10k depending upon how long he/she is flying for and where he/she takes photos. Photographers who work in remote areas, such as forests or national parks, could make upwards of $20-30 per hour.
An average person is paid $15-$25 an hr in retail. That means you could fly drones for $50-$75 if that's what you desire. There are many opportunities to make even more. Many drone pilots work for companies that require them fly across the country and even internationally.
It is possible to charge $100 to $300 per flight depending on how many miles you cover and how much time you spent flying. These fees can add up quickly but if you love flying and photography it might be worth it.
Is it safe to fly a drone in the night?
Drones are becoming increasingly popular. Drones can provide stunning aerial shots of our homes, businesses, as well as providing amazing video footage of sporting events, as well as being useful in surveying large areas and delivering goods. There are currently very few regulations that govern drone usage. They have been banned in some US states while others have limited their use.
While flying drones during daylight hours are relatively safe, there are still risks involved when operating them at night. Your safety and that of other pilots may be endangered if you fly your drone at night. This is due to the difficulty of spotting hazards and obstacles. A pilot's mistakes could lead to an accident.
Drones are becoming increasingly popular; therefore, we must learn how to operate them safely. There are currently two main types of drones: fixed-wing and rotary-wing. Fixed-wing drones are typically smaller and easier to pilot than rotary-wing ones. Fixed-wing models usually have four propellers while rotary-wing models only have one rotor.
You should be familiarized with all local drone laws to avoid any mishaps. You should also ensure your drone is equipped with lights. Make sure they flash red or green. This makes it easier to spot potential threats. Protect your camera lens from damage if you intend to take photos. When flying your drone, you should wear protective goggles.
Flying drones at night poses a number of dangers, including collisions with power lines, trees, and buildings. A drone could also become lost or fall from the skies. Therefore, you must keep your drone away from obstructions and stay close to the ground. Drones can be exposed to wind gusts and abrupt weather changes. These conditions can cause your drone to lose control and crash land.
Although drones are becoming increasingly popular, they come with potential health risks. Drones emit noises which can disrupt hearing and cause headaches. The vibrations from drones can also cause harm to the body. The operator license allows you to fly drones, but it can also lead to legal action and fines.
These guidelines will help you avoid any drone accident. When flying your drone, you must keep it within your line of sight. If you are flying near airports, make sure that you obey any restrictions imposed by airport authorities. It is important to be cautious when flying drones over water. This increases the chance of a collision.
Statistics
Though the Mavic 3 is about 50% heavier than the Mavic Air 2, it's still conveniently sized. (nytimes.com)
Homes with aerial images sold 68% faster than homes with standard images. (alexdronephotography.com)
60 second video with branding, captions, contact information, and music Strip / Convenience / Neighborhood / Community Centers pricing per center (up to 400,000 sq ft) PLACE ORDER (dronebase.com)
A grey card is just a piece of thick paper that is a specific shade of grey (18%), which will be the foundation on which we choose our color temperature. (dronegenuity.com)
Again, no stabilization is applied, and the 50% throttle stick position cuts the power to the motors. (photographypro.com)
Two main types of cameras are commonly used when making time-lapses: DSLRs (Digital Single Lens Reflex), that are usually more expensive than point and shoot digital cameras.
The way light enters DSLR cameras can also make them produce better quality images. They are not ideal for video because they require manual focus, exposure and exposure settings.
Easy to use, point-and shot cameras, like those made by GoPro. Videos will look grainy because of the lower resolution.
The best camera for time-lapsing is a consumer drone. These small flying robots have become very popular as an affordable alternative for professional drones.
A drone, a remote controlled aircraft, is one that can fly independently of human intervention. A drone generally uses one propeller to fly. Quadcopter drones could have multiple propellers.
In addition to providing aerial footage, a drone can capture cinematic shots from a bird's eye view. Drones can also be equipped with a gimbal stabilizer to shoot smooth handheld footage.
For a time-lapse effect, you can start recording while your drone hovers above the subject. If the sun doesn't directly over the subject, the sky won't look dark during the shot.
You can adjust the shutter speed and aperture to achieve the desired effect. If you are filming a sunset, for example, the shutter speed can be set at 30 seconds and the aperture wide open to allow in as much natural lighting as possible.
Night shots can be shot using the opposite approach. To reduce light entering the camera's sensor, set the shutter speed at 1 second. This technique creates a bright image where details are visible.