Support us on Patreon to gain access to full quality flyover galleries, round-table analysis and more!:
We are now doing weekly aerial flyovers depending on the support that we get. Our cost range from pilot fees to rental fees of the Cessna 172 that is used for the flyovers over the sites.
Come join our Discord!
Other content creator's footage:
Starship Gazer: Shaun Gisler:
Video Production Team:
Research and Writing Team: Vanta DJ Esmerald: B.J.
QC Team: Stephanie B.J. Geoff A
Media Managers: Stephanie
Video Editor: Jaadoo:
Voiceover: Geoff A
Photographer: Irma Atilano
Labeled Graphics: Proky
Thanks for Watching!
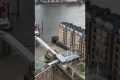
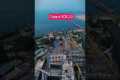
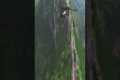
By: RGV Aerial Photography Title: High Bay Dismantling + Flame Trench Progress! Starbase Flyover Update 77 Sourced From: www.youtube.com/watch?v=f3fn7oV6Lb4
You've got check out the 3 most popular drones on Amazon Today!
Frequently Asked Questions
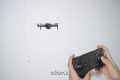
How do I get started drone photography?
There are many options for starting to photograph with a drone. The first is to purchase a ready-made drone set. It will come with everything you need in order to get started. They vary from $200 up to $500, depending on which model.
Another option is to build your own drone. Although this can be a bit complicated, it's still possible to create something that works well enough to take some decent photos and videos.
A quadcopter is the best choice for anyone who wants to build their own drone. Quadcopters have four propellers (or rotors) as opposed to two like traditional helicopters.
A quadcopter can be assembled and maintained in a much shorter time than a helicopter. It is also more affordable to buy and easier for you to transport.
First, you need to pick the right parts. Motors, batteries and controllers are all required. Pick the correct size, weight and type.
Next, decide which controller you would like to use. There are many options available. These include joysticks, touch screens and remote controls. You can attach your drone to the camera with the built-in camera.
Once you have selected the correct parts, it's time to assemble your drone. We recommend purchasing a pre-assembled kit to make things easier. If you would prefer to build your drone yourself, there are a few things you need to do.
Step 1: Attach your battery pack
For your quadcopter to be built, you'll need the battery pack connected to the motor. To begin, remove the cover plate at the bottom of your battery pack. Then, slide the battery into place.
Step 2 Connect the motors
Next, you'll need to install the motors in the appropriate slots. Each motor needs to be installed in its respective slot. When installing motors, ensure that they face forward while remaining perpendicular with the frame.
Step3: Installing the propeller
Attach the propellers to your frame. Place them at an equal distance.
You are now ready to test the drone. If the drone doesn't move when you turn it on, make sure the propellers face forward. Also, ensure that there aren’t obstructions between propellers.
What are the drawbacks to drone photography?
Drone photography allows you to capture stunning images and video. But there are also downsides when choosing to fly a small aircraft.
The main disadvantage to flying drones is their high cost. It all depends on what type of drone you choose. You could end up spending hundreds of thousands or even thousands.
A drone pilot must be trained and certified. This means that you will need to invest your time and money in order to learn how to safely fly them.
Safety is another problem. Drones are extremely dangerous because they require constant maintenance. Drones can be dangerous because they require constant maintenance and repair.
You might find that your time spent flying your drone is more productive than actually taking pictures or recording footage. You may also have restricted airspace in which you can fly your drone.
Some local governments have restrictions on where you can fly an unmanned aerial vehicle. For example, you can not fly above 400ft or within five mile of any local airports, stadiums and hospitals.
Finally, drones aren't for everyone. Drones can make people nervous because they could crash or fall out from the air. Some fear they might hit an object or another person.
You might be uncomfortable flying a drone. Instead, you can try traditional aerial photography or videography.
What type of drone does the professional use?
Drones are a great tool for aerial photography. They are incredibly useful for recording video footage and capturing images from above. Drones are also useful for surveying land or taking measurements.
These devices are often used for commercial purposes such as mapping large areas or checking construction sites. However, there are plenty of uses for them beyond business applications.
Drones can also be great entertainment for friends and family. You have many options to fly these machines, and even explore new areas. Drones also make it easy to take photos and video of special events.
Drones can be used in a variety of ways. Continue reading to find out how you can get the most from your drone.
Can drones shoot nighttime photos?
The answer to that question is yes. We've been doing this for many years. We've been taking pictures at night for decades.
There's a catch. Night photography requires sophisticated equipment. With a camera costing less than $10k, there is no way to do night photography.
The wavelengths of light that bounce back from objects when they are hit by light can vary.
These wavelengths overlap and combine to form white light at very long distances from the source.
This is why our eyes can see colors even though the sun is millions of miles away.
Instead, light reflects narrow bands of wavelengths when it strikes objects that are close to the source. These wavelengths bounce back directly to us without any overlap.
This means that objects appearing brighter are closer together. This is how objects glow when exposed to black light.
How much energy the object absorbs affects how much light is reflected. When light hits an object it will reflect more blue light than red.
The human eye is sensitive to blue light the most so objects appear brighter when viewed in black light.
What does all this have to do about drones? You need a bright light source if you want to photograph dark objects, such as caves or forests.
A regular lamp will not be powerful enough for the illumination of the entire scene. You will get a shadowed image, nothing more.
If you want to get a great picture, you will need a flashgun. You won't want to lug around a large flashgun so you will need a smaller one.
These lights are known as speedlights because they produce flashes of light so fast that they create a stroboscopic effect.
When we say "stroboscopic," you can watch the light pulse across the screen. The better the quality of the image, the faster it is.
We won't be discussing how to set up Speedlights here. But there are plenty of tutorials online.
We will tell you to make sure that the subject is properly illuminated in order for a clear photograph.
This is achieved by aiming the beam at 45 degrees. You can adjust light intensity by moving your flashgun's head.
Once you have chosen the best setting, hold your gun steady while you press the shutter release.
Then, just before the light reaches the subject, press the shutter again. This will trigger the flashgun to fire another burst of light.
The first burst is the most visible, and the second captures the moment after the burst has ended.
The end result is a continuous exposure with both bursts light and recorded.
Now that you are able to take photographs during the day, let us move on to night photography.
So far, I have told you everything you need to know about photographing things at night.
There's one more thing to be covered: the color balance.
Most people assume that all the images taken at night will be too dark.
It's true. But it also applies to daytime photographs.
It doesn’t matter whether you’re shooting at dawn or at dusk. The camera will always record a darker shot.
What are the laws concerning drone photography?
The Federal Aviation Administration (FAA) regulates drone flights. Local laws might also apply to drone flight operations. For information on drone flying regulations in your state, contact the transportation department.
Drone owners must obtain a FAA license in most cases. Guidelines for licensing have been established by the FAA. Learn more about these guidelines by clicking here.
In certain states, drone operators are required to register their drones at the government. Learn more about drone registration in our Guide to Drone Registration.
Which drone can hold a DSLR camera?
Drones are increasingly useful for everyday tasks. Drones can already be equipped with cameras to take aerial photos.
But even though drones have been around for years, most people haven't used them much because they aren't practical. Most drones are too expensive, noisy, and hard to control.
Drone-A1 has been created to address this need. This quadcopter is the first to be fully autonomous and specifically designed for photographers.
The Drone-A1 features an HD camera that captures stunning videos and photos. Due to its powerful computer onboard, the Drone-A1 will follow a subject seamlessly without any human intervention.
You can now focus on taking great photos while the Drone-A1 will take care of hovering, flying and following your subject.
Amazing shots can be captured with the Drone-A1 thanks to Smart Follow. Point the Drone-A1 at your subject and it will automatically track and keep you separated.
You will have more freedom and greater convenience shooting with the Drone-A1. You won't have to worry about being steady or knowing where your subject is.
The Drone- A1 also features a built-in GPS that allows you to share your photographs with friends and family. You can share your pictures with anyone around the globe.
The Drone-A 1 is ideal for professionals and hobbyists who love to take pictures.
Statistics
Here's proof: according to an analysis of FAA drone registration numbers by drone market research and data group Drone Industry Insights, DJI had a 76.8% market share in the U.S. (thedronegirl.com)
Regional & Super Regional Centers pricing per center (400,000+ sq ft) PLACE ORDER (dronebase.com)
A grey card is just a piece of thick paper that is a specific shade of grey (18%), which will be the foundation on which we choose our color temperature. (dronegenuity.com)
Among the biggest improvements, the Skydio 2+ has over the standard 2 is a 20% longer battery life, longer range if you add the Beacon, and a neat AI video creation tool called Keyframe. (thedronegirl.com)
Though the Mavic 3 is about 50% heavier than the Mavic Air 2, it's still conveniently sized. (nytimes.com)
What is the optimal distance for a drone's flight?
The best distance for a drone to travel is when it becomes an extension or part of you. It is possible to lose sight physical boundaries of the drone if you begin to view it as a separate entity.
A good distance for a drone allows you to immerse yourself in the environment without worrying about where the drone is going next.
A close approach to the ground can also have psychological benefits. Flying close to the ground gives you a greater sense of control and makes it easier to feel connected to nature.
There is however a downside. Flying near the ground means we are exposed to wind and weather conditions that could damage the drone. How far from the ground can you fly?
The answer depends on the type of drone you are flying. If you are trying to film a landscape or capture aerial footage, a good rule of thumb is to stay at least 500 feet above the ground.
You might choose to film a cityscape at 1,000 feet, for instance. This will allow you to avoid obstructions like trees and buildings.
Drones are more sensitive to low-light conditions. Lowering the altitude can help reduce hover time in dark conditions.
You should also ensure that the area where you fly is free from obstructions such as traffic signs or power lines.
It may be a good idea to fly during the day, rather than at night. This avoids reflections caused shadows and street lights.
Another thing to think about is the size of the drone itself. The closer the drone is to the ground, the greater its size. For example, a large quadcopter will usually require a minimum height of 300ft.
You should never miss the golden hour if you are looking for great drone footage.
This is the period between 3 pm and 6 pm. This is the time when you have maximum visibility because of direct overhead sunlight.
It is also known for its "magic hour", which is perfect for capturing stunning images.
However, you should avoid flying your drone at sunset and sunrise. These times can result in poor quality footage.
These tips have been given to you. Now it's time for you to create amazing drone videos.