London UK 🇬🇧 to hong kong 🇭🇰 one of the longest flight route on planet #shorts #aeroplane #travelmap
By: GLOBE MASTER🌍 Title: London UK 🇬🇧 to hong kong 🇭🇰 one of the longest flight route on planet #shorts #aeroplane #travelmap Sourced From: www.youtube.com/watch?v=Q5F-75G4HYo
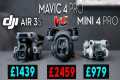
Here are the 3 most popular drones on Amazon while they're on sale
Frequently Asked Questions
Can drones shoot nighttime photos?
Yes, that's the answer. But we have been doing it for years. We have been taking photos at night for many decades.
But there is a catch. Night photography requires specialist equipment. With a camera costing less than $10k, there is no way to do night photography.
Light bounces back when it hits an object in a series wavelengths.
These wavelengths combine to create white light at very distant distances from the source.
This is why your eyes can see colors even if the sun is many millions of miles away.
Instead, light reflects narrow bands of wavelengths when it strikes objects that are close to the source. These wavelengths bounce directly back to us and do not overlap.
It means that the object closer you are, the brighter it will appear. This is why objects can glow under black lights.
The energy an object absorbs determines how much light it reflects. Therefore, if light hits an object, it might reflect more blue than red light.
Blue light is the most visible to the human eye, so objects will appear more blue if they are seen under black light.
This has to do with drones. If you want to photograph something dark like a forest or cave, you will need a very bright source of light.
A normal lamp won't provide enough light to illuminate the entire scene. It will only create a shadowed scene.
A strobe is better for taking great pictures. Also, a small flashgun won't be as convenient for you.
These lights are also known as speedlights, because they emit flashes so fast they create a stroboscopic effect.
If we say "stroboscopic", you can see the light pulse across the screen. The picture will be better quality if it moves at a faster rate.
We won’t talk about how to setup a Speedlight. But you can find many tutorials online.
We will tell that it is important to have a bright and even lighting source in order to capture clear images.
You should aim the beam at a 45 degree angle to achieve this. You can adjust light intensity by moving your flashgun's head.
Once you have chosen the best setting, hold your gun steady while you press the shutter release.
Then, just before the light reaches the subject, press the shutter again. This will trigger the flashgun to fire another burst of light.
While the first burst illuminates the subject, the second one will capture the moment after the first burst has passed.
This creates a continuous exposure in which both bursts or light are recorded.
Now that you're comfortable taking photos during the day let's get to night photography.
So far, I have told you everything you need to know about photographing things at night.
There's one more thing to be covered: the color balance.
Most people assume that all the images taken at night will be too dark.
And that's true - but it's also true for daytime pictures.
It doesn't matter whether you're taking pictures at dawn or dusk; the camera will always record a darker image.
What are the essentials for drone photography?
Drone photography is more than just flying a camera. Planning and executing a successful drone shoot requires a lot of considerations. From finding the right location to getting enough insurance, a successful drone shoot is possible.
The most important thing to do is check to see if you have permission. It is important to find out if there any restrictions on the areas you can fly in and where your drone may be used. If there are, you might have to apply for a permit to fly them in the area.
It is important that you check your country's regulations. Some countries require permits for drone flying. Others restrict the number and duration of drone flights.
To fly drones safely and securely, you must have permission. You can often rent a landing pad from local businesses, which will charge you per hour and provide you with storage space. Or, you can buy a dedicated landing area.
Before you can even start shooting, you need to choose the drone that you want to use. Different drones have different capabilities and features. Fixed-wing drones, for example, are less expensive and more controllable, while multirotor drones, on the other hand, are more powerful and stable.
Once you decide which type of drone is best for you, the next step is to determine what equipment you will need. The drone camera typically comprises a gimbal with remote controller, batteries, batteries and memory cards.
The camera is stabilized by the gimbal during flight. The drone's gimbal is attached directly to its body to help keep it steady.
Remote controllers permit you to control your drone remotely. These devices come with joysticks as well as buttons that allow the drone to be moved forward, backward, left, right, or left. You can also adjust its altitude.
The batteries power the drone's cameras and motors. Memory cards store photos taken by it. To ensure that the drone takes clear pictures, you'll need to ensure sufficient battery life.
Once you've selected the equipment you'll need, you'll need to figure out where you'll shoot. Do you prefer to shoot outdoors or indoors? Will you be photographing architecture or landscapes in your home? Which area are you going for? All of these factors affect how you'll need to prepare for your shoot.
If you intend to shoot inside, lighting is a must. Multiple lights can be used to brighten a room. Place one large light near the subject, another near it, and yet another close to the floor.
Wind conditions are an important consideration when you are outdoors. Drone pilots may experience problems if they are blown off course by windy conditions. Take off only when the weather permits.
You should consider whether you need additional equipment when selecting your location. These items will keep your drone stable and allow you to capture high quality images.
An outdoor shoot should be between 10 am to 4 pm. Although there won’t be as many people around at this time, it will still provide enough light for stunning photos.
To conclude, drone photography isn't just fun and incredibly useful for capturing stunning aerial photographs. Just follow these steps and you can begin creating stunning images today!
Can drone photography make you money?
The biggest problem for any photographer trying to make money off drones is that there aren't any products out there that solve the problems that come with flying them. You can enjoy the experience by using quality equipment and software.
Also, you need to be aware of liability and insurance issues. This is why most photographers opt to take photos from the ground. This is a completely new way to capture images, and you might get paid for it.
In the way they capture light, drones look very similar to video cameras. Use the same technology to take amazing photos.
Companies have already made great strides to create photo-quality images from above. We have already discussed DJI & GoPro. But now we're starting to see more and more companies enter the space.
Even though these cameras are designed for aerial photography, they are pretty good on the ground. Major manufacturers invest heavily in their imaging technology.
You'll soon be able buy a drone capable of taking incredible photos and 4K video. This may be happening already. Companies like DJI have been releasing higher-resolution versions of their Phantom series of drones.
DJI's Inspire 2 recently came out with a 12-megapixel sensor, capable of shooting at 5120x3456 Pixels. And if you want to shoot in RAW format, you can record 8-bit files at 30 frames per second.
Yes, drone photos can be a great way to make some extra cash.
Statistics
Homes with aerial images sold 68% faster than homes with standard images. (alexdronephotography.com)
Greater than 50% throttle stick position generates positive thrust, but less than 50% throttle stick position reverses the direction of the motors, allowing upside-down flying! (photographypro.com)
Compared to the old days of the Phantom, this drone is super small, but it will likely require you to check a bag, the way a Mini 3 Pro could easily stow away in an oversized pocket. (thedronegirl.com)
Though the Mavic 3 is about 50% heavier than the Mavic Air 2, it's still conveniently sized. (nytimes.com)
A grey card is just a piece of thick paper that is a specific shade of grey (18%), which will be the foundation on which we choose our color temperature. (dronegenuity.com)
Drone pilots love to observe the world around them. There is another reason to fly drones at night, however: to capture images in the cityscape.
This is known as urban photography, and it is growing in popularity among drone enthusiasts.
Photographing at night has many benefits, including capturing more detail and better lighting conditions.
Many photographers prefer to shoot at night to avoid dealing with the limitations of daytime shooting.
These are all great benefits, but urban photography is still very popular. People fly drones at nights to capture beautiful nighttime scenes.
They love the way the light changes when the sun goes down. So much so that many people have started making videos of themselves flying drones at night and posting them online.
Although drone footage isn’t necessarily cutting-edge technology, the quality of the images is exceptional.
The best part is that you can do it yourself without special equipment. All you need is a smartphone with a camera.
However, you can still use your smartphone. Plenty of high-quality cameras available on the market today would allow you to produce great drone videos.
You will find some models that offer night vision capability if you're thinking of buying a DSLR camera.
Canon's EOS-5D Mark III comes with an embedded infraredLED system that allows the camera to see in low lighting conditions.
Other manufacturers include Sony, Nikon, Olympus, Panasonic, Pentax, and Samsung.
However, not all smartphones have the ability to record drone footage.
iPhones' front-facing cameras cannot be used to capture aerial footage. Instead, they can rely only on the dual rear cameras in the iPhone 8 Plus.
Once you've decided what kind of camera you'd like to use, you'll need to decide where you want to film your video from.
You could opt to film your drone footage using a fixed location, or you could choose to follow your subject instead.
It is important that you have your subject in the frame while filming drone footage. You should aim your drone at your subject.
As long as your goals are within this range, you'll be able to produce great results.
It is important to keep in mind that the closer your subject is to you, the sharper your footage will appear.
Try to make your subject move as fast as you can.
Now that we know how to capture drone footage, let's discuss how to edit it.