Support us on Patreon to gain access to full quality flyover galleries, round-table analysis and more!:
We are now doing weekly aerial flyovers depending on the support that we get. Our cost range from pilot fees to rental fees of the Cessna 172 that is used for the flyovers over the sites.
Come join our Discord!
Other content creator's footage:
ChromeKiwi: Labpadre: Alaska Space: Vix:
Video Production Team:
Research and Writing Team: Vanta DJ Esmerald: B.J.
QC Team: Stephanie B.J. Geoff A
Media Managers: Stephanie
Video Editor: Jaadoo:
Voiceover: Geoff A
Photographer: Irma Atilano
Labeled Graphics: Proky
Thanks for Watching!
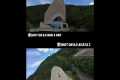
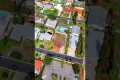
By: RGV Aerial Photography Title: Massive Progress at Pad B + Office Building Opens! NEW Starbase Flyover Sourced From: www.youtube.com/watch?v=3s3MPliCgcQ
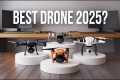
Look at the 3 best drones on Amazon Today!
Frequently Asked Questions
Which drone can be used to carry a DSLR?
Drones are increasingly useful for everyday tasks. Drones can already be equipped with cameras to take aerial photos.
Drones have been around since the beginning of time, but they are not practical for most people. Drones are often too expensive, noisy and difficult to control.
We created the Drone-A1. It's the world's first fully autonomous quadcopter designed specifically for photographers.
The Drone-A1 features an HD camera that captures stunning videos and photos. Due to its powerful computer onboard, the Drone-A1 will follow a subject seamlessly without any human intervention.
This allows you to focus solely on the capture of great images, while Drone-A1 does all the flying, hovering and following your subject.
You'll love how easy it is to capture amazing shots with the Drone-A1, thanks to our exclusive Smart Follow feature. Point the Drone-A1 toward your subject. It will automatically track them and maintain distance between you.
You'll have complete freedom and ease when shooting with the Drone-A1. You won't have to worry about being steady or knowing where your subject is.
The Drone- A1 has a GPS integrated that allows you and your family to share your pictures. You can share your pictures with anyone around the globe.
The Drone-A 1 is a great choice for anyone who loves to take photos for fun or as a professional photographer.
How much money do drone photographers make?
A photographer makes more than $10k per gig depending on how long he/she flies for and where he/she shoots. Photographers who work in remote areas, such as forests or national parks, could make upwards of $20-30 per hour.
An average person is paid $15-$25 an hr in retail. That means you could fly drones for $50-$75 if that's what you desire. There are other opportunities to make more. Most drone pilots fly for companies that require them travel throughout the country, or internationally.
Prices for flights can range from $100 to $300 depending on the amount of time spent flying and the distance covered. This can add up quickly, but if you enjoy flying and love photography, it may be worth it for you.
What equipment do you need to take drone photos?
Drone photography requires more than just flying a plane. Planning and executing a successful drone shoot requires a lot of considerations. It all starts with choosing the right place and determining how much insurance is required to make an aerial shoot a success.
It is important to check that you have permission for drones to be flown in the area where you intend to shoot. You should check to see if there are restrictions on where and how you can fly your drone. You may need to apply to fly your drone in restricted areas if there are.
It is also important to verify the laws in your country. You may need a permit to fly drones in some countries. Others limit the number you can make in a given time period.
A drone pilot license is required. You'll also need to find a safe and secure place to land your drone after every flight. Many local businesses offer landing pads to rent for a fee. You will also get storage space. A dedicated landing pad can also be purchased.
Before you begin shooting, you must decide on the type of drone you want. Different drones have different capabilities and features. Fixed-wing drones are cheaper and easier to control, while multirotors are more powerful, stable, and reliable.
Once you decide which type of drone is best for you, the next step is to determine what equipment you will need. A drone camera usually consists of a gimbal, remote controller, batteries, and memory cards.
A gimbal stabilizes the camera during flight, making it easy to capture sharp images without worrying about shaking hands or dropping the device. The drone's body attaches to the gimbal to ensure that the camera stays steady.
Remote controllers enable you to pilot your drone remotely. These controllers have joysticks and buttons, which allow you to control the drone's direction, speed, direction, and altitude.
Batteries power the drone’s motors and camera, while memory cards store photos taken with the drone. In order to ensure clear shots, ensure you have enough battery life.
After selecting the equipment you will require, you will need to determine where you will be shooting. Do you prefer to shoot outdoors or indoors? Are you going to photograph architecture or landscapes instead? Which area are you going for? These factors will influence how you prepare for your shoot.
You'll need to consider lighting if you're planning to shoot inside. Multiple lights will help lighten a room. Try placing one large light above the subject, another near the middle, and a third closer to the floor.
When outdoors, wind conditions are important. Drone pilots may experience problems if they are blown off course by windy conditions. It is best to take off only when it is calm.
Consider whether additional equipment such as stands or tripods is necessary when you select your location. These items will allow you to keep your drone level so that you don't lose high-quality shots.
For an outdoor shoot, it's advisable to work between 10 am and 4 pm. You won't see too many people during this time but you will still have enough light to take great photos.
Let's conclude that drone photography is more than just fun. It can also be extremely useful for taking stunning aerial photos. These are just a few steps that you can follow to create incredible images.
Is a drone worth the money?
If you are serious about owning your business, then you will soon realize that a great product is vital. You must have a great product if you want to be seen.
The problem with most photographers is that they're not selling themselves. They try to convince someone else to purchase their stuff rather than convincing them to do it.
You won't be allowed to wait for anyone else when you start your own business. You will need to get out there and find customers immediately.
That means you'll need to create a compelling story that helps them figure out why they should buy your products instead of somebody else's.
Also, you will need to create a strategy for marketing these products. Even after all that effort, you may still fail because your product prices are not correct.
You might decide to charge too little. You might decide to charge too much. You're likely to make a mistake regardless of which way you go.
This will help you avoid making costly mistakes. You don't have to become a billionaire. What it means is that you must learn how to value your time, money, and effort.
You must also develop strategies to measure the success of your company.
Once you have a good understanding of pricing, you can now focus on creating the best product possible. A product that's both profitable and creative.
A product that solves real problems and offers real benefits.
One that is different from all others.
Once you've finished building the product, launch it. You'll also be ready to build your brand.
It doesn't matter if you are a professional photographer or amateur, a drone is able to take amazing photos. It will make it easier to start your career as a photographer. It will also help you improve your photography skills. It will also allow you to grow your company.
Which time of the day is best to take drone photos?
A drone could capture aerial images during sunrise and sunset hours when there isn't much activity on the ground.
Drones make great tools for photographing beautiful landscapes and the skies above them. You might not be able to capture spectacular night views because drones are not allowed to fly at night.
If you want to make sure that you capture all the photo opportunities, fly during sunset and sunrise hours. These times allow for stunning shots of nature and are often more popular because there are fewer cars on roads and fewer people.
You'll find that you can shoot at lower levels of light, which makes it easier for you to take pictures without worrying about overexposing.
Furthermore, you don't have to worry about strong winds or rain, snow, fog, or freezing temperatures. These are all factors that make daylight great for photography with a drone.
However, if you want to capture some nighttime scenes, consider flying during moonlit nights. This will give you an unrivalled view of the cityscape.
How do I get started with drone photography?
There are many options for starting to photograph with a drone. The first option is to buy a ready-made drone kit. This kit will contain everything you need for getting started. They cost $200 to $500, depending upon which model you choose.
You can also build your own drone. Although this can be a bit complicated, it's still possible to create something that works well enough to take some decent photos and videos.
A quadcopter is the best choice for anyone who wants to build their own drone. Like conventional helicopters, quadcopters have four rotors or propellers.
A quadcopter is easier to assemble and maintain than a helicopter. It is also more affordable to buy and easier for you to transport.
You'll first need to select the right parts. You will need props, motors, batteries controllers and controllers. Pick the correct size, weight and type.
Next, you will need to choose which type of controller you want. There are many different options, including touch screens, joysticks, and remote controllers. A drone with a built in camera is a good choice.
Once you have selected the correct parts, it's time to assemble your drone. We recommend purchasing a pre-assembled kit to make things easier. However, you can also build your own drone by following a few steps.
Step 1 Attach the battery pack
To begin building your quadcopter, connect the battery to the motor. To start, remove the cover from the battery pack. Next, slide the battery in place.
Step2: Connect the motors
Next, you'll need to install the motors in the appropriate slots. Each motor must be placed in the appropriate slot. When installing the motors, make sure they face forward and are perpendicular to the frame.
Step3: Installing the propeller
You will then need to attach your propellers onto the frame. Be sure to place them at equal distances.
You are now ready to test the drone. If the engine does not move, ensure that the propellers are facing forward. Also, ensure that there aren’t obstructions between propellers.
What is best drone for photography?
Drones can be used for a variety of purposes, including aerial photography, filming movies, and even delivering packages. What makes drones so useful? Drones have two main advantages. They are versatile and easy to use. There are thousands of ways to use drones. They can be used for just about any task you might use a regular camera for. They are also easy to operate. If you have flown a quadcopter before, you already know how simple it is to fly a drone.
Drones also have the ability to capture stunning images. Amazing photos can be captured by drones in places you would not normally visit. These include remote locations where you may be exposed to danger.
Drones are so easy to operate, so anyone can learn how to pilot one quickly. Once you've mastered the basics you can fly your drone and take stunning photos no matter where it takes you. So if you are interested in taking better photographs, check out our drone range today.
Statistics
Homes with aerial images sold 68% faster than homes with standard images. (alexdronephotography.com)
A grey card is just a piece of thick paper that is a specific shade of grey (18%), which will be the foundation on which we choose our color temperature. (dronegenuity.com)
60 second video with branding, captions, contact information, and music Strip / Convenience / Neighborhood / Community Centers pricing per center (up to 400,000 sq ft) PLACE ORDER (dronebase.com)
Here's proof: according to an analysis of FAA drone registration numbers by drone market research and data group Drone Industry Insights, DJI had a 76.8% market share in the U.S. (thedronegirl.com)
Among the biggest improvements, the Skydio 2+ has over the standard 2 is a 20% longer battery life, longer range if you add the Beacon, and a neat AI video creation tool called Keyframe. (thedronegirl.com)
Two main types of cameras are commonly used when making time-lapses: DSLRs (Digital Single Lens Reflex), that are usually more expensive than point and shoot digital cameras.
DSLR cameras produce images that are more high-quality due to how light enters them. They are not ideal for video because they require manual focus, exposure and exposure settings.
It is easier for beginners to use point and shoot cameras such as those made of GoPro. Videos will look grainy because of the lower resolution.
A consumer drone is the best camera to time-lapse. These tiny flying robots are a popular alternative to professional drones.
A drone is a remotely controlled aircraft that can fly autonomously and without human intervention. A drone typically uses a single propeller to fly, although quadcopter drones may have multiple propellers.
A drone can provide aerial footage as well as cinematic shots. You can equip your drone with a stabiliser to capture smooth handheld footage.
You can create a time lapse by recording the drone above your subject. The sky won't appear dark during the shot if the sun isn't directly overhead.
The aperture and shutter speed can be adjusted to create the desired effect. To capture a sunset, you might set the shutter speed at 30 seconds, and open the aperture wide to let in as much natural sunlight as possible.
You should use the opposite approach for night shots. To reduce light entering the camera, slow the shutter speed to 1 second and then close the aperture. This produces a bright image that makes details visible.