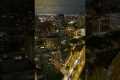
Soar above the heart of New York City with breathtaking drone footage capturing Midtown Manhattan’s most iconic landmarks! From the ultra-modern skyscrapers of Hudson Yards to the timeless grandeur of the Empire State Building, this aerial journey showcases the city's incredible skyline as it sits on the West Side.
Watch as the camera glides over the historic New Yorker Hotel, hovers above the legendary Madison Square Garden, and reveals stunning views of the bustling streets below. Whether you're a fan of architecture, a lover of NYC, or just craving a cinematic escape, AeroCineFilms delivers an unforgettable perspective of the NYC.
By: AEROCINE Films Title: Midtown NYC Drone Footage - Hudson Yards, Luxury Real Estate, The New Yorker, Empire State Sourced From: www.youtube.com/watch?v=g3BsPhcstxc
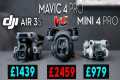
Check out the 3 most popular drones on Amazon in 2022
Frequently Asked Questions
Is there a good place to take photos from a drone?
Drones are a great tool for taking stunning photos of nature and landscapes. Drones are perfect for both close-up shots and stunning photos of wildlife like butterflies and birds.
The best locations to use drones include mountains, deserts, lakes, oceans, beaches, and cities. Drone enthusiasts love to capture picturesque views of their home and other local attractions.
To discover new areas, you should shoot at night when the lights illuminate it. You might also consider shooting in other seasons, especially during winter when there is snow on the ground.
What drone can be used to take aerial photos?
You have two choices if your goal is to fly. You can either rent or buy a large camera package that includes a stabilizer and gimbal, or you could purchase a more expensive camera package.
If you are planning to shoot a film or video, the first option is ideal because you have complete control over how your shots look. The second option will require you to pay more for the pilot and make you more dependent on him.
What happens when you want to make sure that your shot looks flawless even though it's not your camera? Drones can help you achieve this.
A drone is a small aircraft that can fly autonomously and take photos or video without any input from the operator.
They are extremely versatile and can fly very close to buildings to capture images and record footage. They can also fly low over crowds to capture pictures of people.
Drones are incredibly useful for aerial photography and videography. They're also great marketing tools because you can create amazing visuals without having to use a lot of equipment and manpower.
You can easily place them in strategic locations to capture stunning imagery. They can also be flown remotely making them very easy to use.
For example, some companies hire drones for weddings. These wedding photographers can use their drones to fly above the ceremony area and capture amazing photos of the bride & groom.
They can also fly them over to guests and capture portraits of loved ones. They can fly them to the reception area to capture stunning views.
These activities are perfect for promotional material and event coverage. You can also make short films with drones. To show clients why you are better than theirs, you could use one.
These are all reasons drones have become increasingly popular in aerial photography and videography. A drone could be your answer to professional photography.
Which drone is best for photography
Drones are an exciting technology used in various ways, from aerial photography to filming movies and even delivering packages. What makes drones so useful? Well, there are two main reasons why drones are so popular now. Firstly, they are incredibly versatile tools. Drones can be used for thousands of purposes. You can use them for almost every task that you would normally use a camera to accomplish. They are also easy to operate. You already know how easy it is to fly quadcopters if you've flown one before.
Drones also have the ability to capture stunning images. Amazing photos can be captured by drones in places you would not normally visit. These include remote areas where you could potentially fall into dangerous situations.
Drones require very little skill to operate. Once you master the basics, you can use your drone to shoot incredible photos wherever you may be. You can check out our drone line if this interests you.
What do you need for drone photography?
Drone photography goes beyond just using a drone to take pictures. Planning and executing a successful drone shoot requires a lot of considerations. The right location is key to making sure you have enough insurance to cover your aerial shoot.
It is important to check that you have permission for drones to be flown in the area where you intend to shoot. This means finding out whether there are any restrictions on where you can fly and where you can operate your drone. If there are, you may need to apply for a license to fly them in these areas.
It is important that you check your country's regulations. Some countries require permits to fly drones. Others limit how many flights you can make in a specific time.
Not only will you need permission to fly drones but also where to safely land your drone after each flight. You can rent a landing spot from local businesses for around $10 per hour. Also, you will have storage space. Another option is to buy a dedicated landing platform.
Before you even begin shooting, you'll need to decide what drone you'd like to use. Different drones come with different features and capabilities. For example, fixed-wing drones are typically less expensive and easier to handle, while multirotors have more power and stability.
You will first have to decide on the type of drone that you want. Then, you need to decide what equipment you need. A drone camera usually consists of a gimbal, remote controller, batteries, and memory cards.
Gimbals are used to stabilize the camera when it's in flight. They make it possible to take sharp pictures without worrying about the device falling or being shaken. To keep the camera stable, the gimbal attaches directly on the drone's body.
Remote controllers allow you to control your drone from anywhere. These devices include joysticks and buttons that let you move the drone forwards, backward, left, and right and adjust its altitude.
The drone's motors are powered by batteries, and the cameras have memory cards that store images taken by the drone. In order to ensure clear shots, ensure you have enough battery life.
After you have selected the equipment, it is time to decide where you will shoot. Are you going to be shooting indoors or outside? Are you going to be shooting landscapes or architecture? What are you planning to shoot? All of these factors impact how you should prepare for your shoot.
Lighting is an essential part of indoor photography. Multiple lights can be used to brighten a room. One large light should be placed above the subject, one near the middle and another closer to the floor.
Outdoors, you'll need to consider wind conditions. Drone pilots can be blown off-course by windy days. Take off only when the weather permits.
If you are going to be bringing extra equipment like tripods or stands, consider whether this is something that you will need. These items will keep your drone stable and allow you to capture high quality images.
For an outdoor shoot, it's advisable to work between 10 am and 4 pm. Although there won’t be as many people around at this time, it will still provide enough light for stunning photos.
Drone photography is not only fun, but also extremely useful in capturing breathtaking aerial photos. You can create amazing images by following a few simple steps.
How do you get started with drone photography
There are many ways to get started with drone photography. First, you can buy a pre-made drone kit. This will include everything you need to get started. They range from $200 to $500, depending on the model.
You can also build your own drone. Although this can be a bit complicated, it's still possible to create something that works well enough to take some decent photos and videos.
If you are interested in building your drone, we recommend you begin with a quadcopter. Quadcopters have four propellers (or rotors) as opposed to two like traditional helicopters.
A quadcopter can be assembled and maintained in a much shorter time than a helicopter. It is also less expensive to buy and easier to transport.
You'll first need to select the right parts. You'll need to purchase motors and batteries, controllers, as well as props. Pick the correct size, weight and type.
Next, you will need to choose which type of controller you want. Many different types are available, such as joysticks, touch screens, and remote controls. It is recommended to buy one with a builtin camera so that you don't need to attach another device to your drone.
Once you've picked the right parts you can start assembling your drone. Pre-assembled kits are recommended to make it easier. However, if you prefer to build your own, you'll need to follow a few steps before assembling your drone.
Step 1: Attach battery pack
For your quadcopter to be built, you'll need the battery pack connected to the motor. To begin, remove the cover plate at the bottom of your battery pack. Next, slide the battery in place.
Step 2: Connect the motors
Next, mount the motors to the right slots. Each motor must be placed in the appropriate slot. Make sure the motors are facing forward when installing them.
Step 3: Install your propeller
The propellers will need to be attached to the frame. Be sure to place them at equal distances.
After completing all these steps, you're finally ready to test your new drone! If there is no movement when the engine turns on, check that the propellers point forward. Also, make sure that there are no obstructions between the propellers.
What information should I have about drone photography laws?
Drone flights can be regulated by Federal Aviation Administration. Local laws might also apply to drone flight operations. You can check with your state's transport department to find out what rules govern drone flights.
Drone owners must obtain a FAA license in most cases. The FAA has guidelines for licensing. These guidelines are available for more information.
In certain states, drone operators are required to register their drones at the government. To learn more, visit our Guide to Drone Registration.
What type of drone are professionals using?
Drones are an amazing tool for aerial photography. They are invaluable for taking aerial photos and recording video footage. They are useful when taking measurements and surveying land.
These devices are commonly used commercially, such as to map large areas or check construction sites. But they have many other uses.
Drones can also be great entertainment for friends and family. There are countless ways to fly these machines and explore new places. Drones can also be used to capture photos and videos of special events or celebrations.
When it comes to drones, the sky is your limit. If you've been wondering how to make the most out of your flying machine, keep reading to learn more about these incredible tools.
Statistics
Greater than 50% throttle stick position generates positive thrust, but less than 50% throttle stick position reverses the direction of the motors, allowing upside-down flying! (photographypro.com)
Though the Mavic 3 is about 50% heavier than the Mavic Air 2, it's still conveniently sized. (nytimes.com)
60 second video with branding, captions, contact information, and music Strip / Convenience / Neighborhood / Community Centers pricing per center (up to 400,000 sq ft) PLACE ORDER (dronebase.com)
Again, no stabilization is applied, and the 50% throttle stick position cuts the power to the motors. (photographypro.com)
Here's proof: according to an analysis of FAA drone registration numbers by drone market research and data group Drone Industry Insights, DJI had a 76.8% market share in the U.S. (thedronegirl.com)
Two main types of cameras are commonly used when making time-lapses: DSLRs (Digital Single Lens Reflex), that are usually more expensive than point and shoot digital cameras.
Due to the way light enters the camera, DSLR cameras tend to produce better-quality images. Videography is not as easy because you need to manually focus and adjust the exposure.
Easy to use, point-and shot cameras, like those made by GoPro. However, the lower resolution means videos look grainy.
A consumer drone is the best camera for time-lapsing. These small flying robots are popular because they provide an affordable alternative to professional drones.
A drone is an autonomous remote-controlled aircraft that can fly without the need for human intervention. A drone generally uses one propeller to fly. Quadcopter drones could have multiple propellers.
Drones can be used to capture cinematic footage from a bird's-eye view. To capture smooth handheld footage, drones can be outfitted with a stabilizer.
For a time-lapse effect, you can start recording while your drone hovers above the subject. If the sun doesn't directly over the subject, the sky won't look dark during the shot.
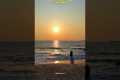
To achieve the desired effect you can adjust your shutter speed and aperture. To capture a sunset, you might set the shutter speed at 30 seconds, and open the aperture wide to let in as much natural sunlight as possible.
Night shots can be shot using the opposite approach. To reduce light entering the camera, slow the shutter speed to 1 second and then close the aperture. This technique creates a bright image where details are visible.