Tianzhu Mountain is a mountain range located in Qianshan, Anqing City, Anhui Province. It is named because its main peak is like a pillar leaning against the sky. Tianzhu Mountain is also known as Wanshan Mountain and Wangong Mountain. It was called Huoshan Mountain and Hengshan Mountain in ancient times. It is known as "the first mountain in Jianghuai" and "the ancient Nanyue". Tianzhu Mountain is a gathering place for ancient Anhui culture.
Tianzhu Mountain presents natural landscapes such as strange peaks, strange rocks, secluded caves, and canyons. It is famous for its majesty, strangeness, spirit, and beauty. Tianzhu Mountain is lush with vegetation, with a forest coverage rate of up to 97%. The negative oxygen ions, which are known as "air vitamins", are three times the highest national level I standard. The great Tang Dynasty poet Bai Juyi praised in his poem "Ti Tianzhu Peak": "Tianzhu Peak holds up the sun and the moon, and the cave gate is thousands of feet high and locks the clouds and thunder. **"Live View China" - Your Gateway to Authentic Chinese Beauty**
Immerse yourself in the breathtaking landscapes and vibrant cityscapes of China with "Live View China"! We bring you a meticulously curated collection of live video streams, captured by our own cameras and trusted sources, offering a real-time window into the heart of China.
**What We Offer:** - **From Serene to Dynamic:** Witness the tranquil beauty of natural wonders and the pulsating energy of urban hubs, all in one place. - **Real-Time Exploration:** Experience the authentic essence of China as it unfolds, from sunrise over misty mountains to the glittering skyline of bustling metropolises. - **Captivating Scenes:** Discover the most enchanting and picturesque locations across the country, each frame a testament to China's diverse and stunning landscapes.
**Why Choose Us?** - **Exclusive Access:** Our unique blend of proprietary and selected feeds ensures a fresh and unparalleled viewing experience. - **Diverse Perspectives:** From the quiet charm of rural villages to the dynamic rhythm of city life, we cover it all. - **Immersive Experience:** Feel the pulse of China through high-definition streams that bring you closer to the action, no matter where you are.
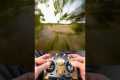
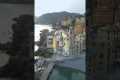
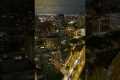
By: Real Live View CHN Title: Most places in the china mystery places #explore #nature #beautiful # adventure # photography Sourced From: www.youtube.com/watch?v=eGm-NEZmYTA
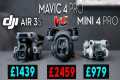
Look at the 3 best drones on Amazon Today!
Frequently Asked Questions
What are the advantages of drone photography?
Drone photography is a great way to capture images as well as video. You should be aware of the potential downsides of flying a small aircraft.
The biggest disadvantage of flying drones are their cost. Depending on the type of drone you purchase, it could set you back hundreds or even thousands of dollars.
Flying a drone requires training and certification, so you'll need to invest time and money to learn how to operate them safely.
Another downside is safety. Drones are extremely dangerous because they require constant maintenance. Drones can be dangerous because they require constant maintenance and repair.
You might find that you spend more time operating a drone than actually capturing photographs or recording footage. A drone can be difficult to fly because of limited airspace.
Some local governments limit where you can fly your unmanned aircraft vehicle. For example, you can not fly above 400ft or within five mile of any local airports, stadiums and hospitals.
Drones might not be right for everyone. Some people feel uneasy about flying these machines because they fear they might crash or fall out of the sky. Others are concerned that they may accidentally hit someone or something else.
If you don't feel comfortable flying a helicopter, you may want to stick with traditional aerial photography and videography techniques.
What do you need for drone photography?
Drone photography is more than just flying a camera. It is important to plan and execute a successful drone shooting. From choosing the right location to determining how much insurance you need to carry out a successful aerial shoot.
It is essential to make sure you have permission to fly drones within the area you are planning to shoot. This means finding out whether there are any restrictions on where you can fly and where you can operate your drone. If there are, you might have to apply for a permit to fly them in the area.
You should also check which regulations are in place in your particular country. Some countries require permits to fly drones. Others limit how many flights you can make in a specific time.
Not only will you need permission to fly drones but also where to safely land your drone after each flight. You can rent a landing spot from local businesses for around $10 per hour. Also, you will have storage space. Another option is to buy a dedicated landing platform.
Before you begin to shoot, you will need to decide which drone you want. Different drones are equipped with different capabilities. For example, fixed-wing drones are typically less expensive and easier to handle, while multirotors have more power and stability.
You will first have to decide on the type of drone that you want. Then, you need to decide what equipment you need. A drone camera usually consists of a gimbal, remote controller, batteries, and memory cards.
The camera is stabilized by the gimbal during flight. To ensure the drone stays stable, the gimbal attaches to its body.
Remote controllers permit you to control your drone remotely. These devices come with joysticks as well as buttons that allow the drone to be moved forward, backward, left, right, or left. You can also adjust its altitude.
Batteries power the drone’s motors and camera, while memory cards store photos taken with the drone. To ensure that the drone takes clear pictures, you'll need to ensure sufficient battery life.
Once you've selected the equipment you'll need, you'll need to figure out where you'll shoot. Do you prefer to shoot outdoors or indoors? Do you plan to shoot architecture or landscapes? What are you planning to shoot? All these factors influence the way you need to prepare for your shoot.
If you are planning on shooting inside, lighting will be an issue. Multiple lights are the best way of lighting a room. Try placing one large light above the subject, another near the middle, and a third closer to the floor.
Outdoors, you'll need to consider wind conditions. Drone pilots can be blown off-course by windy days. You should always take off only when the weather is calm.
If you are going to be bringing extra equipment like tripods or stands, consider whether this is something that you will need. These items will help you keep your drone level stable, so you don't lose quality shots.
An outdoor shoot should be between 10 am to 4 pm. This time there won't many people, but enough light will allow for great photos.
Let's conclude that drone photography is more than just fun. It can also be extremely useful for taking stunning aerial photos. Follow these simple steps to create stunning images right away!
Can drone photography make you money?
If you want to make money flying drones, the problem is that there isn't a product that will solve your problems. The experience is less enjoyable if there's no quality software and equipment.
You also have to worry about insurance costs and liability issues, so most photographers will stick to taking pictures from the ground. We're talking about a new way to capture images that could lead to you being paid.
Drones work in the same way that video cameras do by capturing light. Why not make amazing photos with the same technology?
Companies are making huge strides towards creating high-quality photos taken from the sky. We've previously discussed DJI and GoPro. We're seeing more companies in the space.
These cameras are great for ground photography even though they were made for aerial photography. Every major manufacturer is investing heavily in the development and maintenance of their imaging technologies.
This means that you'll eventually be able to buy a drone that shoots 4K videos and takes incredible photographs. This could be already happening. DJI is one of the companies that has started to release higher-resolution Phantom series drones.
DJI just released the Inspire 2 camera, which has a 12-megapixel sensor and can capture images at 5120 x 35656 pixels. You can also shoot 8-bit RAW files at 30 frames/second if you wish.
You can indeed make money selling drone photos.
Which drone is used for aerial photography?
There are two options if you want to do aerial photography. Either you can rent a small remote-controlled helicopter, or you can buy an expensive camera set with a gimbal stabilizer.
If you are planning to shoot a film or video, the first option is ideal because you have complete control over how your shots look. With the second option, you'll have to pay more and be much more dependent on the pilot.
What happens if the shot doesn't look perfect? This is where drones come into play.
A drone can be described as a tiny, unmanned aircraft that can fly independently and take photos and videos without being directed by its operator.
They are versatile and can fly close to structures and buildings to capture photos or film footage. They can also fly low above crowds to take pictures of people.
Drones can be used for video and aerial photography. You can also use them to market your business by creating amazing visuals that don't require much manpower or equipment.
It is easy to place them in strategic spots to capture beautiful imagery. You can fly them remotely, which makes it easy to operate.
Some companies even hire drones to photograph weddings. These drone-flying wedding photographers can capture stunning photographs of the bride or groom from above the ceremony area.
Or, they can fly them over to guests to capture portraits of family members. They can fly them to the reception area to capture stunning views.
These activities are great for event coverage or promotional material. Drones are also great for making short films. A drone could be used by you to show clients your company is better than theirs.
For all these reasons, drones are becoming increasingly popular for aerial photography and videography. A drone could be your answer to professional photography.
How do I get started with drone photography?
You have many options to begin photographing with a drone. A ready-made drone package is the first choice. This will include everything you need to get started. They range from $200 to $500, depending on the model.
A drone can also be built. Although this is not an easy task, it is possible to still create a drone capable of taking decent photos and videos.
If you are interested in building your drone, we recommend you begin with a quadcopter. As found on conventional helicopters, a quadcopter has four rotors (or propellers) instead of two.
It is much easier to assemble and maintain a quadcopter than a helicopter. It's also cheaper to purchase and easier to carry around.
You'll first need to select the right parts. Motors, batteries and controllers are all required. Be sure to select the right size and weight.
Next, decide which controller you would like to use. There are many different options, including touch screens, joysticks, and remote controllers. A drone with a built in camera is a good choice.
Once you have selected the correct parts, it's time to assemble your drone. We recommend purchasing a pre-assembled kit to make things easier. If you would prefer to build your drone yourself, there are a few things you need to do.
Step 1 Attach the battery pack
To begin building your quadcopter, connect the battery to the motor. First, remove the cover plate from the bottom of the battery pack. Next, slide your battery into place.
Step 2 Connect the motors
Next, you will need to place the motors within the proper slots. Each motor needs to be installed in its respective slot. Install the motors facing forward, perpendicular and in the designated slot.
Step 3: Install the propeller
The propellers will need to be attached to the frame. You should position them at equal distances.
After completing all these steps, you're finally ready to test your new drone! If you see no movement when you turn on the engine, double-check that the propellers are facing forward. Make sure the propellers are free from obstructions.
Is a camera drone worth it?
A great product is the most important thing if you want to start your own business. You must have a great product if you want to be seen.
Many photographers don't know how to sell themselves. They try to convince someone else to purchase their stuff rather than convincing them to do it.
If you are running your own company, it won't make sense to wait around for others. You'll need to start looking for customers right away.
It is necessary to tell a compelling tale that explains why people should choose your products.
You'll also need to come up with an effective strategy for marketing those products. You might still fail if you don't price your products correctly, even after all this.
There are two options. You might decide to charge too much. Either way, if you don’t know what your charges are, you’re most likely making a mistake.
This will help you avoid making costly mistakes. You don't have to become a billionaire. What it means is that you must learn how to value your time, money, and effort.
Additionally, strategies must be developed to measure success in your business.
Once you know the price, you can start building the best product. You want a product that is both creative and financially viable.
It solves problems, and it provides real benefits.
One that stands out from the rest.
And once you've built that product, you'll be ready to launch it. Your brand will be built.
It doesn't really matter if your goal is to fly a drone or not. Because it will help you get started as a photographer. You will be able to improve your skills. It will also help you to grow your business.
How to fly my drone?
Practice is key to flying a drone. Pilots need to practice flying drones. They are far more stable than regular aircraft. If you are a beginner, it is advisable to practice indoors and close to your home.
There are three essential skills that you need to know in order to fly a Drone. These skills include hovering, taking off and landing.
Take Off
The drone will take off by simply being lifted into the air. To do this, press the button on the controller until the drone starts moving upward. Stop pushing the button when the drone reaches a desired height.
Hovering
Hovering is a way to keep the drone still in midair. To hover, press and hold the left or the right triggers. To tilt the drone, hold down both triggers and press the throttle.
Landing
Landing is the act of returning the drone safely to earth. To land, let go of the throttle and gently tilt the controller towards the ground. This will cause the drone to slow down and eventually land.
Flying your drone is a matter of comfort. You must be careful not that your drone crashes into anything.
Statistics
60 second video with branding, captions, contact information, and music Strip / Convenience / Neighborhood / Community Centers pricing per center (up to 400,000 sq ft) PLACE ORDER (dronebase.com)
Here's proof: according to an analysis of FAA drone registration numbers by drone market research and data group Drone Industry Insights, DJI had a 76.8% market share in the U.S. (thedronegirl.com)
A grey card is just a piece of thick paper that is a specific shade of grey (18%), which will be the foundation on which we choose our color temperature. (dronegenuity.com)
Regional & Super Regional Centers pricing per center (400,000+ sq ft) PLACE ORDER (dronebase.com)
Compared to the old days of the Phantom, this drone is super small, but it will likely require you to check a bag, the way a Mini 3 Pro could easily stow away in an oversized pocket. (thedronegirl.com)
When making time-lapses, there are two main types of cameras commonly used - DSLRs (Digital Single Lens Reflex), which are generally more expensive than point-and-shoot digital cameras.
The way light enters DSLR cameras can also make them produce better quality images. They are not ideal for video because they require manual focus, exposure and exposure settings.
For beginners, point-and-shoot cameras such as the GoPro are simpler to use. However, videos with lower resolutions look grainy.
A consumer drone is the best camera to time-lapse. These tiny flying robots are a popular alternative to professional drones.
A drone is a remotely controlled aircraft that can fly autonomously and without human intervention. A drone typically uses a single propeller to fly, although quadcopter drones may have multiple propellers.
Drones can be used to capture cinematic footage from a bird's-eye view. You can equip your drone with a stabiliser to capture smooth handheld footage.
To create a time-lapse, start recording while the drone hovers above your subject. If the sun isn’t directly overhead, the sky won’t appear darken during the shot.
You can adjust the shutter speed and aperture to achieve the desired effect. For example, you could set your shutter speed to 30 seconds for a sunset shot and keep the aperture wide open in order to capture as much natural daylight as possible.
Night shots can be shot using the opposite approach. For night shots, use a slow shutter speed of 1 sec and close the aperture to reduce light ingress. This technique creates a bright image where details are visible.