Thank you for supporting the weekly flyovers.* Your contributions go towards RGV Flyovers and all associated expenses.
Starbase Weekly Live Streams Join us for the Starbase Weekly Live stream, where we discuss ground and aerial* photos taken during the week. Starbase Weekly Live occurs at 12pm CT every Saturday.
Additionally, Patreon and YouTube tiered members receive perks, including the exclusive invite to join us in Discord before, after, and during the live stream and Show & Tell events.
Appreciation & Gratitude Thank you again for supporting RGV Aerial Photography. Without your support it would be almost impossible to complete a flyover each week as it is your support that allows RGV Aerial Photography owner and photographer, Mauricio, to be wheels up each week. And for his YouTube and Patreon supporters, We are able to provide over 500 aerial and ground photos combined each week!
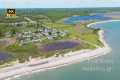
All Flyovers photos are taken above 10,500 ft. while flying in a Cessna Skyhawk aircraft.
*Flyovers are dependent on favorable weather conditions.
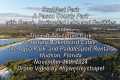
Timestamps:
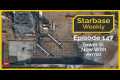
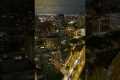
By: RGV Aerial Photography Title: Starbase Weekly, Ep.149: Post-Launch Flyover + Pad B Progress! Sourced From: www.youtube.com/watch?v=wFXkmfYDYf8
Here are the 3 most popular drones on Amazon while they're on sale
Frequently Asked Questions
Which drone can hold a DSLR camera?
Drones have become more practical for everyday tasks. Already, drones are equipped with cameras capable of aerial photography.
Drones have been around since the beginning of time, but they are not practical for most people. Drones are expensive and noisy, making them difficult to control.
The Drone-A1 is a result of this. It's the world's first fully autonomous quadcopter designed specifically for photographers.
The Drone-A1 has an HD camera which can capture stunning photos and video. Thanks to its powerful onboard processor, the Drone-A1 is able to follow a subject with no human intervention.
This allows you to concentrate entirely on capturing amazing images while the Drone-A1 takes over flying, hovering and following along with your subject.
Smart Follow makes it easy to get amazing shots using the Drone-A1. Point the Drone-A1 toward your subject. It will automatically track them and maintain distance between you.
The Drone-A1 will give you freedom and convenience while shooting. The Drone-A1 will eliminate the need for you to have a steady hand and know exactly where your subject goes.
The Drone- A1 also has a GPS, which allows you to share photos with family and friends. You can view all of your photos anywhere you are in the world.
The Drone-A 1 drone is great for amateur photographers or for casual photography.
How can I get started in drone photography?
There are several ways to start photographing using a drone. The first is to purchase a ready-made drone set. This will include everything you need to get started. They vary in price from $200 to $500 depending upon the model.
Other options include building your drone. Although this is not an easy task, it is possible to still create a drone capable of taking decent photos and videos.
For those who want to try building their drone, we recommend starting with a quadcopter. A quadcopter, like conventional helicopters has four propellers or rotors instead of the usual two.
A quadcopter is easier to assemble and maintain than a helicopter. It is also less expensive to buy and easier to transport.
You'll first need to select the right parts. You'll need motors, batteries, controllers, and props. You should choose the right size and weight.
Next, you will need to choose which type of controller you want. There are many different options, including touch screens, joysticks, and remote controllers. A built-in camera is an option, as you don’t need to attach a separate device. We recommend buying one.
Once you have selected the correct parts, it's time to assemble your drone. We recommend purchasing a pre-assembled kit to make things easier. However, you can also build your own drone by following a few steps.
Step 1 Attach the battery pack
You'll need to connect the battery pack to the motor to start building your quadcopter. To begin, remove the cover plate at the bottom of your battery pack. After that, slide in the battery.
Step 2 Connect the motors
Next, mount the motors to the right slots. Each motor should be installed in its own slot. Make sure the motors are facing forward when installing them.
Step3: Install the propeller
Attach the propellers to your frame. Be sure to place them at equal distances.
You are now ready to test the drone. If there is no movement when the engine turns on, check that the propellers point forward. Also, make sure that there are no obstructions between the propellers.
Is it safe to fly a drone in the night?
Drones have become more and more popular. Drones provide amazing aerial photos of our homes and businesses. They can also be used to survey large areas and deliver goods. However, drones still have very few regulations. Some states in America have banned drones completely, while others have put restrictions on their operation.
Drones that are flown during daylight hours are quite safe. However, night-time operation can pose dangers. Your safety and that of other pilots may be endangered if you fly your drone at night. This is because drones are difficult to see obstacles and hazards. Pilot errors could result in an accident.
Drones are becoming increasingly popular; therefore, we must learn how to operate them safely. There are two main types currently: fixed-wing or rotary-wing drones. Fixed-wing drones can be controlled more easily than rotary wing models. A fixed-wing model usually has four propellers, whereas a rotary-wing model has a single rotor.
You should be familiarized with all local drone laws to avoid any mishaps. You should also ensure your drone is equipped with lights. Make sure they flash red or green. This makes it much easier to spot objects that might threaten you. If you intend to photograph, it is important to protect your lens. It is also a good idea to use protective goggles when flying your drone.
Flying drones at night poses a number of dangers, including collisions with power lines, trees, and buildings. Drones also have the potential to become lost, or even fall out of sight. You must ensure your drone is not in danger of being tripped up or falling from the sky. Drones are also susceptible to wind gusts and sudden changes in weather conditions. These conditions can cause your drone to lose control and crash land.
Drones have become increasingly popular, but there are possible health risks. These drones can emit noises that can cause hearing loss and headaches. The vibrations from drones can also cause harm to the body. Flying drones without a license can result in fines and legal action.
These guidelines will help you avoid any drone accident. You must keep your drone within your direct line of sight when flying it. If you are flying near airports, make sure that you obey any restrictions imposed by airport authorities. Flying your drone over water increases the risk of a collision.
Which drone should a beginner buy?
It is easy to fly a drone, and the best drones for beginners. These include drones with an FPV (first person view) camera. This allows you to remotely control your drone from your smartphone.
Some quadcopters have been specifically designed to be used for aerial photography. A multirotor model might be a better choice if you want to explore advanced features, such as obstacle avoidance or autonomous flight mode.
There are two types: the cheap drones that cost less than $100 and the more expensive drones that cost over $300.
The cheapest models often have limited range and battery life. But the best models are more reliable and can fly longer distances.
The majority of beginners prefer to start with the cheaper options, as they are more easy to use and manage. If you intend to fly your drone for hours, however, you might consider buying a more expensive model.
Statistics
Again, no stabilization is applied, and the 50% throttle stick position cuts the power to the motors. (photographypro.com)
60 second video with branding, captions, contact information, and music Strip / Convenience / Neighborhood / Community Centers pricing per center (up to 400,000 sq ft) PLACE ORDER (dronebase.com)
Homes with aerial images sold 68% faster than homes with standard images. (alexdronephotography.com)
Among the biggest improvements, the Skydio 2+ has over the standard 2 is a 20% longer battery life, longer range if you add the Beacon, and a neat AI video creation tool called Keyframe. (thedronegirl.com)
Here's proof: according to an analysis of FAA drone registration numbers by drone market research and data group Drone Industry Insights, DJI had a 76.8% market share in the U.S. (thedronegirl.com)
The best distance for a drone to travel is when it becomes an extension or part of you. It is possible to lose sight physical boundaries of the drone if you begin to view it as a separate entity.
For drones, a good distance allows you to fully immerse your self in the environment without having to worry about where the drone is going next.
It also has psychological benefits. It allows us to have more control over our surroundings and helps us feel closer with nature.
There is also a downside. The drone could be damaged if it is flying too close to the ground. So how far away do you fly?
It depends on the drone type you have. The rule of thumb for aerial footage and filming landscapes is to hover at least 500ft above the ground.
For example, if you are filming a cityscape, you might want to keep it at 1,000 feet. This way, you can avoid buildings and trees that would otherwise block your view.
Low-light conditions are a problem for drones. To reduce hovering time when flying in the darkness, lower the altitude.
Also, ensure your area is clear from any obstructions, such as power lines or traffic signs.
Also, you might consider flying during daylight instead of at nights. This allows you to avoid reflections due to street lights or shadows.
The drone's size is another important consideration. The further it is from the ground the bigger the drone. For example, a large quadcopter will usually require a minimum height of 300ft.
You should never miss the golden hour if you are looking for great drone footage.
This is between 3 and 6 p.m. This time you will have the most visibility from direct overhead sunshine.
It is also known as "magic hour", and it's perfect for taking beautiful photos.
You should not fly your drone between sunset and sunrise. These times are known to cause poor-quality footage.