Thank you for supporting the weekly flyovers.* Your contributions go towards RGV Flyovers and all associated expenses.
Starbase Weekly Live Streams Join us for the Starbase Weekly Live stream, where we discuss ground and aerial* photos taken during the week. Starbase Weekly Live occurs at 12pm CT every Saturday.
Additionally, Patreon and YouTube tiered members receive perks, including the exclusive invite to join us in Discord before, after, and during the live stream and Show & Tell events.
Appreciation & Gratitude Thank you again for supporting RGV Aerial Photography. Without your support it would be almost impossible to complete a flyover each week as it is your support that allows RGV Aerial Photography owner and photographer, Mauricio, to be wheels up each week. And for his YouTube and Patreon supporters, We are able to provide over 500 aerial and ground photos combined each week!
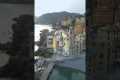
All Flyovers photos are taken above 10,500 ft. while flying in a Cessna Skyhawk aircraft.
*Flyovers are dependent on favorable weather conditions.
Timestamps:
By: RGV Aerial Photography Title: Starbase Weekly, Ep.151: Pad B Flame Diverter Installation Imminent! Sourced From: www.youtube.com/watch?v=yAtOLUgFIyA
Look at the 3 best drones on Amazon while they're on sale
Frequently Asked Questions
Which drone can be used for aerial photography
Two options are available if you plan to do aerial photography. Either buy an expensive camera package with a gimbal stabilizer or rent a small remote-controlled helicopter.
The first option is great for those who plan to film a video or film. It gives you full control over the final shots. The second option will require you to pay more for the pilot and make you more dependent on him.
What happens if the shot doesn't look perfect? That's where drones come in.
A drone is a small aircraft that can fly autonomously and take photos or video without any input from the operator.
They're extremely versatile and fly close to buildings and structures to capture images or record footage. They are also capable of flying low above crowds in order to take photos of people.
Drones can be used for video and aerial photography. Drones are also great for marketing, as they can be used to create stunning visuals that would otherwise take a lot more manpower and equipment.
You can easily place them in strategic locations to capture stunning imagery. They can also be flown remotely making them very easy to use.
For example, some companies hire drones for weddings. These drone pilots can fly over the ceremony area to capture incredible photographs of the groom and bride.
They can also fly them directly to the guests to capture family portraits. They can also fly them over reception areas, capturing beautiful views of your venue.
These activities are perfect to make promotional material or event coverage. You can also make short films with drones. A drone could be used by you to show clients your company is better than theirs.
For all these reasons, drones are becoming increasingly popular for aerial photography and videography. A drone could be your answer to professional photography.
What drone can take a DSLR?
Drones are becoming more indispensable for daily tasks. There are already drones outfitted with cameras that can do aerial photography.
Drones have been around since the beginning of time, but they are not practical for most people. Most drones are too expensive, noisy, and hard to control.
The Drone-A1 is a result of this. The Drone-A1 is the first quadcopter that can autonomously fly and was specifically made for photographers.
The Drone-A1 has an HD camera which can capture stunning photos and video. Due to its powerful computer onboard, the Drone-A1 will follow a subject seamlessly without any human intervention.
You can now focus on taking great photos while the Drone-A1 will take care of hovering, flying and following your subject.
Amazing shots can be captured with the Drone-A1 thanks to Smart Follow. Point the Drone-A1 at your subject and it will automatically track and keep you separated.
You will have more freedom and greater convenience shooting with the Drone-A1. There's no need to be a steady hand or know where your subject is.
You can also share your photos with loved ones using the built-in GPS on the Drone- A1. Everyone can see your photos from any location in the world.
The Drone-A 1 is the perfect drone for professional photographers and amateurs alike.
How do you fly your drone?
You need to practice flying a drone. Even though drones are very stable compared to regular aircraft, it takes time for pilots to gain experience. Practice indoors or at home is the best option for beginners.
Three skills are necessary to learn how to fly a drone. These are taking off, hovering, and landing.
Take Off
Simply lift the drone in the air to take off. Once the drone is moving upward, hold down the button on the controller. When the drone has reached a certain height you can stop pressing the button.
Hovering
Hovering allows the drone to stay in mid-air. To hover, hold down the right or left trigger while pressing on the throttle. The drone can be tilted by pressing the throttle and both triggers.
Landing
Landing is when the drone returns safely to the earth. Release the throttle and turn the controller toward the ground to land. The drone will eventually slow down, and then land.
Fly your drone as comfortable as possible. But be careful not to crash into anything.
How do you get started with drone photography
You have many options to begin photographing with a drone. The first option is to buy a ready-made drone kit. It will come with everything you need in order to get started. They vary in price from $200 to $500 depending upon the model.
Another option is to build your own drone. It's possible to make a drone that takes decent photos and videos, even though it can be complicated.
If you are interested in building your drone, we recommend you begin with a quadcopter. Like conventional helicopters, quadcopters have four rotors or propellers.
It is much easier to assemble and maintain a quadcopter than a helicopter. It's also cheaper to purchase and easier to carry around.
First, select the right components. Motors, batteries and controllers are all required. Be sure to select the right size and weight.
Next, you will need to choose which type of controller you want. There are many options available. These include joysticks, touch screens and remote controls. We recommend purchasing one with a built-in camera, so you don't have to attach a separate device to your drone.
After you've selected the right parts, you can begin to assemble the drone. Preassembled kits make life easier. But if you want to build your own drone, there are some steps you will need to follow.
Step 1: Attach battery pack
To start building your quadcopter you'll first need to connect it to the motor. To start, remove the cover from the battery pack. Next, slide the battery in place.
Step 2 Connect the motors
Next, place the motors in their appropriate slots. Each motor must go into its designated slot. Make sure the motors are facing forward when installing them.
Step 3: Install the propeller
Last, attach the propellers and frame. Place them at an equal distance.
Now it's time to test your new drone. If the engine does not move, ensure that the propellers are facing forward. Also, make sure that there are no obstructions between the propellers.
Statistics
Compared to the old days of the Phantom, this drone is super small, but it will likely require you to check a bag, the way a Mini 3 Pro could easily stow away in an oversized pocket. (thedronegirl.com)
Among the biggest improvements, the Skydio 2+ has over the standard 2 is a 20% longer battery life, longer range if you add the Beacon, and a neat AI video creation tool called Keyframe. (thedronegirl.com)
Again, no stabilization is applied, and the 50% throttle stick position cuts the power to the motors. (photographypro.com)
Though the Mavic 3 is about 50% heavier than the Mavic Air 2, it's still conveniently sized. (nytimes.com)
Homes with aerial images sold 68% faster than homes with standard images. (alexdronephotography.com)
The two most common types of camera used to make time-lapses are DSLRs (Digital Single Lens Reflex) which are typically more expensive that point-and–shoot digital cameras.
DSLR cameras produce images that are more high-quality due to how light enters them. These cameras aren't great for shooting video as they require manual focus or exposure settings.
Beginners will find it easier to use point-and shoot cameras like the GoPro. However, the lower resolution means videos look grainy.
A consumer drone is the best camera for time-lapsing. These small flying robots have become very popular as an affordable alternative for professional drones.
A drone can be described as a remote controlled aircraft that is autonomous and does not require human intervention. A drone typically uses a single propeller to fly, although quadcopter drones may have multiple propellers.
A drone can also capture aerial footage and cinematic shots from a bird’s eye view. A gimbal stabilizer can be added to drones for smooth handheld footage.
For a time-lapse effect, you can start recording while your drone hovers above the subject. If the sun doesn't directly over the subject, the sky won't look dark during the shot.
To achieve the desired effect you can adjust your shutter speed and aperture. For example, you could set your shutter speed to 30 seconds for a sunset shot and keep the aperture wide open in order to capture as much natural daylight as possible.
For night shots, the opposite approach would be taken. To reduce light entering the camera, slow the shutter speed to 1 second and then close the aperture. This creates bright images that show details.