DISCLAIMER: This video and description contains affiliate links, which means that if you click on one of the product links, I will receive a small commission. This helps support this channel and allows me to continue to make videos like this. Thank you for your support!
There are many ways to get started with drone photography. You can start by buying a drone kit. This kit will contain everything you need for getting started. They can range from $200 to $500 depending on the model.
You can also build your own drone. Even though this can be difficult, it is still possible to build a drone that will take decent photos or videos.
We recommend that you start with a quadcopter if you want to build your own drone. A quadcopter, like conventional helicopters has four propellers or rotors instead of the usual two.
A quadcopter is easier to assemble and maintain than a helicopter. It is also more affordable to buy and easier for you to transport.
You'll first need to select the right parts. Motors, batteries, controllers and props will all be required. Make sure you pick the correct size and weight.
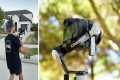
Next, decide which controller you would like to use. There are many different options, including touch screens, joysticks, and remote controllers. A drone with a built in camera is a good choice.
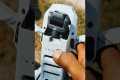
Once you have selected the correct parts, it's time to assemble your drone. To make things easy, we recommend buying a preassembled kit. You can build your drone on your own by following these steps.
Step 1: Attach battery pack
To start building your quadcopter you'll first need to connect it to the motor. To begin, remove the cover plate at the bottom of your battery pack. Slide the battery into its place.
Step 2 Connect the motors
Next, install the motors into the correct slots. Each motor must go into its designated slot. When installing motors, ensure that they face forward while remaining perpendicular with the frame.
Step 3: Install the propeller
You will then need to attach your propellers onto the frame. Be sure to place them at equal distances.
You are now ready to test the drone. If the engine does not move, ensure that the propellers are facing forward. Also, ensure that there aren’t obstructions between propellers.
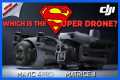
Which drone is best for beginners?
It is easy to fly a drone, and the best drones for beginners. These include drones equipped with an FPV (first-person view) camera, allowing users to control the drone via a smartphone app remotely.
Quadcopters can be used for aerial photography. You may choose a multirotor if your goal is to explore advanced features such an autonomous flight mode or obstacle avoidance.
There are two types in price of drones: cheap drones under $100, and more expensive drones over $300.
The cheapest models usually come with a limited range and battery life, while the most expensive ones feature better performance and longer flight times.
Because they are easier to control and operate, most beginners choose to purchase cheaper models. You might want to spend hours flying your drone, so you might look into purchasing a more expensive model.
Where are the best places to take photos with a drone?
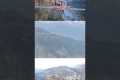
Drones are an extremely useful tool to capture breathtaking shots of nature and landscapes. Drones are perfect for both close-up shots and stunning photos of wildlife like butterflies and birds.
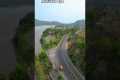
You can use drones in the most beautiful places: mountains, deserts. Drone enthusiasts often capture scenic views of their hometowns and other local attractions.
You should try shooting at night when the lights illuminate the surrounding landscape to explore new places. It is also possible to shoot in other seasons, such as winter, when snow covers the ground.
Statistics
Compared to the old days of the Phantom, this drone is super small, but it will likely require you to check a bag, the way a Mini 3 Pro could easily stow away in an oversized pocket. (thedronegirl.com)
Again, no stabilization is applied, and the 50% throttle stick position cuts the power to the motors. (photographypro.com)
Though the Mavic 3 is about 50% heavier than the Mavic Air 2, it's still conveniently sized. (nytimes.com)
Regional & Super Regional Centers pricing per center (400,000+ sq ft) PLACE ORDER (dronebase.com)
Here's proof: according to an analysis of FAA drone registration numbers by drone market research and data group Drone Industry Insights, DJI had a 76.8% market share in the U.S. (thedronegirl.com)
It is possible to keep a drone at a safe distance if it becomes part of your self. It is possible to lose sight physical boundaries of the drone if you begin to view it as a separate entity.
A drone that is able to fly at a reasonable distance will allow you to be fully immersed in the surrounding environment without worrying about its next destination.
A close approach to the ground can also have psychological benefits. It gives us a feeling of control over the environment and allows us to feel more connected to nature.
But there is a downside too. Flying near the ground means we are exposed to wind and weather conditions that could damage the drone. So how far away do you fly?
The answer depends on the type of drone you are flying. You should aim to fly at least 500 feet above the ground if you're trying to capture aerial footage or film landscapes.
If you're shooting a cityscape, for example, it might be advisable to keep the distance at 1,000 feet. You can avoid trees and buildings that could block your view.
Drones are more sensitive to low-light conditions. You can decrease the time spent hovering if you fly in darkness by lowering your altitude.
Make sure there are no obstructions like power lines, traffic signs, tall buildings, etc.
Also, you might consider flying during daylight instead of at nights. This avoids reflections caused shadows and street lights.
A second thing to consider is the drone's actual size. The further it is from the ground the bigger the drone. For example, a large quadcopter usually requires a minimum height of 300 feet.
The golden hour is the best time to capture drone footage.
This is the time between 3 and 6 PM. This is the time when you have maximum visibility because of direct overhead sunlight.
It is also known for its "magic hour", which is perfect for capturing stunning images.
However, it is important to not fly your drone during sunrise or sunset. These times can result in poor quality footage.
You now have all the information you need to make amazing drone videos.