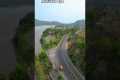
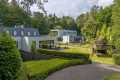
Let us show you this Rietveld-style villa, built in 1972, offering an incredible 49,500m² plot surrounded by a lot of nature. With 697m² of living space, including a private practice area, a garage for six cars, and a charming barn, this energy-efficient property (Label A) is the ultimate home for luxury, tranquility, and comfort.
By: Creative Dreamers NL Title: Cinematic Real Estate Tour | Unique Rietveld Villa in Nature | Sony A7siii & Mavic 3 Pro Sourced From: www.youtube.com/watch?v=iFQhctYmMF8
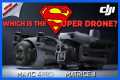
Check out the 3 most popular drones on Amazon in 2022
Frequently Asked Questions
What is the best drone for photography?
Drones are an exciting technology that can be used for many purposes. These include aerial photography, filming movies, and even delivery of packages. What is the secret to drones being such a useful tool for us? Drones have two main advantages. They are versatile and easy to use. Drones have many different uses. You can use them for almost every task that you would normally use a camera to accomplish. Secondly, they are very easy to operate. Quadcopter flying is easy if your experience with quadcopters is good.
Drones can also capture incredible images. Drones can capture amazing photos in places that you might not normally go. These include remote areas where you could potentially fall into dangerous situations.
Drones are simple to use, and anyone can quickly learn to fly one. Once you know the basics, you can fly your drone anywhere and shoot amazing photos. If you're interested in better photos, take a look at our drone range.
What time of day is best for drone photography?
When there's not much activity on ground, a drone can capture aerial images at sunrise and sunset.
Drones are great for taking beautiful photos of landscapes as well as the sky. But sometimes drones aren't allowed to fly at night, so you miss out on spectacular views.
If you want to make sure that you capture all the photo opportunities, fly during sunset and sunrise hours. These times allow for stunning shots of nature and are often more popular because there are fewer cars on roads and fewer people.
Also, you'll find yourself shooting at lower light levels. This makes it easier to capture images without worrying about overexposing them.
Furthermore, you don't have to worry about strong winds or rain, snow, fog, or freezing temperatures. These factors make daylight perfect for shooting photos with a drone.
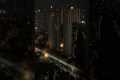
If you are looking for night scenes to capture, then flying at night is a good option. This will give a unique view of the cityscape.
Which drone to buy as a beginner?
Drones that are easy to fly for beginners are the best. These drones include those equipped with an FPV camera that allows users to remotely control the drone using a smartphone app.
Some quadcopters have been specifically designed to be used for aerial photography. A multirotor model might be a better choice if you want to explore advanced features, such as obstacle avoidance or autonomous flight mode.
The drones come in two price categories: low-cost ones under $100 and high-end ones over $300.
The cheapest models often have limited range and battery life. But the best models are more reliable and can fly longer distances.
Many beginners prefer to buy cheaper models because they are easier for them to handle and to learn how to use. You might want to spend hours flying your drone, so you might look into purchasing a more expensive model.
What are some of the cons to using drone photography for your photos?
Drone photography is an exciting way to capture images and video footage. But there are also downsides when choosing to fly a small aircraft.
The most obvious disadvantage of flying drones is the cost involved. You can spend hundreds, thousands or even millions depending on the drone you choose.
Flying a drone requires training and certification, so you'll need to invest time and money to learn how to operate them safely.
Safety is another issue. Drones can be dangerous as they need to be repaired and maintained constantly. A drone that is not controlled properly can cause serious injury to someone or damage property.
It is possible that you spend more time flying a drone than taking photos or filming footage. Your drone might not have enough airspace to fly.
Some local governments restrict where you can fly your unmanned aerial vehicle. You cannot fly more than 400 feet and within five miles from any airports, stadiums hospitals, schools or prisons.
Drones may not be for everyone. Flying these machines is not for everyone. Some fear they might fall or crash out of the sky. Some fear they might hit an object or another person.
If you don't feel comfortable flying a helicopter, you may want to stick with traditional aerial photography and videography techniques.
How to fly my drone?
You need to practice flying a drone. It takes time to learn how to fly drones. For beginners, we recommend practicing indoors or close to home.
When learning how to fly a drone, you'll need to master three basic skills. These skills include hovering, taking off and landing.
Take off
The drone will take off by simply being lifted into the air. You can do this by pressing the button on controller until the drone begins moving upward. Once the drone reaches a certain height, stop pushing the button.
Hovering
Hovering allows the drone to stay in mid-air. To hover, hold down the right or left trigger while pressing on the throttle. By holding down both triggers, you can tilt the drone to move it.
Landing
Landing is when the drone returns safely to the earth. To land, let go of the throttle and gently tilt the controller towards the ground. This will cause your drone to slow down until it lands.
If you feel comfortable flying your drone, take it out of the house. Be careful not to crash into any object.
Can drones be used to take night pictures?
Yes, that's the answer. But it's been a long-standing tradition. Since decades, we have been taking night shots.
There's a catch. Night photography requires specialized equipment. There's no way to do it with any camera that costs less than $10k.
A series of wavelengths are created when light hits an object.
These wavelengths are combined to produce white light at very far distances from their source.
This is how our eyes are able to see colors even when the sun is miles away.
The opposite is true. When light strikes an object very close to its source it reflects in narrow wavelengths. These wavelengths bounce back straight to us, without overlapping.
This means that objects are brighter if they are closer together. This is how objects glow when exposed to black light.
The energy an object absorbs determines how much light it reflects. If light hits an object, it may reflect less red light than more blue.
The human eye is sensitive to blue light the most so objects appear brighter when viewed in black light.
What does all this have to do about drones? Use a very bright light source to photograph dark places, such a forest or cave.
A standard lamp will not provide enough illumination to illuminate the whole scene. It will only provide a shadowed view and not much else.
A strobe is better for taking great pictures. You won't want to lug around a large flashgun so you will need a smaller one.
These lights are known as speedlights because they produce flashes of light so fast that they create a stroboscopic effect.
The light pulses across the screen when "stroboscopic" is used. The higher the speed, the better the picture.
This tutorial will not cover how to install a Speedlight. However, there are numerous tutorials online.
We'll tell you, to get a clear shot, ensure that your subject is well lit.
This is achieved by aiming the beam at 45 degrees. You can adjust the light's intensity by moving the flashgun's head.
Once you have set the setting that is right for you, hold the gun steady as the shutter release button is pressed.
Once the flash has reached the subject's area, press the shutter yet again. This will activate the flashgun and fire another burst.
The first burst will illuminate the subject. However, the second burst will capture the moment after it has passed.
The result is continuous exposure, where both bursts are recorded.
Now that you're comfortable taking photos during the day let's get to night photography.
So far I have covered all you need to know about taking night photos.
However, there is still one thing that needs to be addressed: the color balance.
Most people assume that all images taken at nights will be too dark.
That's true, but the same applies to daytime photos.
It doesn't matter whether you're taking pictures at dawn or dusk; the camera will always record a darker image.
Statistics
Though the Mavic 3 is about 50% heavier than the Mavic Air 2, it's still conveniently sized. (nytimes.com)
Again, no stabilization is applied, and the 50% throttle stick position cuts the power to the motors. (photographypro.com)
Regional & Super Regional Centers pricing per center (400,000+ sq ft) PLACE ORDER (dronebase.com)
Homes with aerial images sold 68% faster than homes with standard images. (alexdronephotography.com)
Greater than 50% throttle stick position generates positive thrust, but less than 50% throttle stick position reverses the direction of the motors, allowing upside-down flying! (photographypro.com)
A drone shot is an excellent way to capture amazing images. It can even be better than any photo you take with a camera when done properly.
But there are ways to improve the quality of your images. You can do this by making sure you are using the right settings for your model.
You can edit your photos with some apps and tools. Adobe Photoshop Lightroom software is one of these. This software allows you edit multiple photos at once, and lets you adjust each one separately.
You can also crop and enhance individual parts of your image. This includes cropping out unwanted objects and changing lighting and contrast.
Snapseed is another tool that offers basic editing capabilities such as cropping and brightness adjustments.
Post-processing is important, but it's also crucial to ensure that your final product looks professional.
This means knowing how to set your camera correctly and learning how to position yourself properly.
Also, ensure that you select the correct settings for your lens. If you're photographing landscapes, for example, use a longer focal-length (e.g. 200mm), whereas if your goal is to take close-ups of objects, choose a shorter focal length (e.g. 50mm).
Finally, learn how you can shoot in RAW format. This gives you more control over the final images.
Once you are proficient in these techniques you can create stunning drone pictures that will wow everyone.