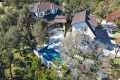
Lori Hesterhagen-Ficarra, a top-producing realtor for DiTomasso Realty, had this drone video created for her current listing at 535 Craig Ave., Tottenville.
By: Staten Island Advance Title: Drone tour of Staten Island home Sourced From: www.youtube.com/watch?v=OPY-eiEI_ns
You've got check out the 3 best drones on Amazon while they're on sale
Frequently Asked Questions
Which drone can be used for aerial photography
There are two options for aerial photography. Either buy an expensive camera package with a gimbal stabilizer or rent a small remote-controlled helicopter.
The first option is great if you plan to shoot a video or film because it gives you complete control over how the shots look. With the second option, you'll have to pay more and be much more dependent on the pilot.
What happens if you want the shot to look perfect even though the camera isn't in your hands? Drones can help you achieve this.
A drone can be described as a tiny, unmanned aircraft that can fly independently and take photos and videos without being directed by its operator.
They are extremely versatile and can fly very close to buildings to capture images and record footage. They can also fly low over crowds to capture pictures of people.
Drones make great aerial photography and videography tools. These drones can also be great for marketing as they enable you to create breathtaking visuals that would otherwise need a lot less manpower and equipment.
You can easily place them in strategic locations to capture stunning imagery. They can also fly remotely, making them extremely easy to operate.
Some companies even hire drones to photograph weddings. These wedding photographers can take amazing photos of the bride and groom while their drones fly above the ceremony location.
They can also fly them to family members to take portraits. They can fly them to the reception area to capture stunning views.
These activities are perfect for promotional material and event coverage. Drones are also great for making short films. You could use one to show clients why your company is better than yours.
These are all reasons drones have become increasingly popular in aerial photography and videography. A drone may be the perfect tool for professional photographers.
Can drones shoot nighttime photos?
The answer to that question is yes. But it's been a long-standing tradition. For decades, we've been taking photos at night.
But there's a catch. Night photography requires specialized equipment. With a camera costing less than $10k, there is no way to do night photography.
Light bounces back when it hits an object in a series wavelengths.
These wavelengths merge to form white light at long distances from source.
This is why your eyes can see colors even if the sun is many millions of miles away.
Contrary to popular belief, light that strikes objects close to their source reflects in a narrow range of wavelengths. These wavelengths bounce directly back to us and do not overlap.
This means that objects appear brighter when they are closer to each other. This is how objects glow when exposed to black light.
The energy the object absorbs influences how much light is reflected. Therefore, if light hits an object, it might reflect more blue than red light.
The human eye is sensitive to blue light the most so objects appear brighter when viewed in black light.
This is what drones have to do. If you want to photograph something dark like a forest or cave, you will need a very bright source of light.
An ordinary lamp won't be powerful enough to illuminate the entire scene. It will only provide a shadowed view and not much else.
If you want a good picture, you'll need to use a strobe instead. It's not practical to have a bulky flashgun around, so it's best to get a small one.
Speedlights are also known for their flashes of light that create a stroboscopic effect.
The light pulses across the screen when "stroboscopic" is used. The higher the speed, the better the picture.
We won’t talk about how to setup a Speedlight. However, there are numerous tutorials online.
We will tell you that to capture a clear picture, you must ensure that the subject is illuminated evenly.
The beam should be aimed at a 45° angle in order to achieve this. You can adjust light intensity by moving your flashgun's head.
Once you have found the right setting, hold the gun steady while pressing the shutter release button.
Next, close to the subject, release the shutter. This will trigger the flashgun to fire another burst of light.
While the first burst illuminates the subject, the second one will capture the moment after the first burst has passed.
The result is a continuous exposure where both bursts of light are recorded.
Now that you are able to take photographs during the day, let us move on to night photography.
I have already covered everything you need on night photography.
There's one more thing to be covered: the color balance.
Most people assume that nighttime images will not be dark enough.
This is true even for daytime images.
The camera will always record darker images regardless of whether you are taking photos at dawn and dusk.
What are the laws concerning drone photography?
The Federal Aviation Administration (FAA) regulates drone flights. Local laws and regulations may apply, in addition to those of the FAA. For details on drone flight regulations, please contact your state's transportation agency.
In most cases, drone owners need to get a FAA license. The FAA has established guidelines for licensing. These guidelines can be found here.
Some states require drone operators to register their drones with the government. Learn more about drone registration in our Guide to Drone Registration.
What is the best way to capture drone photography?
Drone photography goes beyond just using a drone to take pictures. Planning and executing a successful drone shoot requires a lot of considerations. From choosing the right location to determining how much insurance you need to carry out a successful aerial shoot.
The most important thing you can do is make sure that your drones are allowed to fly in the location you want to photograph. You should check to see if there are restrictions on where and how you can fly your drone. If there are, you may need to apply for a license to fly them in these areas.
You should also check which regulations are in place in your particular country. Some countries require permits for drone flying. Others restrict the number and duration of drone flights.
A drone pilot license is required. You'll also need to find a safe and secure place to land your drone after every flight. You can often rent a landing pad from local businesses, which will charge you per hour and provide you with storage space. A dedicated landing pad can also be purchased.
Before you even begin shooting, you'll need to decide what drone you'd like to use. Different drones are equipped with different capabilities. For example, fixed-wing drones tend to cost less and are easier to control, whereas multirotor drones are more powerful and stable.
You'll first need to decide what kind of drone to use. Next, you will need to select the equipment that you will require. A drone camera usually consists of a gimbal, remote controller, batteries, and memory cards.
The gimbal helps stabilize the camera in flight. It makes it simple to take sharp images and not worry about losing the device. The drone's gimbal is attached directly to its body to help keep it steady.
Remote controllers allow you to control your drone from anywhere. These devices include joysticks and buttons that let you move the drone forwards, backward, left, and right and adjust its altitude.
Batteries power the drone's motors and cameras, and memory cards store photos taken by the drone. A sufficient amount of battery life is necessary to ensure clear images are taken by the drone.
Once you've decided on the equipment you will need, you can start to plan where to take your photos. Will you be taking photos indoors or outdoors? Are you going to be shooting landscapes or architecture? What kind of places are you going to be shooting? All of these factors impact how you should prepare for your shoot.
If you intend to shoot inside, lighting is a must. Multiple lights can be used to brighten a room. One large light should be placed above the subject, one near the middle and another closer to the floor.
Outdoors, you'll need to consider wind conditions. Drone pilots could be affected by windy days, as they can be blown off track. Avoid taking off during stormy weather.
When selecting your location, think about whether you'll need to bring in extra equipment, such as tripods or stands. These items will ensure your drone stays level, so you don’t lose quality shots.
For an outdoor shoot, it's advisable to work between 10 am and 4 pm. During this time, there won't be too many people around, but there will still be enough light to create great photos.
Drone photography is not only fun, but also extremely useful in capturing breathtaking aerial photos. Just follow these steps and you can begin creating stunning images today!
Which drone should a beginner buy?
A drone that doesn't require special skills to fly is the best for beginners. These include drones with an FPV (first person view) camera. This allows you to remotely control your drone from your smartphone.
Some quadcopters have been specifically designed to be used for aerial photography. A multirotor model might be a better choice if you want to explore advanced features, such as obstacle avoidance or autonomous flight mode.
In terms of price, there are two types of drones; cheap ones that cost under $100 and expensive ones that cost above $300.
The cheapest models tend to have a limited range, battery life, and flight time. The more expensive models feature greater performance and longer flight durations.
Most beginners prefer to go for cheaper options as these are easier to handle and learn how to operate. If you plan on spending hours flying your drone, you might be interested in a higher-end model.
How much money do drone photographers make?
A photographer could make more or less than $10k depending upon how long he/she is flying for and where he/she takes photos. For those who shoot in remote locations such as forests and national parks, the hourly rate could be between $20-30.
An average person is paid $15-$25 an hr in retail. That means you could fly drones for $50-$75 if that's what you desire. There are other opportunities to make more. Drone pilots typically fly for companies that require them to travel across the country or even internationally.
Prices for flights can range from $100 to $300 depending on the amount of time spent flying and the distance covered. These fees can add up quickly but if you love flying and photography it might be worth it.
Can drone photography make you money?
Photographers trying to make a living from drones face the greatest problem: there aren’t many products available that can solve the problems of flying them. You can enjoy the experience by using quality equipment and software.
Also, you need to be aware of liability and insurance issues. This is why most photographers opt to take photos from the ground. This is a completely new way to capture images, and you might get paid for it.
Drones capture light in a similar way to video cameras. So why not use the same technology to create amazing photos?
Companies are making huge strides towards creating high-quality photos taken from the sky. We've already spoken about DJI, GoPro. But now we're starting to see more and more companies enter the space.
These cameras are great for ground photography even though they were made for aerial photography. The major manufacturers have invested heavily in the development of their imaging technologies.
This means you can eventually buy a drone which shoots 4K videos, and takes amazing photographs. This may be happening already. DJI and other companies have released higher resolution versions of their Phantom drones.
DJI recently released the Inspire 2, which features a 12-megapixel sensor capable of shooting at 5120 x 3456 pixels. And if you want to shoot in RAW format, you can record 8-bit files at 30 frames per second.
You can indeed make money selling drone photos.
Statistics
Again, no stabilization is applied, and the 50% throttle stick position cuts the power to the motors. (photographypro.com)
Among the biggest improvements, the Skydio 2+ has over the standard 2 is a 20% longer battery life, longer range if you add the Beacon, and a neat AI video creation tool called Keyframe. (thedronegirl.com)
Compared to the old days of the Phantom, this drone is super small, but it will likely require you to check a bag, the way a Mini 3 Pro could easily stow away in an oversized pocket. (thedronegirl.com)
Greater than 50% throttle stick position generates positive thrust, but less than 50% throttle stick position reverses the direction of the motors, allowing upside-down flying! (photographypro.com)
Regional & Super Regional Centers pricing per center (400,000+ sq ft) PLACE ORDER (dronebase.com)
A good distance for a drone is when it becomes an extension of yourself. When you become aware of the drone as a separate entity, you lose sight of its physical boundaries.
A good distance for a drone allows you to immerse yourself in the environment without worrying about where the drone is going next.
It also has psychological benefits. It gives us a feeling of control over the environment and allows us to feel more connected to nature.
There is however a downside. If we fly close to ground, wind and other weather conditions can cause damage to our drones. How far can you fly from the ground?
This depends on which drone you are using. It is a good idea to maintain a minimum of 500 feet above the ground when you are trying to capture aerial footage.
For example, if you are filming a cityscape, you might want to keep it at 1,000 feet. By doing this, you can avoid any obstructions such as trees or buildings.
This is because drones tend to struggle with low-light conditions. Lowering the altitude can help reduce hover time in dark conditions.
Also, ensure the area you are flying in is clear of any obstacles such as power lines, traffic signs, or tall buildings.
Consider flying during daylight hours instead of at night. This will help you avoid reflections from street lights and shadows.
A second thing to consider is the drone's actual size. The farther away the drone must be from ground, the larger the drone. A large quadcopter requires a minimum height limit of 300 feet.
For great drone footage, look for the golden hour.
This is the time between 3 and 6 PM. This is the time when you have maximum visibility because of direct overhead sunlight.
It's also known to be the "magic hour," and is ideal for capturing beautiful images.
Avoid flying drones at sunrise and sunset. These times can cause poor-quality footage.
You now have all the information you need to make amazing drone videos.