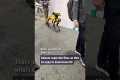
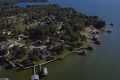
We filmed the exterior of this beautiful home which had its roof and deck redone. Contact us today for any of your New England real estate media needs! https://www.frogsvideography.com/
We specialize in creating high-quality promotional videos, social media content, captivating event coverage, stunning real estate walkthroughs and peaceful nature videos. We help bring any creative vision to life!
By: Frogs Videography Title: Exterior Home Showcase | Real Estate Exterior Walkthrough | DJI Mini 3 Pro | BMPCC6K Pro Sourced From: www.youtube.com/watch?v=M3Bt-whFTdc
Here are the 3 best drones on Amazon while they're on sale
Frequently Asked Questions
What drone is best for aerial photography?
Two options are available if you plan to do aerial photography. You can either rent or buy a large camera package that includes a stabilizer and gimbal, or you could purchase a more expensive camera package.
The first option is great for those who plan to film a video or film. It gives you full control over the final shots. The second option is more expensive and more dependent on the pilot.
But what if you want to make sure the shot looks great even though you're not controlling the camera? This is where drones come into play.
A drone can be described as a tiny, unmanned aircraft that can fly independently and take photos and videos without being directed by its operator.
They are versatile and can fly close to structures and buildings to capture photos or film footage. They can also fly low over crowds to capture pictures of people.
Drones are incredibly useful for aerial photography and videography. Drones are also great for marketing, as they can be used to create stunning visuals that would otherwise take a lot more manpower and equipment.
To capture incredible imagery, you can place them easily in strategic locations. They can also be flown remotely making them very easy to use.
Some companies even hire drones to photograph weddings. These wedding photographers can take amazing photos of the bride and groom while their drones fly above the ceremony location.
They can also fly them to family members to take portraits. They can also fly them over reception areas, capturing beautiful views of your venue.
These activities can be used to create promotional material and event coverage. You can also make short films with drones. You could use one to show clients why your company is better than yours.
Drones are becoming increasingly popular for aerial videography and photography. A drone may be the perfect tool for professional photographers.
What time is best for drone photography?
The drone could capture aerial photos during sunrise and dusk hours, when there isn’t much activity on earth.
Drones are great tools for capturing beautiful photos of landscapes and the sky above them. Some drones cannot fly at night and you may miss amazing views.
If you want to make sure that you capture all the photo opportunities, fly during sunset and sunrise hours. You have more chances to capture breathtaking shots of nature during these times because there are fewer cars driving and fewer people around.
You'll find that you can shoot at lower levels of light, which makes it easier for you to take pictures without worrying about overexposing.
Additionally, the drone can withstand strong winds, rain and snow. These factors make daylight perfect for shooting photos with a drone.
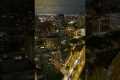
But, if you wish to capture nighttime scenes, flying during the moonlit nights is an option. This will give a unique view of the cityscape.
Is there a good place to take photos from a drone?
Drones are a great tool for taking stunning photos of nature and landscapes. Drones are great for taking close-up shots or stunning landscapes.
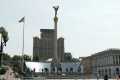
Drones are best used in mountains, deserts and other locations such as beaches, cities, oceans, rivers, and lakes. Drone enthusiasts love to capture picturesque views of their home and other local attractions.
To discover new areas, you should shoot at night when the lights illuminate it. Also, you can shoot in different seasons, particularly winter when snow covers the ground.
Is it okay to fly a drone at night.
Drones are becoming more popular every day. Drones offer amazing aerial shots of our houses and businesses. They are also great for delivering goods to large areas or capturing footage of sporting events. There are very few regulations regarding drone use. They are banned in some states, and restricted in others.
While flying drones during daylight hours are relatively safe, there are still risks involved when operating them at night. The safety of you and other pilots is at risk when flying drones at night. Because it is hard to spot hazards and obstacles, mistakes made by pilots could cause an accident.
Drones are becoming more and more popular. It is therefore important that we learn how they can be safely operated. There are two main types: fixed-wing, and rotary wing. Fixed-wing drones are generally smaller and easier to control compared to rotary-wing models. A fixed-wing aircraft usually has four propellers. A rotary-wing aircraft has one.
To avoid any accidents, it is recommended that you familiarise yourself with local laws regarding drone usage and make sure that you keep your drone within your line of sight at all times. You should also ensure your drone is equipped with lights. Make sure they flash red or green. This will make it easier for you spot potentially dangerous objects. Your camera lens should be protected against any scratches if you plan to take pictures. It is also a good idea to use protective goggles when flying your drone.
Drone flying at night presents a variety of dangers including collisions with power lines and trees as well as buildings. Drones can also get lost or fall out the sky. Avoid obstacles and stay close to your drone. Drones also are susceptible to sudden weather changes or wind gusts. These factors could disrupt the drone's flight or cause it to crash into land.
Drones have become increasingly popular, but there are possible health risks. The drone's noise can damage the hearing and cause headaches. A drone's vibrations can cause physical and emotional damage. The operator license allows you to fly drones, but it can also lead to legal action and fines.
This guideline will help prevent any accidents. Keep your drone within your sight line when flying. If you are flying near airports, make sure that you obey any restrictions imposed by airport authorities. It is important to be cautious when flying drones over water. This increases the chance of a collision.
Can you make money off of drone photography?
For photographers trying to make money with drones, the biggest problem is that there aren’t any products that can solve the problems associated with them. A lack of quality equipment and software makes the experience enjoyable.
Also, you need to be aware of liability and insurance issues. This is why most photographers opt to take photos from the ground. However, there is an entirely new way to take pictures that can potentially earn you a commission.
Drones work in the same way that video cameras do by capturing light. Use the same technology to take amazing photos.
Companies are already making strides in creating photos that can be captured from above. We've already talked about DJI and GoPro. We're seeing more companies in the space.
These cameras are not only great for aerial photography, but they also work well on the ground. The major manufacturers have invested heavily in the development of their imaging technologies.
This means that you'll eventually be able to buy a drone that shoots 4K videos and takes incredible photographs. We may already be seeing this happen. DJI has been releasing higher-resolution versions for their Phantom series drones.
DJI just released the Inspire 2 camera, which has a 12-megapixel sensor and can capture images at 5120 x 35656 pixels. The Inspire 2 can also be used to record RAW files at 30 frames/second.
You can indeed make money selling drone photos.
How do I get started with drone photography?
There are many options for starting to photograph with a drone. The first is to purchase a ready-made drone set. This will include everything you need to get started. They cost $200 to $500, depending upon which model you choose.
Another option is to build your own drone. It's possible to make a drone that takes decent photos and videos, even though it can be complicated.
We recommend that you start with a quadcopter if you want to build your own drone. A quadcopter, like conventional helicopters has four propellers or rotors instead of the usual two.
A quadcopter is simpler to assemble than a helicopter. It is also less expensive to buy and easier to transport.
First, choose the right parts. You'll need motors, batteries, controllers, and props. You should choose the right size and weight.
Next, choose the controller that you want to use. There are many options available. These include joysticks, touch screens and remote controls. A built-in camera is an option, as you don’t need to attach a separate device. We recommend buying one.
Once you've picked the right parts you can start assembling your drone. A preassembled kit is a great option to save time and make things simpler. If you would prefer to build your drone yourself, there are a few things you need to do.
Step1: Attach the battery pack
To begin building your quadcopter, connect the battery to the motor. First, remove the cover plate from the bottom of the battery pack. Then, slide the battery into place.
Step2: Connect the motors
Next, you will need to place the motors within the proper slots. Each motor must be in its assigned slot. When mounting the motors, ensure they face forward and are parallel to the frame.
Step 3: Install the propeller
Last, attach the propellers and frame. Remember to position them at equal distances apart.
Once you have completed all of these steps, your drone is now ready for testing! If you see no movement when you turn on the engine, double-check that the propellers are facing forward. Make sure the propellers are free from obstructions.
What equipment do you need to take drone photos?
Drone photography is much more than just taking pictures with a drone. You need to think about many things when planning and executing a drone photography shoot. From choosing the right location to determining how much insurance you need to carry out a successful aerial shoot.
The most important thing to do is check to see if you have permission. This includes finding out what restrictions apply to where and how your drone can be operated. If you find that there are restrictions, you might need to apply for a license in order to fly them.
It is also important to verify the laws in your country. Some countries require permits for drone flying. Others restrict the number and duration of drone flights.
You will need permission to fly drones. After each flight, you will also need to locate a safe place to land the drone. You can rent a landing spot from local businesses for around $10 per hour. Also, you will have storage space. Or, you can buy a dedicated landing area.
Before you begin shooting, you must decide on the type of drone you want. Different drones have different capabilities and features. For example, fixed-wing drones tend to cost less and are easier to control, whereas multirotor drones are more powerful and stable.
Once you decide which type of drone is best for you, the next step is to determine what equipment you will need. A drone camera usually consists of a gimbal, remote controller, batteries, and memory cards.
The camera is stabilized by the gimbal during flight. The drone's gimbal is attached directly to its body to help keep it steady.
Remote controllers let you control your drone remotely. These devices come with joysticks as well as buttons that allow the drone to be moved forward, backward, left, right, or left. You can also adjust its altitude.
The drone's motors, cameras and memory cards power their batteries. They also store the photos that the drone has taken. A sufficient amount of battery life is necessary to ensure clear images are taken by the drone.
Once you've decided on the equipment you will need, you can start to plan where to take your photos. Do you prefer to shoot outdoors or indoors? Are you going for architecture or landscape photography? Which part of the world are you going? All of these factors impact how you should prepare for your shoot.
If you plan to shoot indoors, lighting is an important consideration. Multiple lights can be used to brighten a room. Place one large light near the subject, another near it, and yet another close to the floor.
Outdoors, you'll need to consider wind conditions. Drone pilots can be blown off-course by windy days. You should always take off only when the weather is calm.
You should consider whether you need additional equipment when selecting your location. These items will keep your drone stable and allow you to capture high quality images.
Outdoor shoots can be done between 10 AM and 4 PM. Although there won’t be as many people around at this time, it will still provide enough light for stunning photos.
To conclude, drone photography isn't just fun and incredibly useful for capturing stunning aerial photographs. Just follow these steps and you can begin creating stunning images today!
Statistics
Homes with aerial images sold 68% faster than homes with standard images. (alexdronephotography.com)
Compared to the old days of the Phantom, this drone is super small, but it will likely require you to check a bag, the way a Mini 3 Pro could easily stow away in an oversized pocket. (thedronegirl.com)
Among the biggest improvements, the Skydio 2+ has over the standard 2 is a 20% longer battery life, longer range if you add the Beacon, and a neat AI video creation tool called Keyframe. (thedronegirl.com)
Regional & Super Regional Centers pricing per center (400,000+ sq ft) PLACE ORDER (dronebase.com)
Though the Mavic 3 is about 50% heavier than the Mavic Air 2, it's still conveniently sized. (nytimes.com)
Drones are flown at night by people for two reasons: curiosity and to capture images of the surrounding world.
Most people fly drones at nights because of their curiosity. They enjoy looking out at the world. Drones are also used to take photographs of the urban landscape at night.
This is what is known as urban photography and is growing in popularity with drone enthusiasts.
Photography at night offers many benefits such as better lighting conditions, more detail, and even seeing the stars.
Many photographers prefer to shoot at night to avoid dealing with the limitations of daytime shooting.
These are all great benefits, but urban photography is still very popular. People fly drones at nights to capture beautiful nighttime scenes.
They love how the lights change as the sun sets. Many have begun to post videos online of themselves flying drones at nights.
Although drone footage isn’t necessarily cutting-edge technology, the quality of the images is exceptional.
The best thing is that you don't need special equipment to make it happen. You only need a smartphone camera.
You don't need a smartphone to use this feature. The market has many great cameras, so you can make amazing drone videos.
If you're looking to purchase a DSLR camera, you'll find that some models offer night vision capabilities.
Canon's EOS5D III has an infrared LED-system that allows it can see in low-light conditions.
Other manufacturers include Sony, Nikon, Olympus, Panasonic, Pentax, and Samsung.
However, not every smartphone can capture drone footage.
For example, iPhones cannot use their front-facing camera to record aerial footage. Instead, they must rely on the iPhone 8 Plus's dual rear cameras.
After you've chosen what camera you'd prefer, you can decide where you want your video to be shot.
You could film your drone footage at one location or follow your subject.
Your subject should be visible when you are filming drone footage. Your subject should be within reach of your drone.
This range should not limit your ability to achieve great results.
Remember that the closer you are with your subject, the sharper the details of your drone footage.
So, try to move towards your subject as quickly as possible.