Check out the 3 most popular drones on Amazon in 2022
Frequently Asked Questions
Is a camera drone worth it?
If you're serious about starting your own business, you'll eventually realize there's nothing more important than having a great product. A killer product is essential if you are going to market yourself.
Photographers are not selling themselves. They try to convince someone else to purchase their stuff rather than convincing them to do it.
When you own your company, however, you can't wait for permission from someone else. You will have the ability to find customers today.
It is necessary to tell a compelling tale that explains why people should choose your products.
Also, you will need to create a strategy for marketing these products. You might still fail if you don't price your products correctly, even after all this.
Sometimes, you may charge too much. You might decide to charge too much. Either way, you're probably making a mistake if you don't know what you're charging.
These mistakes can be avoided by thinking like a businessman. That doesn't mean you have to become a capitalist. It means that you need to learn how value your time, money and effort.
It is important to create strategies that will measure the success and failure of your business.
Once you understand the pricing of your product, you can then focus on building the best product. A product that makes sense both financially and creatively.
A product that solves your problems and gives you real benefits.
One that is distinct from the rest.
After you've developed the product, you can launch it. Then you can start building your brand.
So whether or not you want to take pictures with a drone, you'll want to consider getting one. It will enable you to become a professional photographer. It will help you improve your skills. It will also help you to grow your business.
What is the best time to fly a drone?
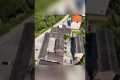
The drone could capture aerial photos during sunrise and dusk hours, when there isn’t much activity on earth.
Drones make great tools for photographing beautiful landscapes and the skies above them. But sometimes drones aren't allowed to fly at night, so you miss out on spectacular views.
Take advantage of the sunrise and sunset hours to capture great photo opportunities. You have more chances to capture breathtaking shots of nature during these times because there are fewer cars driving and fewer people around.
Also, you'll find yourself shooting at lower light levels. This makes it easier to capture images without worrying about overexposing them.
Furthermore, you don't have to worry about strong winds or rain, snow, fog, or freezing temperatures. All these factors make daylight ideal for taking photos with a drone.
You can capture nighttime scenes by flying at night. This will give you a unique perspective of the cityscape below.
What drone is best for aerial photography?
There are two options for aerial photography. Either buy an expensive camera package with a gimbal stabilizer or rent a small remote-controlled helicopter.
This is the best option if you want to shoot a movie or video because it allows you complete control over what the shots look like. The second option requires you to pay more and be dependent on the pilot.
But what happens when you want to ensure that the shot looks perfect, even though you aren't controlling the camera? That's where drones come in.
A drone can be described as a tiny, unmanned aircraft that can fly independently and take photos and videos without being directed by its operator.
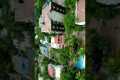
They are versatile and can fly close to structures and buildings to capture photos or film footage. They can also fly low to capture photos of people.
Drones are incredibly useful for aerial photography and videography. You can also use them to market your business by creating amazing visuals that don't require much manpower or equipment.
To capture incredible imagery, you can place them easily in strategic locations. They can be flown remotely which makes them simple to operate.
A few companies have hired drones for weddings. These wedding photographers can take amazing photos of the bride and groom while their drones fly above the ceremony location.
They can also fly them over to guests and capture portraits of loved ones. They can also fly them above reception areas to capture stunning views of the venue.
These activities can be used to create promotional material and event coverage. You can also make short films with drones. A drone could be used by you to show clients your company is better than theirs.
These are all reasons drones have become increasingly popular in aerial photography and videography. A drone could be your answer to professional photography.
What do you need for drone photography?
Drone photography is more than just flying a camera. It is important to plan and execute a successful drone shooting. The right location is key to making sure you have enough insurance to cover your aerial shoot.
The most important thing to do is check to see if you have permission. This includes finding out what restrictions apply to where and how your drone can be operated. You may need to apply to fly your drone in restricted areas if there are.
It is also important to verify the laws in your country. Some countries require permits to fly drones. Others limit how many flights you can make in a specific time.
Not only will you need permission to fly drones but also where to safely land your drone after each flight. Many local businesses offer landing pads to rent for a fee. You will also get storage space. Or, you can buy a dedicated landing area.
Before you even begin shooting, you'll need to decide what drone you'd like to use. Different drones offer different capabilities and features. For example, fixed-wing drones tend to cost less and are easier to control, whereas multirotor drones are more powerful and stable.
Once you decide which type of drone is best for you, the next step is to determine what equipment you will need. A drone camera typically includes a gimbal and remote controller, batteries, memory card, and batteries.
Gimbals are used to stabilize the camera when it's in flight. They make it possible to take sharp pictures without worrying about the device falling or being shaken. The gimbal attaches directly to the drone's body to keep the camera steady.
Remote controllers let you control your drone remotely. These devices come with joysticks as well as buttons that allow the drone to be moved forward, backward, left, right, or left. You can also adjust its altitude.
The drone's motors, cameras and memory cards power their batteries. They also store the photos that the drone has taken. You'll need enough battery power to ensure clear pictures.
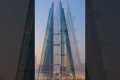
Once you've selected the equipment you'll need, you'll need to figure out where you'll shoot. Are you going to be shooting indoors or outside? Will you be photographing architecture or landscapes in your home? Which area are you going for? All of these factors affect how you'll need to prepare for your shoot.
Lighting is an essential part of indoor photography. Multiple lights will help lighten a room. Try placing one large light above the subject, another near the middle, and a third closer to the floor.
You need to take into account wind conditions when outdoors. Drone pilots can be blown off-course by windy days. Take off only when the weather permits.
You should consider whether you need additional equipment when selecting your location. These items will allow you to keep your drone level so that you don't lose high-quality shots.
An outdoor shoot should be between 10 am to 4 pm. You won't see too many people during this time but you will still have enough light to take great photos.
Let's conclude that drone photography is more than just fun. It can also be extremely useful for taking stunning aerial photos. Just follow these steps and you can begin creating stunning images today!
Can drones capture night shots?
The answer to that question is yes. We've been doing this for many years. Since the 1970s, we have been taking photographs at night.
But there's a catch. Night photography requires specialized equipment. It's impossible to achieve night photography with a camera less than $10,000.
When light hits an object, it bounces back in a series of wavelengths.
These wavelengths are combined to produce white light at very far distances from their source.
This is why your eyes can see colors even if the sun is many millions of miles away.
On the contrary, when light strikes an object close to its source, it reflects in a narrow band of wavelengths. These wavelengths bounce back straight to us, without overlapping.
This means that objects appearing brighter are closer together. This is why objects can glow under black lights.
The energy an object absorbs determines how much light it reflects. Therefore, if light hits an object, it might reflect more blue than red light.
Because the human eye is most sensitive to blue light, objects look bluer when viewed under black light.
This has to do with drones. If you're trying to photograph something dark, such as a forest or a cave, you need to use a very bright light source.
An ordinary lamp won't be powerful enough to illuminate the entire scene. It will only create a shadowed scene.
If you want a good picture, you'll need to use a strobe instead. It's not practical to have a bulky flashgun around, so it's best to get a small one.
These lights are also known as speedlights, because they emit flashes so fast they create a stroboscopic effect.
If we say "stroboscopic", you can see the light pulse across the screen. The better the quality of the image, the faster it is.
We won't cover how to set-up a Speedlight. However, there are numerous tutorials online.
We will tell you to make sure that the subject is properly illuminated in order for a clear photograph.
This is achieved by aiming the beam at 45 degrees. You can adjust light intensity by moving your flashgun's head.
Once you have set the setting that is right for you, hold the gun steady as the shutter release button is pressed.
Press the shutter once more, just before the flashlight reaches the subject. This will cause the flashgun's flash to go off again, causing it to send out another blast of light.
The first burst will illuminate the subject. However, the second burst will capture the moment after it has passed.
The end result is a continuous exposure with both bursts light and recorded.
Now you know how to take pictures during the day, let's move on to night photography.
So far, I have told you everything you need to know about photographing things at night.
But there's still one thing left to cover: the color balance.
Most people assume that nighttime images will not be dark enough.
And that's true - but it's also true for daytime pictures.
It doesn’t matter whether you’re shooting at dawn or at dusk. The camera will always record a darker shot.
Which drone do you recommend for beginners?
A drone that doesn't require special skills to fly is the best for beginners. These include drones with an FPV (first person view) camera. This allows you to remotely control your drone from your smartphone.
Some quadcopters are specifically made for aerial photography. You might consider a multirotor model if you plan to explore more advanced features, like autonomous flight mode and obstacle avoidance.
Two types of drones can be distinguished in terms of their price: those that are cheap at $100 or more and those that are expensive at $300.
The cheapest models usually come with a limited range and battery life, while the most expensive ones feature better performance and longer flight times.
As they are simpler to use and handle, beginners tend to choose the cheapest options. You might want to spend hours flying your drone, so you might look into purchasing a more expensive model.
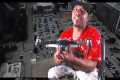
How do I fly my drone?
It takes practice to fly a drone. Drones are more stable than regular aircraft but it takes practice to become proficient. For beginners, we recommend practicing indoors or close to home.
When learning how to fly a drone, you'll need to master three basic skills. These skills include hovering, taking off and landing.
Taking Off
You simply lift the drone up into the air by taking off. The button on the controller should be pressed until the drone moves upward. Stop pushing the button when the drone reaches a desired height.
Hovering
Hovering is when the drone stays in midair. Hold down the right or left trigger and press the throttle to hover. The drone can be tilted by pressing the throttle and both triggers.
Landing
Landing is when the drone returns safely to the earth. Release the throttle and turn the controller toward the ground to land. This will cause your drone to slow down until it lands.
If you feel confident flying your drone, then take it outside. You must be careful not that your drone crashes into anything.
Statistics
Homes with aerial images sold 68% faster than homes with standard images. (alexdronephotography.com)
60 second video with branding, captions, contact information, and music Strip / Convenience / Neighborhood / Community Centers pricing per center (up to 400,000 sq ft) PLACE ORDER (dronebase.com)
Compared to the old days of the Phantom, this drone is super small, but it will likely require you to check a bag, the way a Mini 3 Pro could easily stow away in an oversized pocket. (thedronegirl.com)
Among the biggest improvements, the Skydio 2+ has over the standard 2 is a 20% longer battery life, longer range if you add the Beacon, and a neat AI video creation tool called Keyframe. (thedronegirl.com)
Though the Mavic 3 is about 50% heavier than the Mavic Air 2, it's still conveniently sized. (nytimes.com)
A drone photo is a great way of capturing amazing images. It can even be better than any photo you take with a camera when done properly.
However, there are several ways to improve the quality and appeal of your images. One is making sure to use the most appropriate settings for your model.
You can edit your photos with some apps and tools. These include software such as Adobe Photoshop Lightroom, which lets you import multiple files at once and adjust each shot individually.
You can also crop your image and make it more interesting. This includes removing unwanted objects and adjusting lighting and contrast.
Snapseed is another tool that offers basic editing capabilities such as cropping and brightness adjustments.
Post-processing is important, but it's also crucial to ensure that your final product looks professional.
This means that you need to know how to set up your camera properly and how best to position yourself.
Make sure you choose the right settings for your lens. You might choose a longer focal distance (such as 200mm) if you want to shoot landscapes. If you need to capture close-ups, opt for a shorter focal line (such as 50mm).
Finally, learn how to shoot in RAW format because this gives you greater control over the final image.
These techniques will allow you to create breathtaking drone images that will amaze everyone.