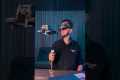
My wife and I recently went on a hike to Mt. Tabor in Trinidad, ofc I had to grab my trusty OG S5 paired with the Helios 44-2 🎬
By: Film By Akil Joefield Title: This almost 5 year old camera still rocks in 2025 - Lumix S5 + Helios 44-2 Sourced From: www.youtube.com/watch?v=XEyounN8kRU
Check out the 3 best drones on Amazon Today!
Frequently Asked Questions
Which drone do you recommend for beginners?
The best drones for beginners are those that do not require any special skills to fly them. These drones include those equipped with an FPV camera that allows users to remotely control the drone using a smartphone app.
Some quadcopters are designed specifically for aerial photography. A multirotor model might be a better choice if you want to explore advanced features, such as obstacle avoidance or autonomous flight mode.
There are two types in price of drones: cheap drones under $100, and more expensive drones over $300.
The cheapest models typically have a limited range or battery life. The most expensive models, however, offer greater performance and longer flight time.
Because they are easier to control and operate, most beginners choose to purchase cheaper models. You might want to spend hours flying your drone, so you might look into purchasing a more expensive model.
Which drone can carry DSLR?
Drones are becoming more useful for everyday tasks. There are already drones outfitted with cameras that can do aerial photography.
But even though drones have been around for years, most people haven't used them much because they aren't practical. Drones are expensive and noisy, making them difficult to control.
That's why we've created the Drone-A1. It's the world's first fully autonomous quadcopter designed specifically for photographers.
The Drone-A1 is equipped with an HD camera capable of taking stunning photos and videos. Due to its powerful computer onboard, the Drone-A1 will follow a subject seamlessly without any human intervention.
This allows you to concentrate entirely on capturing amazing images while the Drone-A1 takes over flying, hovering and following along with your subject.
The Drone-A1's Smart Follow feature makes it easy to take amazing photos. Point the Drone-A1 at your subject and it will automatically track and keep you separated.
You will have more freedom and greater convenience shooting with the Drone-A1. No longer will you need to worry about having a steady hand or knowing exactly where your subject is going.
You can also share your photos with loved ones using the built-in GPS on the Drone- A1. You can share your pictures with anyone around the globe.
The Drone-A 1 is ideal for professionals and hobbyists who love to take pictures.
What do you require for drone photography
Drone photography involves more than simply flying a camera. Planning and executing a successful drone shoot requires a lot of considerations. From finding the right location to getting enough insurance, a successful drone shoot is possible.
The most important thing is to ensure you have permission to fly drones in the area you plan to shoot in. This involves finding out if there are restrictions regarding where you can fly or where your drone can be operated. If there are, you might have to apply for a permit to fly them in the area.
You also need to check what regulations apply in your country. Some countries require drone pilot permits, while others restrict the number of flights that can be made within a certain time frame.
To fly drones safely and securely, you must have permission. Many local businesses offer landing pads to rent for a fee. You will also get storage space. A dedicated landing pad can also be purchased.
Before you begin to shoot, you will need to decide which drone you want. Different drones offer different capabilities and features. Fixed-wing drones tend not to be as expensive and are easier to operate, while multirotor drones can be more stable and powerful.
You'll first need to decide what kind of drone to use. Next, you will need to select the equipment that you will require. A drone camera typically includes a gimbal and remote controller, batteries, memory card, and batteries.
A gimbal stabilizes the camera during flight, making it easy to capture sharp images without worrying about shaking hands or dropping the device. The drone's gimbal is attached directly to its body to help keep it steady.
Remote controllers let you control your drone remotely. These devices include joysticks and buttons that let you move the drone forwards, backward, left, and right and adjust its altitude.
The batteries power the drone's cameras and motors. Memory cards store photos taken by it. In order to ensure clear shots, ensure you have enough battery life.
Once you've chosen the equipment that you need, it's time to plan where you want to shoot. Is it indoors or outdoor? Are you going for architecture or landscape photography? Which part of the world are you going? These are all factors that will affect the preparations you make for your shoot.
You'll need to consider lighting if you're planning to shoot inside. Multiple lights are the best way of lighting a room. Try placing one large light above the subject, another near the middle, and a third closer to the floor.
Wind conditions are an important consideration when you are outdoors. Drone pilots may experience problems if they are blown off course by windy conditions. Avoid taking off during stormy weather.
You should consider whether you need additional equipment when selecting your location. These items will help you keep your drone level stable, so you don't lose quality shots.
Outdoor shoots should be done between 10 and 4 pm. There won't be many people around during this time, but there will still enough light to make great photos.
A drone photographer is not just fun. They are also extremely useful for creating stunning aerial photos. Follow these simple steps to create stunning images right away!
What kind of drone do professionals use?
Drones are an amazing tool for aerial photography. They can capture video footage from above and also take photos. They are useful when taking measurements and surveying land.
These devices are commonly used commercially, such as to map large areas or check construction sites. There are many uses for these devices beyond their business purposes.
Drones are great for entertainment and fun with friends and family. There are countless ways to fly these machines and explore new places. Drones are also perfect for taking photos and videos of special events and celebrations.
The sky is the limit when it comes to using drones. If you've been wondering how to make the most out of your flying machine, keep reading to learn more about these incredible tools.
Is there a good place to take photos from a drone?
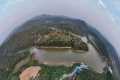
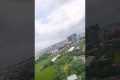
Drones have been a very useful tool in capturing stunning shots of nature. Drones offer the perfect solution for taking stunning photographs of nature and wildlife, as well as beautiful landscapes.
Mountain, deserts, lakes and oceans are all great places to use drones. Drone enthusiasts often capture scenic views of their hometowns and other local attractions.
If you want to see new places, it is worth shooting at night as the lights illuminate the surroundings. You could also shoot during other seasons, especially winter when snow blankets.
Can drones capture night shots?
Yes, that's the answer. But we've been doing it for years now. We've been taking pictures at night for decades.
There's one problem. Night photography requires specialist equipment. You can't do it with a camera that costs less then $10k.
When light strikes an object, it bounces back in various wavelengths.
These wavelengths can be combined to form white light over very long distances.
This is why you can still see colors in the distance even though the sun may be millions of kilometers away.
Instead, light reflects narrow bands of wavelengths when it strikes objects that are close to the source. These wavelengths bounce straight back to us without overlapping.
That means that the closer the object is, the brighter it appears. This is why objects can glow under black lights.
The amount of light reflected depends on how much energy the object absorbs. So when light hits an object, it may reflect more blue light than red light.
Blue light is the most visible to the human eye, so objects will appear more blue if they are seen under black light.
So what does this have to do with drones? If you're trying to photograph something dark, such as a forest or a cave, you need to use a very bright light source.
An ordinary lamp won't be powerful enough to illuminate the entire scene. It will only create a shadowed scene.
If you want a good picture, you'll need to use a strobe instead. Also, a small flashgun won't be as convenient for you.
Speedlights are also known for their flashes of light that create a stroboscopic effect.
If we say "stroboscopic", you can see the light pulse across the screen. The better the picture, the faster the rate.
This tutorial will not cover how to install a Speedlight. But there are plenty of tutorials online.
We will tell that it is important to have a bright and even lighting source in order to capture clear images.
The beam should be aimed at a 45° angle in order to achieve this. You can adjust the light's intensity by moving the flashgun's head.
Once you have set the setting that is right for you, hold the gun steady as the shutter release button is pressed.
Press the shutter once more, just before the flashlight reaches the subject. This will fire another flashgun burst.
The subject is illuminated by the first burst, but the second will capture what happens after that burst.
The end result is a continuous exposure with both bursts light and recorded.
Now that you are able to take photographs during the day, let us move on to night photography.
So far, I have told you everything you need to know about photographing things at night.
But there's still one thing left to cover: the color balance.
Most people assume that all the images taken at night will be too dark.
Yes, it is true. However, it can also be applied to daytime shots.
It doesn’t matter if you’re taking photos at dawn, dusk or both; the camera will always take a darker picture.
Is it safe to fly a drone in the night?
Drones are growing in popularity every day. Drones provide amazing aerial photos of our homes and businesses. They can also be used to survey large areas and deliver goods. However, drones still have very few regulations. Some states in America have banned drones completely, while others have put restrictions on their operation.
Drone flying during daylight hours is relatively safe. However, drones can still be dangerous when operated at night. Your safety and that of other pilots may be endangered if you fly your drone at night. This is due to the difficulty of spotting hazards and obstacles. A pilot's mistakes could lead to an accident.
Drones are rapidly becoming more popular. Therefore, it is important to learn how to safely operate them. There are two main types currently: fixed-wing or rotary-wing drones. Fixed-wing drones are generally smaller and easier to control compared to rotary-wing models. A fixed-wing drone usually has four propellers, while a rotary-wing model only has one.
To avoid potential accidents, you should become familiar with your local laws and ensure that your drone is always within your reach. Another important safety tip is to ensure that your drone is fitted with lights, particularly ones that flash red and green. This makes it easier to spot potential threats. Your camera lens should be protected against any scratches if you plan to take pictures. Also, it is advisable to wear protective goggles whenever you are flying your drone.
Flying drones at night poses a number of dangers, including collisions with power lines, trees, and buildings. Drones can also get lost or fall out the sky. You must ensure your drone is not in danger of being tripped up or falling from the sky. Drones are also susceptible to wind gusts and sudden changes in weather conditions. These factors can disrupt your drone's flight and cause it to crash land.
Drones have become increasingly popular, but there are possible health risks. These devices emit noise that can cause headaches and damage to the ears. Drone vibrations can cause serious damage to the human body. A drone operator license is required to fly. This can lead to fines or legal action.
These guidelines will help you avoid any drone accident. Keep your drone within your sight line when flying. Avoid flying close to airports. It is important to be cautious when flying drones over water. This increases the chance of a collision.
Statistics
Again, no stabilization is applied, and the 50% throttle stick position cuts the power to the motors. (photographypro.com)
60 second video with branding, captions, contact information, and music Strip / Convenience / Neighborhood / Community Centers pricing per center (up to 400,000 sq ft) PLACE ORDER (dronebase.com)
Greater than 50% throttle stick position generates positive thrust, but less than 50% throttle stick position reverses the direction of the motors, allowing upside-down flying! (photographypro.com)
Here's proof: according to an analysis of FAA drone registration numbers by drone market research and data group Drone Industry Insights, DJI had a 76.8% market share in the U.S. (thedronegirl.com)
A grey card is just a piece of thick paper that is a specific shade of grey (18%), which will be the foundation on which we choose our color temperature. (dronegenuity.com)
Drones are flown at night by people for two reasons: curiosity and to capture images of the surrounding world.
People fly drones at night because they are curious and enjoy the view of the world. But there is also another reason for flying drones at night: to capture images of the city landscape.
This is urban photography. Drone enthusiasts are increasingly embracing it.
There are many benefits to shooting photos at night. You can capture more detail, better lighting conditions and even the stars.
Many photographers prefer to shoot at nights to avoid having to deal with the limitations of daylight photography.
These are all great benefits, but urban photography is still very popular. People fly drones at nights to capture beautiful nighttime scenes.
They love the effect of the sunset lights on the sky. Many people are now posting videos online of drone pilots flying at night.
Although drone footage isn’t necessarily cutting-edge technology, the quality of the images is exceptional.
The best thing is that you don't need special equipment to make it happen. All you have to do is use your smartphone's camera.
If you don't have a smartphone, that's perfectly fine. There are many high-quality cameras on the market that can be used to create amazing drone videos.
If you're looking to purchase a DSLR camera, you'll find that some models offer night vision capabilities.
Canon's EOS-5D Mark III comes with an embedded infraredLED system that allows the camera to see in low lighting conditions.
Other manufacturers include Pentax Pentax Pentax Pentax, Olympus Pentax, Sony, Nikon and Olympus.
However, not every smartphone can capture drone footage.
iPhones can't use their front-facing camera for aerial footage, so they cannot. Instead, they will need to rely on their dual rear cameras from the iPhone 8 Plus.
Once you have determined the type of camera that you want, you need to decide where to record your video.
You could either choose to film your drone footage from a fixed spot or you could follow your subject.
Make sure that your subject is visible in the frame when filming drone footage. You should aim your drone at your subject.
You should be able achieve good results as long as you keep within the range.
It is important to keep in mind that the closer your subject is to you, the sharper your footage will appear.
So, try to move towards your subject as quickly as possible.