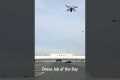
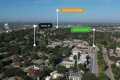
Today's drone job of the day is ground and aerial real estate photos of a Tesla Service Center in North Hollywood, CA.
By: Dronespeare Title: Dronespeare’s Drone Job of the Day | December 8th, 2024 #drone #realestate #tesla #shorts #dji Sourced From: www.youtube.com/watch?v=lOiOjgOJrrw
Here are the 3 most popular drones on Amazon Today!
Frequently Asked Questions
What do you need for drone photography?
Drone photography is more than just flying a camera. When planning and executing a drone shoot, there are many things to take into consideration. You need to consider everything, from choosing the best location to how much insurance you will need to conduct a successful aerial shoot.
It is important to check that you have permission for drones to be flown in the area where you intend to shoot. This involves finding out if there are restrictions regarding where you can fly or where your drone can be operated. If restrictions exist, you will need to apply a license to fly the drones in those areas.
Also, you should check the regulations in your country. Some countries require permits for drone flying. Others restrict the number and duration of drone flights.
You will need permission to fly drones. After each flight, you will also need to locate a safe place to land the drone. You can often rent a landing pad from local businesses, which will charge you per hour and provide you with storage space. Alternatively, you could buy a dedicated landing pad.
Before you start shooting, it is important to determine what kind of drone you would like to use. Different drones offer different capabilities and features. Fixed-wing drones are cheaper and easier to control, while multirotors are more powerful, stable, and reliable.
You will first have to decide on the type of drone that you want. Then, you need to decide what equipment you need. A drone camera usually consists of a gimbal, remote controller, batteries, and memory cards.
A gimbal stabilizes the camera during flight, making it easy to capture sharp images without worrying about shaking hands or dropping the device. To keep the camera stable, the gimbal attaches directly on the drone's body.
Remote controllers enable you to pilot your drone remotely. These devices come with joysticks as well as buttons that allow the drone to be moved forward, backward, left, right, or left. You can also adjust its altitude.
Batteries power the drone’s motors and camera, while memory cards store photos taken with the drone. You will need to ensure enough battery life so that your drone can take clear photos.
Once you've chosen the equipment that you need, it's time to plan where you want to shoot. Do you prefer to shoot outdoors or indoors? Do you plan to shoot architecture or landscapes? Where exactly are you going to shoot? All of these factors affect how you'll need to prepare for your shoot.
Lighting is an essential part of indoor photography. Multiple lights are the best way of lighting a room. You can place one large, centrally located light above your subject and another in the middle of the room. A third is closer to the floor.
Wind conditions are an important consideration when you are outdoors. Drone pilots can be blown off-course by windy days. It is best to take off only when it is calm.
Consider whether additional equipment such as stands or tripods is necessary when you select your location. These items will help you keep your drone level stable, so you don't lose quality shots.
Outdoor shoots can be done between 10 AM and 4 PM. This time there won't many people, but enough light will allow for great photos.
To conclude, drone photography isn't just fun and incredibly useful for capturing stunning aerial photographs. These are just a few steps that you can follow to create incredible images.
What are the laws governing drone photography?
Drone flights are regulated by the Federal Aviation Administration (FAA). Local laws and regulations may apply, in addition to those of the FAA. For information on drone flying regulations in your state, contact the transportation department.
Drone owners must obtain a FAA license in most cases. The FAA has published guidelines regarding licensing. You can learn more about these guidelines here.
Some states require drone operators to register their drones with the government. Check out our Guide to Drone Registration for more information.
Is it possible to make money from drone photography?
The biggest problem for any photographer trying to make money off drones is that there aren't any products out there that solve the problems that come with flying them. It's not easy to enjoy the experience if you don't have quality equipment or software.
Photographers also need to consider liability and insurance. Many photographers will choose to shoot from the ground. You could get paid for your efforts if you use a totally new method of photographing images.
In the way they capture light, drones look very similar to video cameras. You can create incredible photos with the same technology.
Companies are already making significant progress in the creation of high-quality aerial photos. We've already talked about DJI and GoPro. Now, we are seeing more companies join the space.
These cameras are not only great for aerial photography, but they also work well on the ground. The major manufacturers have invested heavily in the development of their imaging technologies.
This means you will eventually be able purchase a drone that can shoot 4K videos and take amazing photos. This could be already happening. DJI is one of the companies that has started to release higher-resolution Phantom series drones.
DJI's Inspire 2 recently came out with a 12-megapixel sensor, capable of shooting at 5120x3456 Pixels. You can also record RAW files at 30 frames per minute, 8-bit format.
It is possible to make money with drone photos.
What are the advantages of drone photography?
Drone photography can be a fun way to capture images or video. However, there are some downsides to flying small aircraft.
The most obvious disadvantage of flying drones is the cost involved. You can spend hundreds, thousands or even millions depending on the drone you choose.
A drone pilot must be trained and certified. This means that you will need to invest your time and money in order to learn how to safely fly them.
Safety is another problem. Drones pose a danger because they are constantly in need of repair and maintenance. Drones can be dangerous because they require constant maintenance and repair.
You may find yourself spending more time flying your drone than you do actually taking photographs or recording footage. You may also have restricted airspace in which you can fly your drone.
You may be restricted by local governments as to where your unmanned aerial vehicle can fly. You cannot fly higher than 400 feet, or within five miles of any stadiums, hospitals or schools.
Drones are not for everyone. These machines can cause anxiety for some people who fear that they may crash or fall from the skies. Others fear that they could accidentally hit an object or person.
You might be uncomfortable flying a drone. Instead, you can try traditional aerial photography or videography.
What drone is best for aerial photography?
If you're going to do aerial photography, there are two options. Either you can rent a small remote-controlled helicopter, or you can buy an expensive camera set with a gimbal stabilizer.
If you are planning to shoot a film or video, the first option is ideal because you have complete control over how your shots look. The second option will require you to pay more for the pilot and make you more dependent on him.
What happens when you want to make sure that your shot looks flawless even though it's not your camera? Drones are the answer.
A drone can be described as a tiny, unmanned aircraft that can fly independently and take photos and videos without being directed by its operator.
They are versatile and can fly close to structures and buildings to capture photos or film footage. They can also fly low over crowds to capture pictures of people.
Drones can be used for video and aerial photography. But they're also great for marketing because they allow you to create incredible visuals that would otherwise require a lot of manpower and equipment.
To capture incredible imagery, you can place them easily in strategic locations. Plus, they can be flown remotely, which makes them easy to operate.
Some companies even hire drones to photograph weddings. These wedding photographers can take amazing photos of the bride and groom while their drones fly above the ceremony location.
They can also fly the cameras to relatives to capture portraits. Or they can fly them over reception areas to capture beautiful views of the venue.
These types of activities are ideal for creating promotional material or event coverage. Drones are also great for making short films. You could use one to show clients why your company is better than yours.
For all these reasons, drones are becoming increasingly popular for aerial photography and videography. A drone may be the perfect tool for professional photographers.
Is it OK to fly a drone at night?
Drones have become more and more popular. Drones not only provide incredible aerial shots of homes and businesses but also allow for the delivery of goods and surveillance of large areas. However, there are still very few regulations surrounding the use of drones. Some states have banned drones entirely, while others have placed restrictions on where they can be used.
Drone flying in daylight hours is quite safe. But, at night there are risks. Flying a drone at night could put you and other pilots in danger. This is because drones are difficult to see obstacles and hazards. Pilot errors could result in an accident.
Drones are becoming more and more popular. It is therefore important that we learn how they can be safely operated. There are currently two main types of drones: fixed-wing and rotary-wing. Fixed-wing drones are typically smaller and easier to pilot than rotary-wing ones. A fixed-wing model usually has four propellers, whereas a rotary-wing model has a single rotor.
To avoid accidents, you should familiarize yourself with the local laws concerning drone usage. It is also important that you ensure that your drone is within your direct line of sight at all time. A key safety tip is to make sure your drone has lights that flash green and red. This will make it easier to identify potential dangers. Your camera lens should be protected against any scratches if you plan to take pictures. It is also a good idea to use protective goggles when flying your drone.
Drone flying at night presents a variety of dangers including collisions with power lines and trees as well as buildings. A drone could also become lost or fall from the skies. Therefore, you must keep your drone away from obstructions and stay close to the ground. Drones can be exposed to wind gusts and abrupt weather changes. These factors can disrupt your drone's flight and cause it to crash land.
Drones are becoming more popular but they can pose health risks. For example, the noise emitted by these devices can affect hearing and cause headaches. The vibrations from drones can also cause harm to the body. Finally, flying drones without an operator license puts you at risk of fines and legal action.
These guidelines will help you avoid any drone accident. Keep your drone within your sight line when flying. If you are flying near airports, make sure that you obey any restrictions imposed by airport authorities. Flying your drone over water increases the risk of a collision.
How can I get started with drone photography
There are several ways to start photographing using a drone. You can start by buying a drone kit. It will come with everything you need in order to get started. They cost $200 to $500, depending upon which model you choose.
A drone can also be built. Although it is a complicated task, you can still make something that captures decent images and videos.
A quadcopter is the best choice for anyone who wants to build their own drone. The quadcopter is similar to conventional helicopters but has four rotors (or propellers), instead of just two.
A quadcopter takes less time to assemble, and is more reliable than a traditional helicopter. You can also purchase it cheaper and carry it around easier.
First, choose the right parts. You'll need to purchase motors and batteries, controllers, as well as props. Make sure you pick the correct size and weight.
Next, you need to choose what type of controller to use. Many different types are available, such as joysticks, touch screens, and remote controls. You can attach your drone to the camera with the built-in camera.
After you've selected the right parts, you can begin to assemble the drone. We recommend purchasing a pre-assembled kit to make things easier. You can build your drone on your own by following these steps.
Step 1: Attach your battery pack
To begin building your quadcopter, connect the battery to the motor. To start, remove the cover from the battery pack. Then, slide the battery into place.
Step 2 Connect the motors
Next, you'll need to install the motors in the appropriate slots. Each motor must go into its designated slot. When mounting the motors, ensure they face forward and are parallel to the frame.
Step3: Installing the propeller
Attach the propellers to your frame. Place them at an equal distance.
Once you have completed all of these steps, your drone is now ready for testing! If there is no movement when the engine turns on, check that the propellers point forward. Also, make sure that there are no obstructions between the propellers.
Statistics
Greater than 50% throttle stick position generates positive thrust, but less than 50% throttle stick position reverses the direction of the motors, allowing upside-down flying! (photographypro.com)
Here's proof: according to an analysis of FAA drone registration numbers by drone market research and data group Drone Industry Insights, DJI had a 76.8% market share in the U.S. (thedronegirl.com)
60 second video with branding, captions, contact information, and music Strip / Convenience / Neighborhood / Community Centers pricing per center (up to 400,000 sq ft) PLACE ORDER (dronebase.com)
A grey card is just a piece of thick paper that is a specific shade of grey (18%), which will be the foundation on which we choose our color temperature. (dronegenuity.com)
Homes with aerial images sold 68% faster than homes with standard images. (alexdronephotography.com)
There are two types of cameras that can be used for time-lapse photography: DSLRs (Digital Single Lens Reflex) and point-and-shoot digital camera.
Because of the way light enters a DSLR camera, it tends to produce higher quality images. But when shooting video, they aren't ideal because they require manual focus and exposure settings.
It is easier for beginners to use point and shoot cameras such as those made of GoPro. Videos can look grainy due to the lower resolution.
Consumer drones are the best choice for time-lapse photography. These tiny flying robots are a popular alternative to professional drones.
A drone is an autonomous remote-controlled aircraft that can fly without the need for human intervention. Although quadcopter drones might have multiple propellers to fly, a drone uses a single propeller.
A drone can also capture aerial footage and cinematic shots from a bird’s eye view. Drones can also be equipped with a gimbal stabilizer to shoot smooth handheld footage.
Start recording while the drone hovers over your subject to create a time-lapse. If the sun isn’t directly overhead, the sky won’t appear darken during the shot.
You can adjust both the shutter speed or aperture to get the desired effect. For example, if you're filming a sunset, the shutter speed could be set to 30 seconds while the aperture is wide open to let in as much natural light as possible.
You should use the opposite approach for night shots. Use a slow shutter speed of 1 second and close the aperture to reduce the amount of light entering the camera. This creates bright images where details can be clearly seen.