This video was made with Clipchamp my first time using this new app. So far I like it but haven't figured out if I want to pay the subscription yet! This video is part two of the video before!
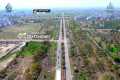
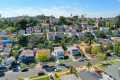
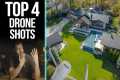
By: Stoic and Resilient /Drone Pilot Title: "4k Drone Photos" St Petersburg FL, Skyway Marina District 03/23/2025 Sourced From: www.youtube.com/watch?v=BOg6t6L6JJw
Here are the 3 highest-rated drones on Amazon Today!
Frequently Asked Questions
Which hour is best to photograph drones?
When there's not much activity on ground, a drone can capture aerial images at sunrise and sunset.
Drones can capture beautiful photographs of landscapes and the sky over them. Sometimes drones can't fly at night so you might miss spectacular views.
If you want to make sure that you capture all the photo opportunities, fly during sunset and sunrise hours. These times provide more opportunities to capture stunning shots of nature because there are usually fewer cars on the road and fewer people walking around.
Also, you'll find yourself shooting at lower light levels. This makes it easier to capture images without worrying about overexposing them.
A drone is also immune to strong winds and rain. These are all factors that make daylight great for photography with a drone.
You can capture nighttime scenes by flying at night. This will allow you to see the cityscape from a different perspective.
Which drone is the best for photography?
Drones have many uses, from aerial photography to filming movies or delivering packages. But what is it that makes drones such a useful tool? Drones have two main advantages. They are versatile tools. There are thousands of ways to use drones. This means you can use them to do almost any type of task you normally use a camera for. They are also easy to operate. It is very easy to fly a quadcopter if you have ever flown one.
Drones are also great because they can capture amazing images. You can take stunning photos from places you wouldn’t normally go with a drone. These are remote areas that could lead to dangerous situations.
Drones are so easy to operate, so anyone can learn how to pilot one quickly. Once you master the basics, you can use your drone to shoot incredible photos wherever you may be. Take a look at our drone selection if your goal is to capture better photographs.
Which are some great places to use a drone to take photos?
Drones can be used to capture stunning images of landscapes and nature. Whether you want close-up shots of animals like birds and butterflies or to capture beautiful scenery, drones are ideal.
Mountains, deserts lakes oceans beaches and cities are the best places to fly drones. Drone enthusiasts often capture scenic views of their hometowns and other local attractions.
It is a good idea to shoot at night so that the lights can illuminate the surrounding area. This allows you to see new places. It is also possible to shoot in other seasons, such as winter, when snow covers the ground.
Are drone photos a good way to make money?
Photographers trying to make a living from drones face the greatest problem: there aren’t many products available that can solve the problems of flying them. A lack of quality equipment and software makes the experience enjoyable.
You also have to worry about insurance costs and liability issues, so most photographers will stick to taking pictures from the ground. We're talking about a new way to capture images that could lead to you being paid.
Drones can capture light very much in the same way as video cameras. Why not create stunning photos using the same technology?
Companies are already making great strides toward creating photo-quality images taken from above. We've previously discussed DJI and GoPro. Now, we are seeing more companies join the space.
These cameras are great for ground photography even though they were made for aerial photography. All the major manufacturers are investing heavily to develop their imaging technologies.
This means that one day you might be able to purchase a drone with 4K video and incredible photography capabilities. We may already be seeing this happen. Companies like DJI have been releasing higher-resolution versions of their Phantom series of drones.
DJI just released the Inspire 2 camera, which has a 12-megapixel sensor and can capture images at 5120 x 35656 pixels. And if you want to shoot in RAW format, you can record 8-bit files at 30 frames per second.
You can indeed make money selling drone photos.
What are some of the cons to using drone photography for your photos?
Drone photography allows you to capture stunning images and video. However, there are some downsides to flying small aircraft.
The main disadvantage to flying drones is their high cost. It can cost hundreds to thousands depending on which drone you buy.
A drone pilot must be trained and certified. This means that you will need to invest your time and money in order to learn how to safely fly them.
Safety is another downside. Drones are inherently dangerous because they require constant maintenance and repair. A drone that is not controlled properly can cause serious injury to someone or damage property.
You may find yourself spending more time flying your drone than you do actually taking photographs or recording footage. You may also have restricted airspace in which you can fly your drone.
Some local governments have restrictions on where you can fly an unmanned aerial vehicle. You cannot fly higher than 400 feet, or within five miles of any stadiums, hospitals or schools.
Drones are not for everyone. People feel nervous about flying drones because they fear that they will crash into the ground or fall from the sky. Others fear that they could accidentally hit an object or person.
You might be uncomfortable flying a drone. Instead, you can try traditional aerial photography or videography.
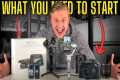
How do you get started with drone photography
There are many options for starting to photograph with a drone. A ready-made drone package is the first choice. It will come with everything you need in order to get started. They can range from $200 to $500 depending on the model.
Another option is to build your own drone. It's possible to make a drone that takes decent photos and videos, even though it can be complicated.
If you are interested in building your drone, we recommend you begin with a quadcopter. As found on conventional helicopters, a quadcopter has four rotors (or propellers) instead of two.
A quadcopter can be assembled and maintained in a much shorter time than a helicopter. It is also easier to transport and purchase.
First, choose the right parts. You will need props, motors, batteries controllers and controllers. It is important to choose the correct size and weight.
Next, you need to choose what type of controller to use. Many different types are available, such as joysticks, touch screens, and remote controls. You can attach your drone to the camera with the built-in camera.
Once you have selected the correct parts, it's time to assemble your drone. To make things easy, we recommend buying a preassembled kit. If you would prefer to build your drone yourself, there are a few things you need to do.
Step 1: Attach battery pack
To build your quadcopter, you will need to connect the battery pack and the motor. First, remove the cover plate from the bottom of the battery pack. Next, slide the battery in place.
Step 2: Connect the motors
Next, you will need to place the motors within the proper slots. Each motor must be in its assigned slot. When installing motors, ensure that they face forward while remaining perpendicular with the frame.
Step3: Install the propeller
The propellers will need to be attached to the frame. Place them at an equal distance.
Now you are ready to test your drone. If you see no movement when you turn on the engine, double-check that the propellers are facing forward. Make sure the propellers are free from obstructions.
Statistics
Greater than 50% throttle stick position generates positive thrust, but less than 50% throttle stick position reverses the direction of the motors, allowing upside-down flying! (photographypro.com)
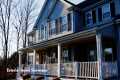
Homes with aerial images sold 68% faster than homes with standard images. (alexdronephotography.com)
Here's proof: according to an analysis of FAA drone registration numbers by drone market research and data group Drone Industry Insights, DJI had a 76.8% market share in the U.S. (thedronegirl.com)
Among the biggest improvements, the Skydio 2+ has over the standard 2 is a 20% longer battery life, longer range if you add the Beacon, and a neat AI video creation tool called Keyframe. (thedronegirl.com)
Compared to the old days of the Phantom, this drone is super small, but it will likely require you to check a bag, the way a Mini 3 Pro could easily stow away in an oversized pocket. (thedronegirl.com)
A drone shot is an excellent way to capture amazing images. The result can be more stunning than any image taken with a conventional camera if you do it correctly.
However, there are several ways to improve the quality and appeal of your images. One of them is making sure that you use the best settings for your particular model.
Some tools and apps can help you edit your photos after taking them. Adobe Photoshop Lightroom is one example. It allows you to import multiple files and then adjust each shot individually.
You can crop or enhance specific parts of an image. This can include removing unwanted objects, changing lighting and contrast.
Snapseed offers another editing tool, with basic features like cropping, brightness adjustments and color correction.
Post-processing is all about ensuring your final product looks professional.
This means you must know how to use your camera correctly, and how to position yourselves properly.
Make sure you choose the right settings for your lens. You might choose a longer focal distance (such as 200mm) if you want to shoot landscapes. If you need to capture close-ups, opt for a shorter focal line (such as 50mm).
You can also learn to shoot in RAW format so you have more control over your final image.
Once you've mastered these techniques, you can create stunning drone images that will turn heads.